ChemConnect - An Educational focused AR Cards Game
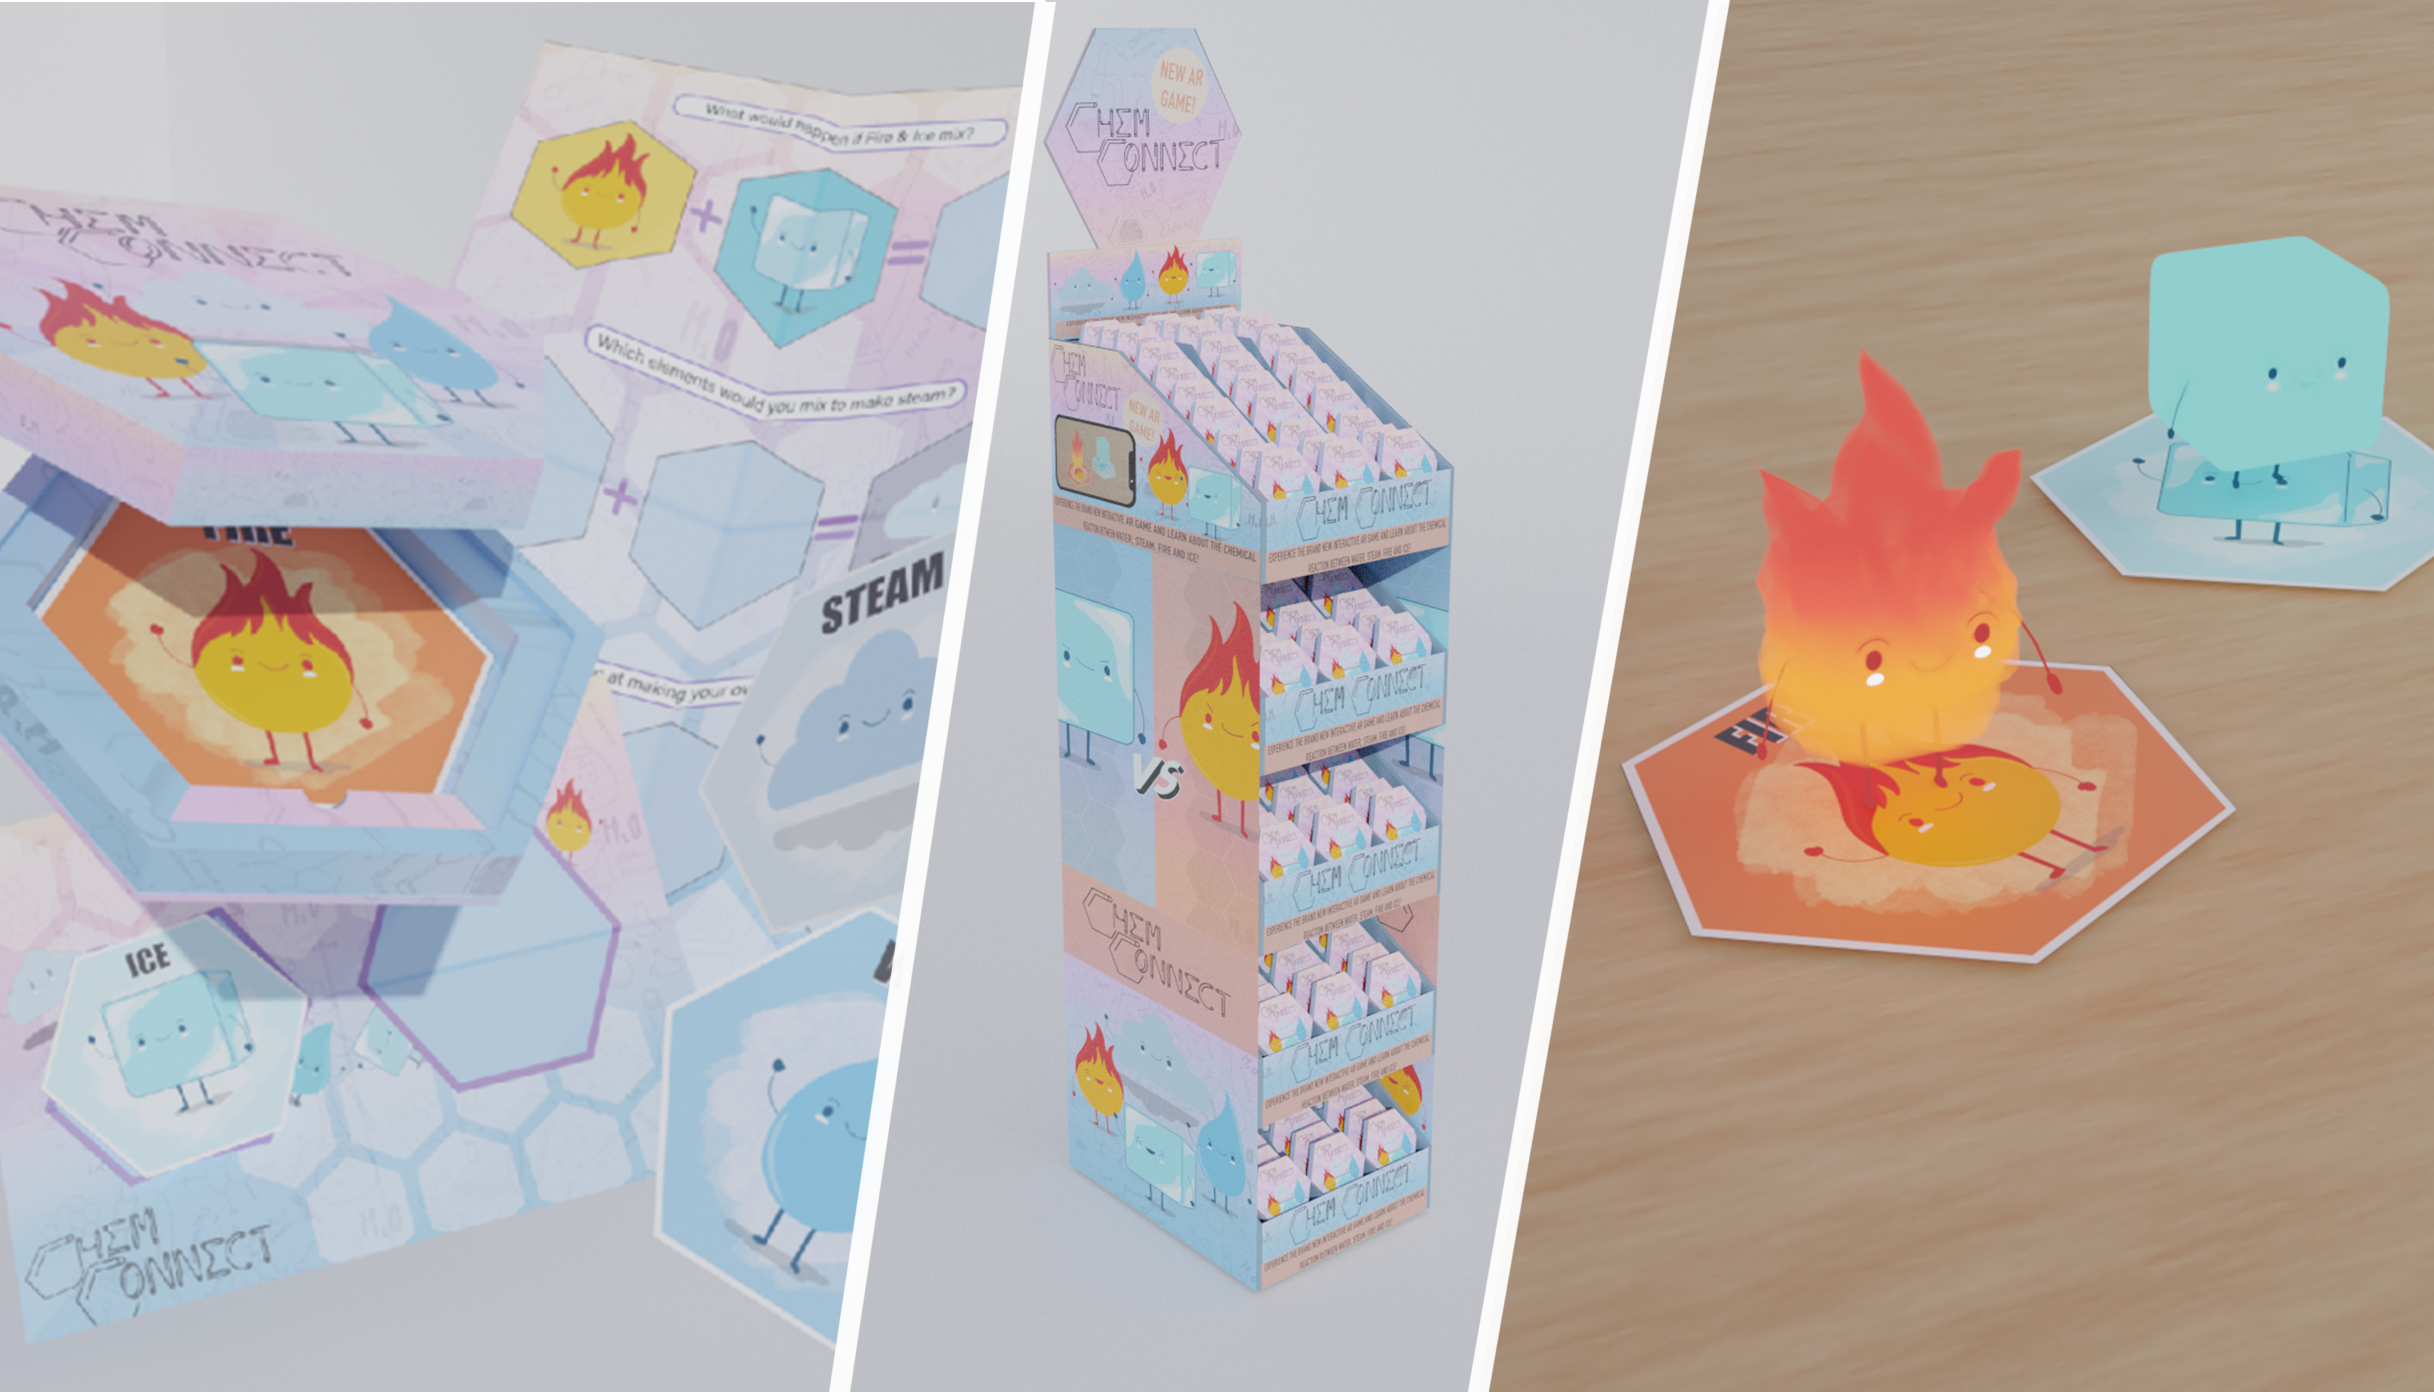
Brief
Design and develop an interactive solution that will offer visitors an interactive engaging experience.
Goal
Create an educational cards game that includes an interactive AR experience. This includes designs, packaging, 3D modelled Characters & a work AR Prototype.
Role in Project
3D Artist
Software
Blender 2.90
Photoshop
Unity
Prep
1.0 Introduction to Project
1.1 Reference
1.2 Target Audience
1.3 Personas
1.4 Vuforia Engine Setup
1.5 Inital Card Composition
1.6 Card development
1.7 Progress & Issues
1.8 Card Development
1.9 Building the App Prototype
Design & 3D
2.0 New Design
2.1 New Design
2.2 Using Vuforia
2.3 Configured Card Layout
2.4 Video Rendered Hero Images
Ice Character
Fire Character
2.7 Fire - Displaced Body
2.8 Body & Rigging
2.9 Spawn, Idle & Wonder Animations
3.0 Other Reaction Based Animation
Steam Character
3.1 Steam - Body, Material & Rigging
3.2 Body Experimentations
3.3 Spawn, Idle & Wonder Animations
3.4 Other Reaction Based Animation
Water Character
3.5 Water - Body, Material & Rigging
3.6 Vertex Bug - Weight Paint
3.7 Shrink-Wrapped & Shape Keyed
3.8 Spawn, Idle & Wonder Animations
3.9 Other Reaction Based Animation
Unity
4.0 MDD Characters Import / Export Blender
4.1 FBX Export / Import
4.2 Common FBX Bugs
4.3 Importing Animations to Unity
4.4 Unity Toon Shader
4.5 Applied Toon Shader & Animations Preview
4.6 Reaction Animations Preview
4.7 AR Prototype
Time Management & Conclusion
4.8 Time Sheet & Conclusion
1.0 Introduction to Project
ChemConnect is a game that involves an interactive AR experience that helps kids learn about how various elements react with each other! The game consists of 4 different elemental cards: Ice, Water, Fire, and Steam! Using an AR Camera with a phone or tablet, the player can visually see the reactions between the two cards, displaying a fun and creative animations!
The video above is a concept video I developed, displaying an example of how our AR game will work once finished! As the camera reads the two cards, it will trigger the required animation for both characters, displaying how they react! This will be done for all the characters, having multiple combinations of possible reactions! I will later introduce the game sheet and mat as this concept video was made before our other design work has been finished.
We believe that we have successfully designed and developed an interactive solution, allowing the younger generation to experience a new way of visual learning, helping to gain a better understanding of the how and why in a fun and creative way! This product will be aimed towards school children 8+, primarily focusing on primary schools.
1.1 Target Audience
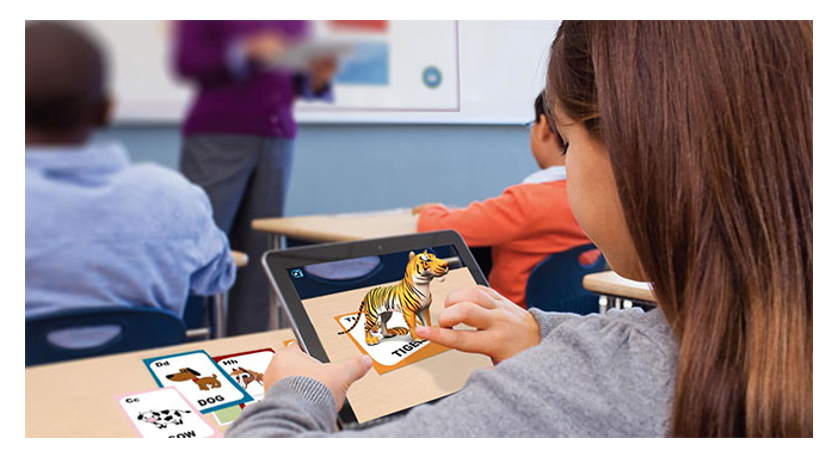
Out of the various audiences’ choices given, we decided to go with School Children as it gives us the opportunity to try educate a much younger audience, meaning we can experiment with lots of amazing ideas that will in hope be fun, engaging and easy to understand!
We decided to go with an age range of 8+ because we believe it’s the right ages to begin incorporating chemicals reactions to their knowledge. Although our product is seen as more elementals based, our initial concept works within chemistry as States of Matter, for example showing what happens when a solid transforms into a liquid. We also aim to appeal towards the parents and teachers as well due to them being the ones who will be purchasing our product.
1.2 Personas
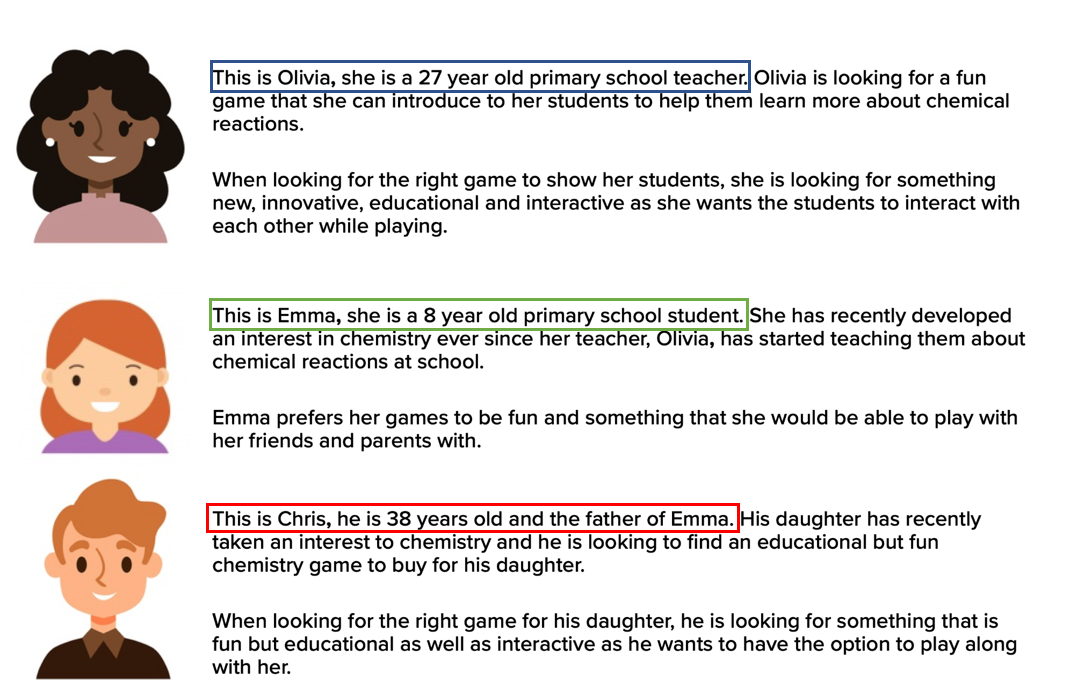
For our product, we intend to appeal to al three of our personas. Our first persona is Olivia, a 27-year-old primary school teacher who is looking for a fun game to help her students learn about chemical reactions. Our second persona is Emma, an 8-year-old primary school student who wants to have fun while learning. And our final persona is Chris, a 38-year-old who is the farther of Emma, and wants to get something for his daughter that will help her learn chemistry in a fun and creative way!
Our main targeted persona is Emma, as she is a primary school student. However, we do want to make sure that our product will appeal towards the Olivia, the teacher, and Chris, a parent, since they will be just as important when it comes to selling our product.
1.3 Inspiration - Game Mechanics
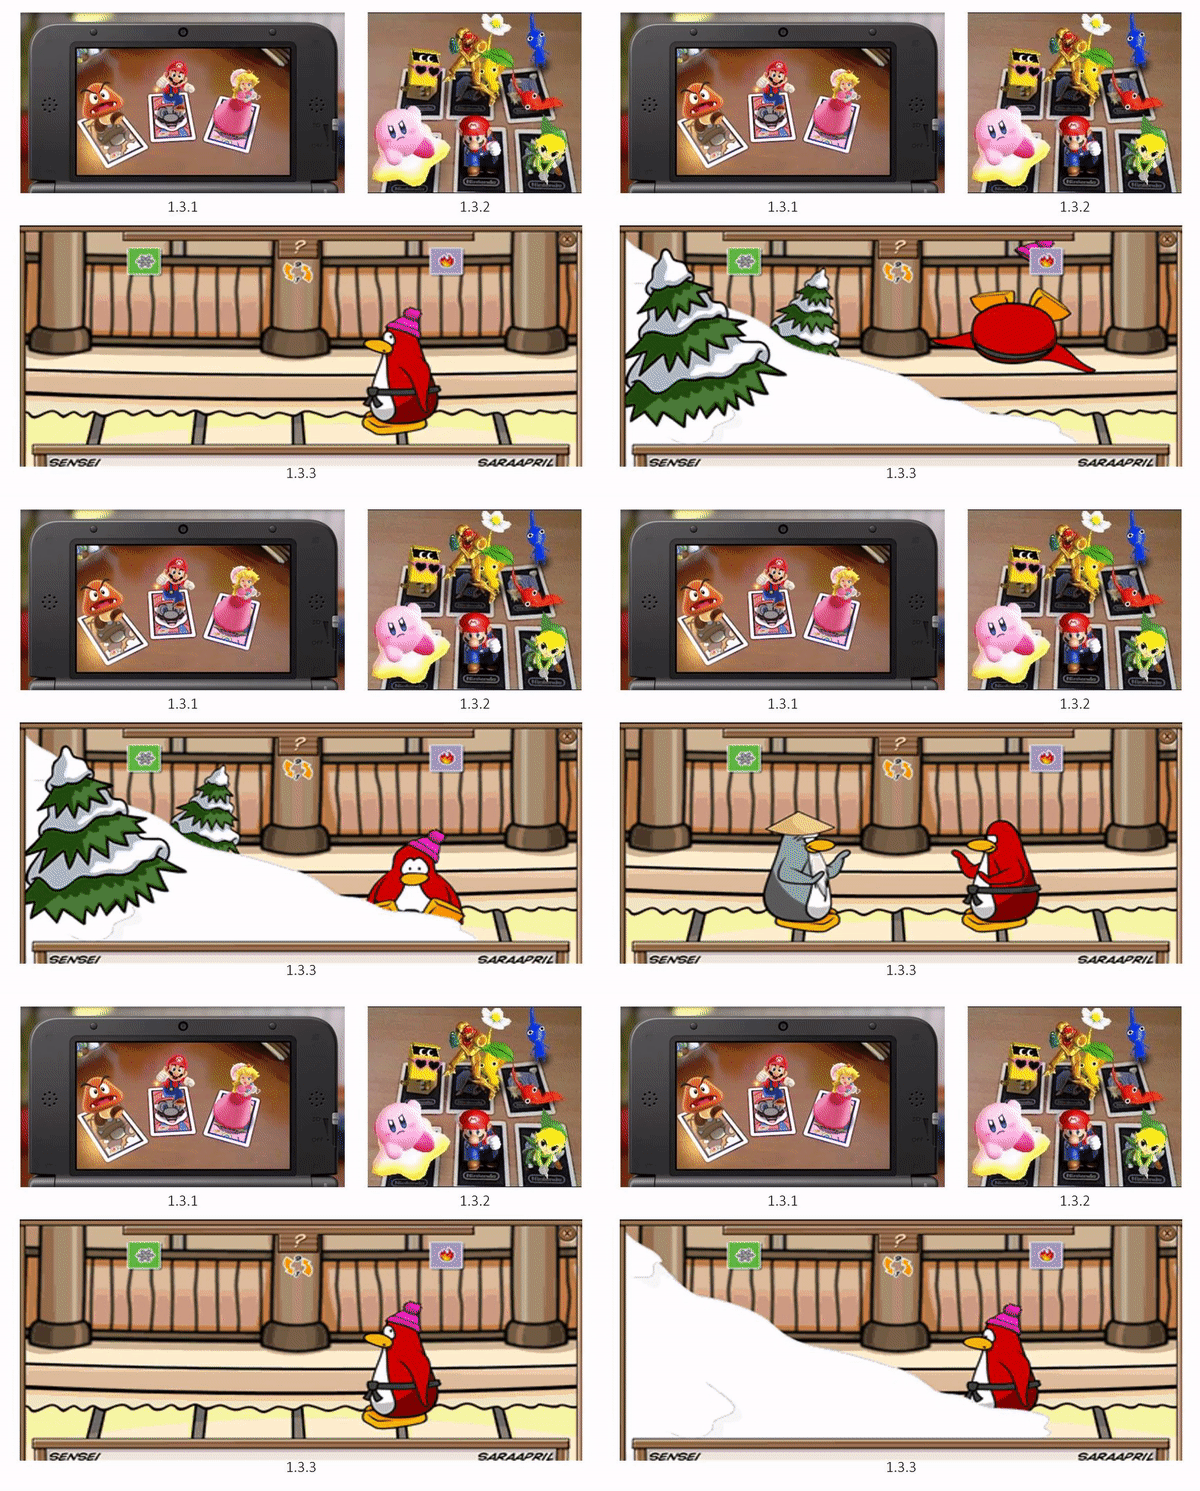
When researching about what kind of kid’s game we could develop, we found an interesting game mechanic that utilizes augmented reality (1.3.2). The Nintendo 3Ds created cards that can be read by their product to see various Nintendo characters brought to life before their very eyes (1.3.1)! In terms of what we wanted our game to revolve around, we researched various popular online games, and found a well-known game within Club Penguin known as Cards Jitsu (1.3.3)! This game mode is a cards game that uses various elemental cards to fight, picking two different elemental cards and drawing at the same time, who’s ever element beats the other wins (1.3.3). With AR in mind and this game mechanic being within the similar age demographic, we thought about bringing this to life using AR! Having various elemental characters that help kids learn how certain elements react with one another, whilst learning about the state of matter as well!
1.4 Inspiration - Art Style
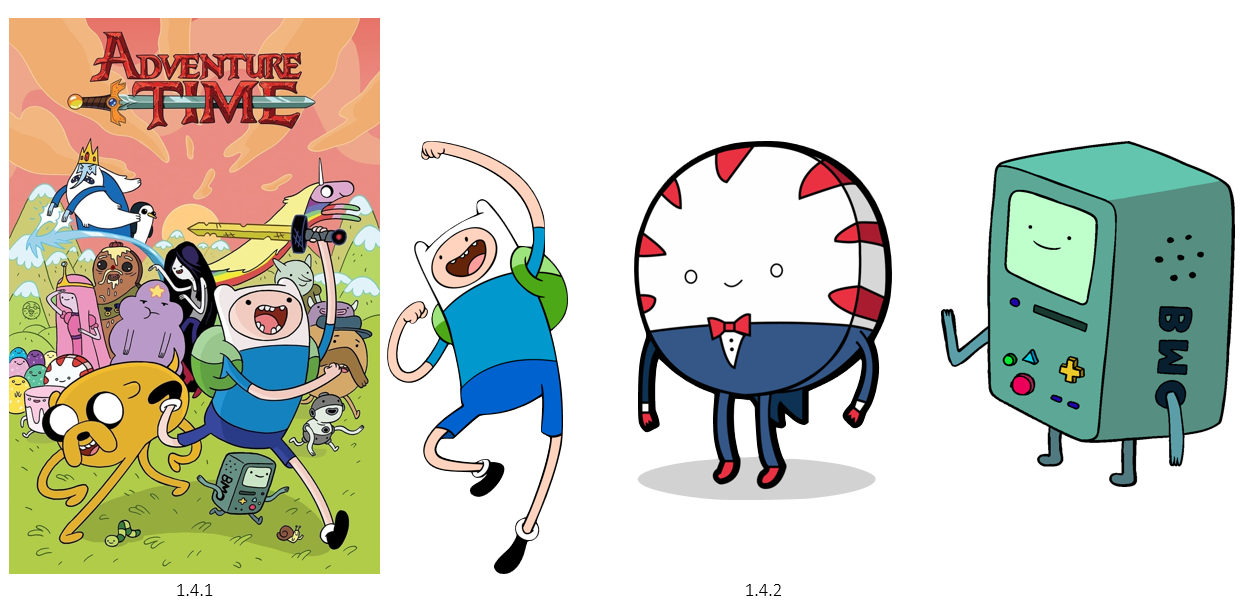
With the game mechanics decided, we needed to be set an art style. Found a TV series known as Adventure Time (1.4.1), a very popular cartoon adventure series that also have a similar demographic to our target audience. The show has a unique and consistent cartoon art style (1.4.2), to which we felt would work very well with our concept!
1.5 Inspiration - Packaging
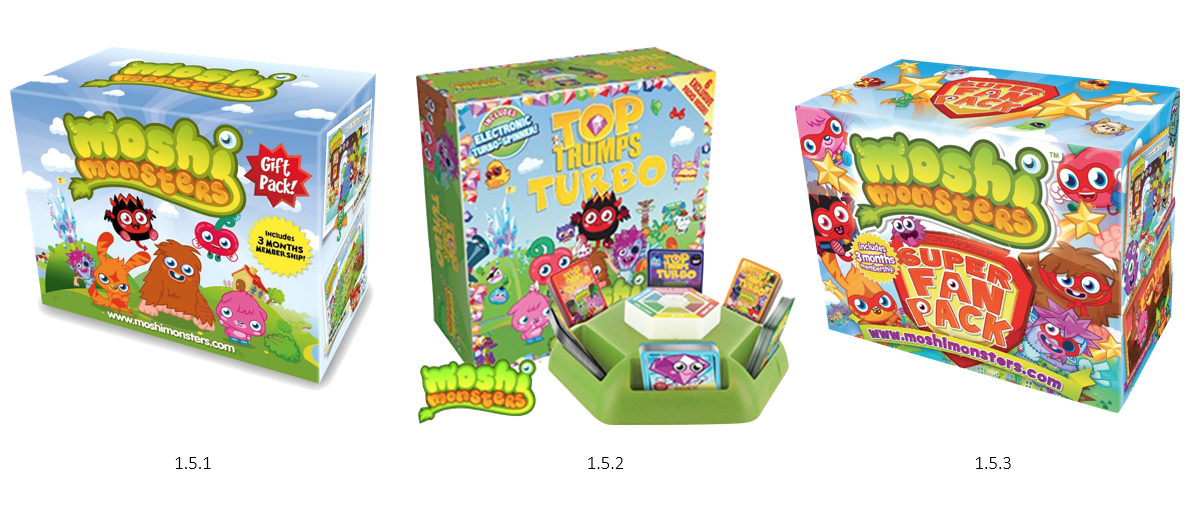
With the game mechanics and art style thought in mind, we also wanted to find a packaging style that we think would work well with our product. Since we’re planning on having elemental characters, we wanted to make sure the stood out on the packaging, however we were not sure in what the best way was. After a bit of research, we came across another online game with a similar demographic known as Moshi Monsters (1.5.1). Although this was an online game, they did sell a large around of merchandise that included things from in game (1.5.2). This game also had five main characters that player could be within the game (1.5.3), to which we agreed on following for our own product!
1.6 The Characters
Designed by Rodothea Papachristoforou
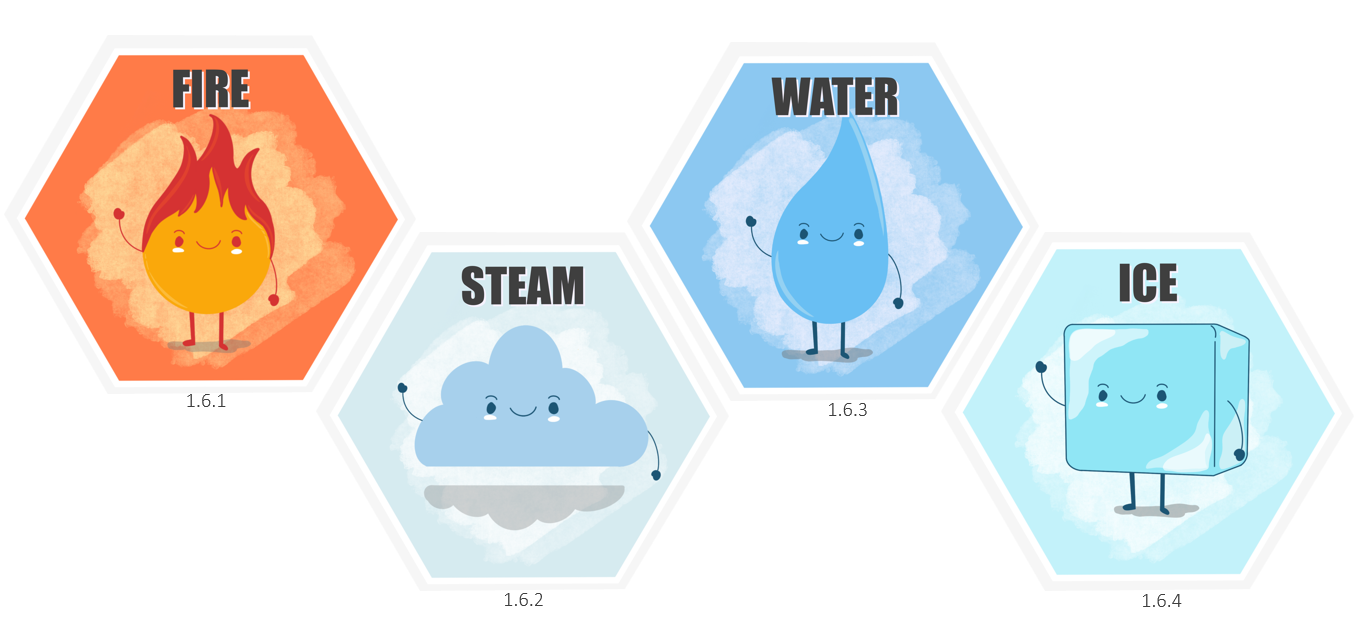
Our designers got to work and created these 4 amazing elemental characters (1.6.1 – 1.6.4)! Each character is applied on a hexagonal card as we want to stick with a chemistry theme, to which we all agreed worked perfectly! The characters are kept within a simple art style, similar to our reference Adventure Time. Finally, each character card is set with a coloured background, giving them their own kind of environment!
1.7 Cards Scaled Render & Why Hexagons?
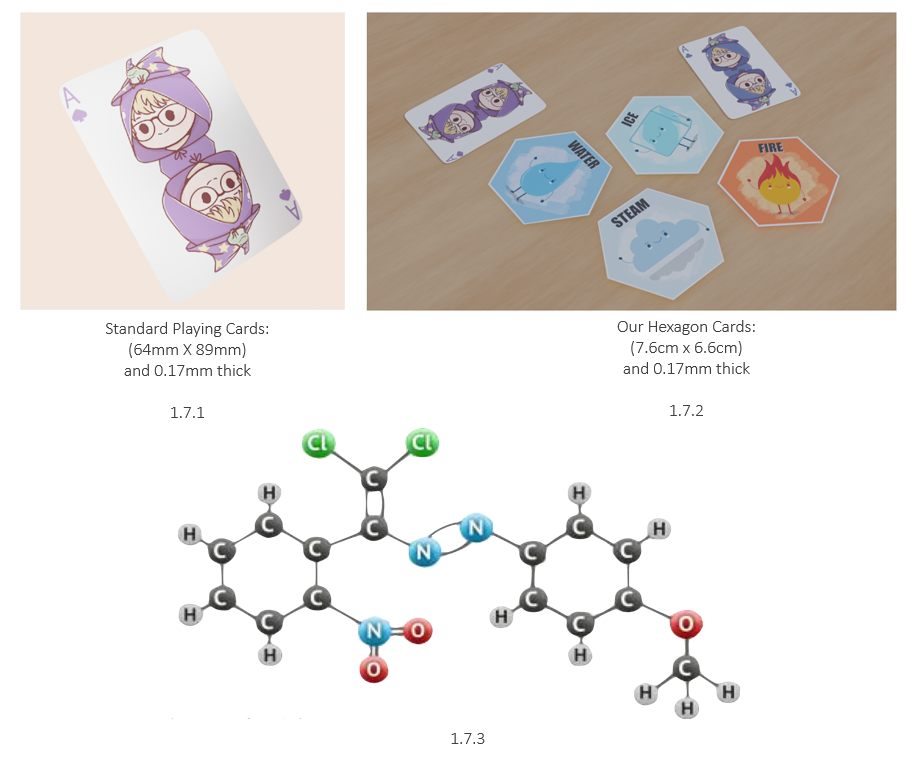
As the card designs were made, I wanted to show what their scaling would look like in real life. In order to show their scaling, I created my own standard playing card (1.7.1). With this, I made a render of all 4 cards laid out next to 2 normal playing cards (1.7.2). The scaling within Blender were made with the same proportions as listed underneath the images (1.7.1 – 1.7.2).
In terms of why we decided to go with hexagon shaped cards, it’s because our branding due to its prevalence in chemistry. As seen above (1.7.3), they are used to show how elements chemically bond together after going through a chemical reaction, something we’re making in a much more visual pleasing way.
Designed by Rodothea Papachristoforou
1.8 Packaging Design & Render
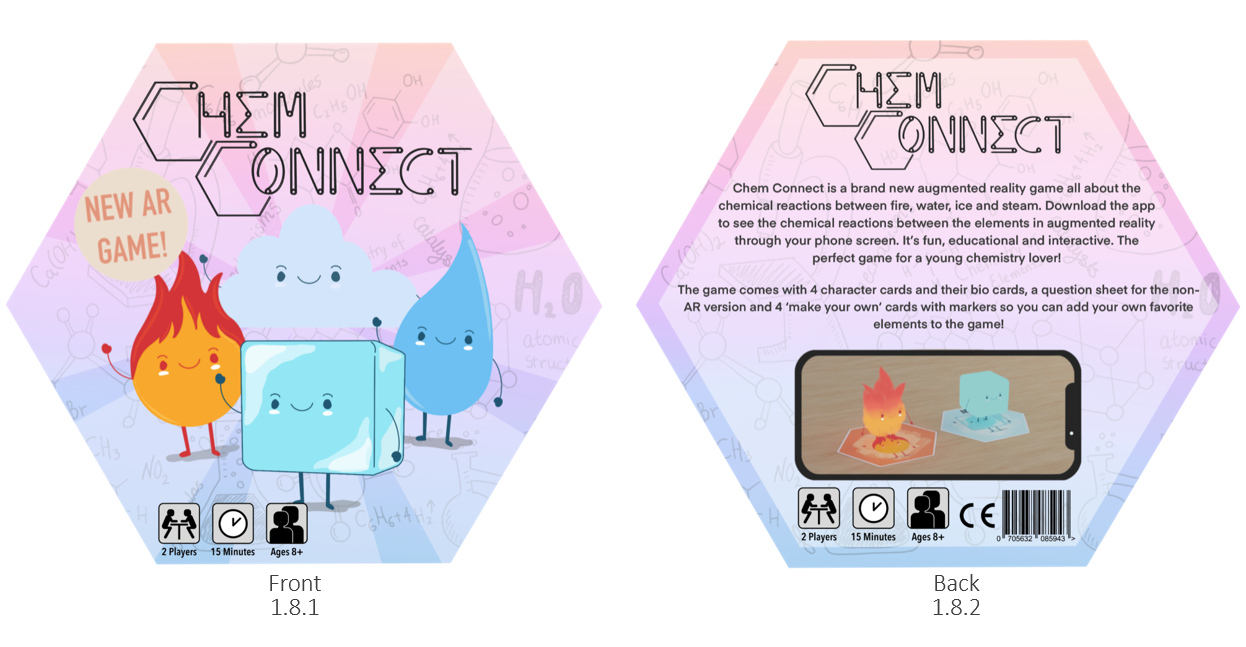
With the characters done, our designer Rodothea began to design the packaging of our product (1.8.1 – 1.8.2). Following the hexagonal theme, we decoded to make this our packaging too as it would utilize all the space due to the shape of the cards. The design includes our brand name and the 4 characters at the front, following a similar theme of our reference Moshi Monsters. We also wanted to make sure the user knows about our unique selling point (USP) that its an AR game, to which she added a sticker “New AR Game” (1.8.1). Finally, she added a description at the back of the packaging (1.8.2) to help explain the game to who ever picks up our product, followed by a visual reference to further demo straight the products functionality.
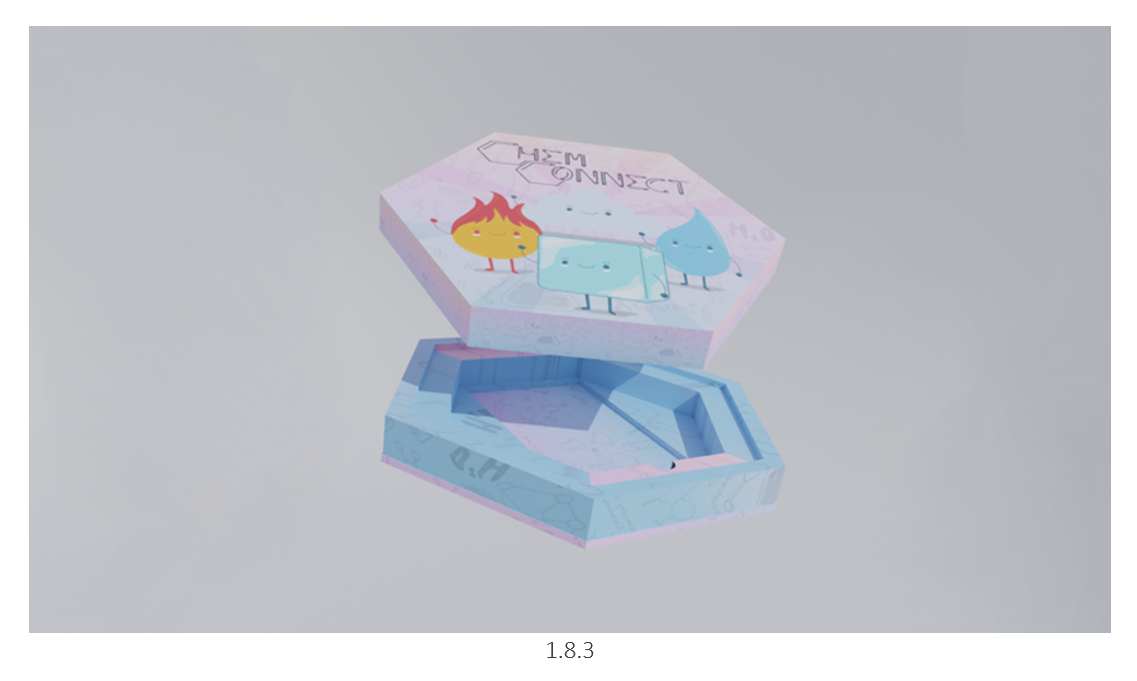
I made a render using Rodothea’s initial packaging design to help her gain a better visual look on how it would look like when its realistically applied (1.8.3). This is what helped further the design to have a bar code, extra timing and player amount details, and generally acknowledgment to how much space she has to work with until its too much!
1.9 Game Matt & Question Sheet
Designed by Phoebe Biddle
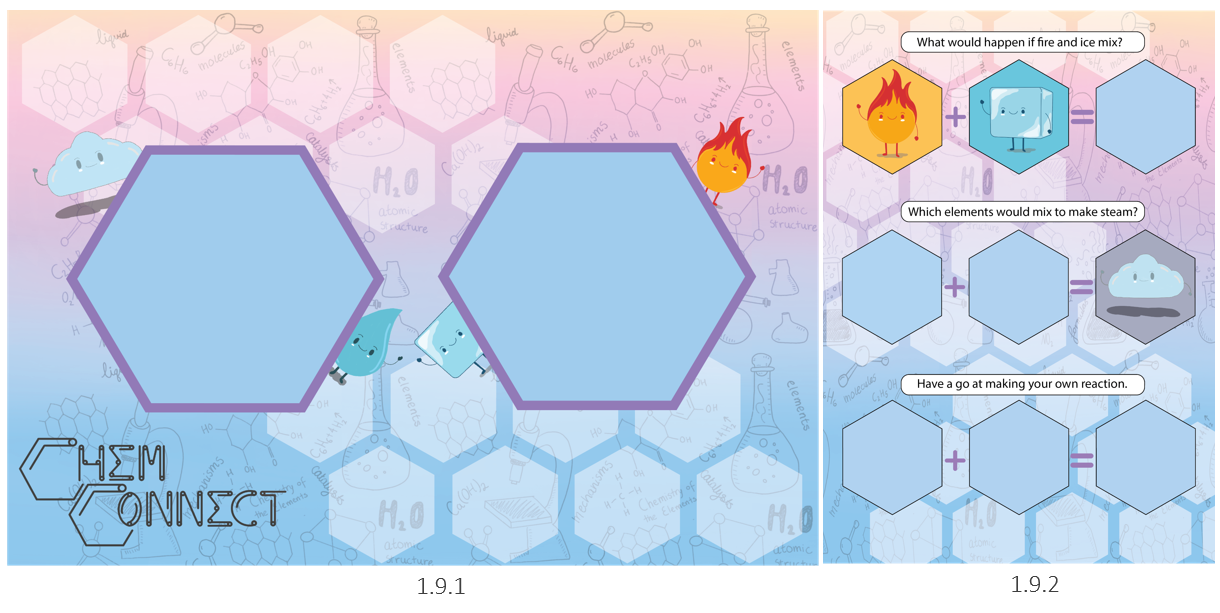
As our game is very much AR focused, we wanted to make sure it was still possible to play the game if the user didn’t have access to a mobile or tablet. This was resolved by making a question sheet (1.9.2)! The question sheet, designed by our other designer Phoebe, created a game sheet that can be used for both AR and non-AR. The game sheet will simply ask you to place the cards where the user thinks is the correct place. This will be answered to questions such as “How can you melt the ice” to which the user will have to figure out. So, in other terms, the AR will only enhance the experience of the game, and is not lost if they don’t have a phone or tablet!
The game mat (1.9.2) is designed for testing reactions, placing 2 cards that they want to see react together down and visually observe!
2.0 Render of Package Contents
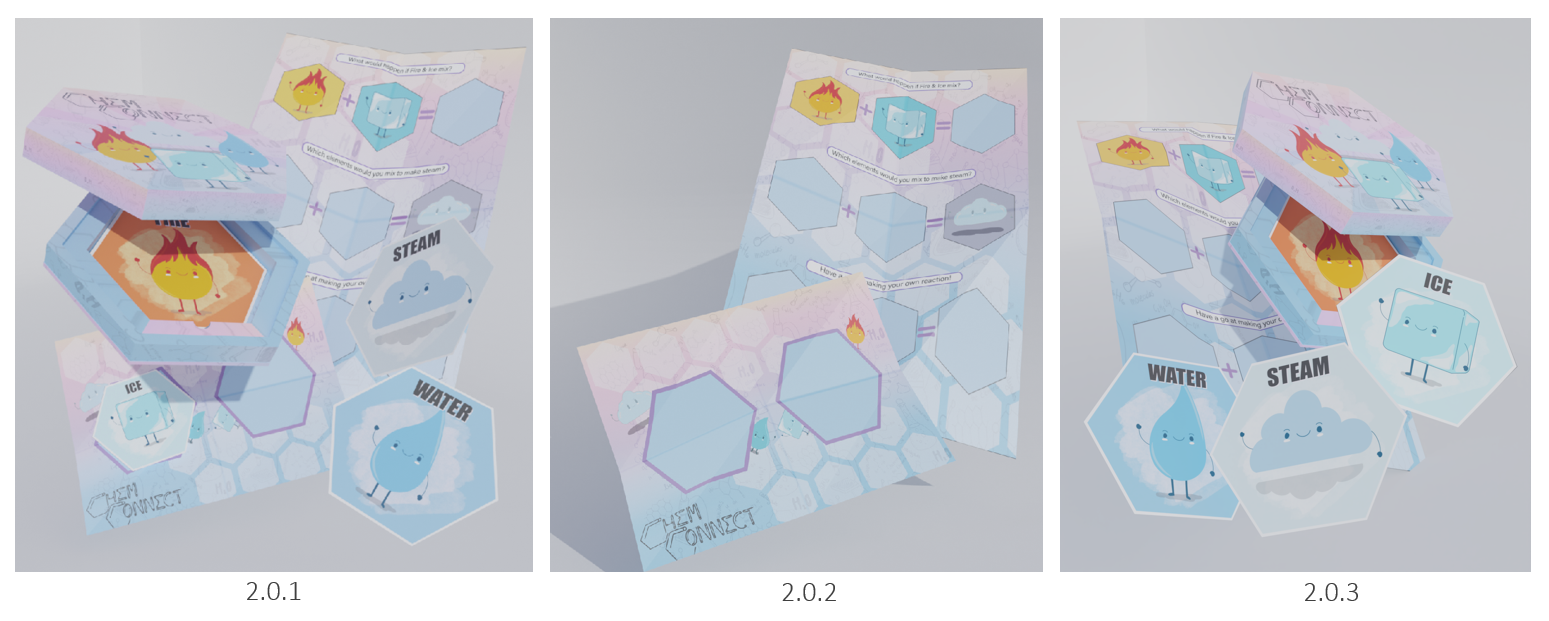
Using the designs that both Rodothea & Phoebe have created, I decided to make a render of the product with all its contents (2.0.1), including the box, game sheet, game mat, and the 4 cards (2.0.3)! I also made a render of just the game mat and question sheet to show off Phoebe’s design (2.0.2)!
2.1 Marketing & Advertisement
Placement in Shops:
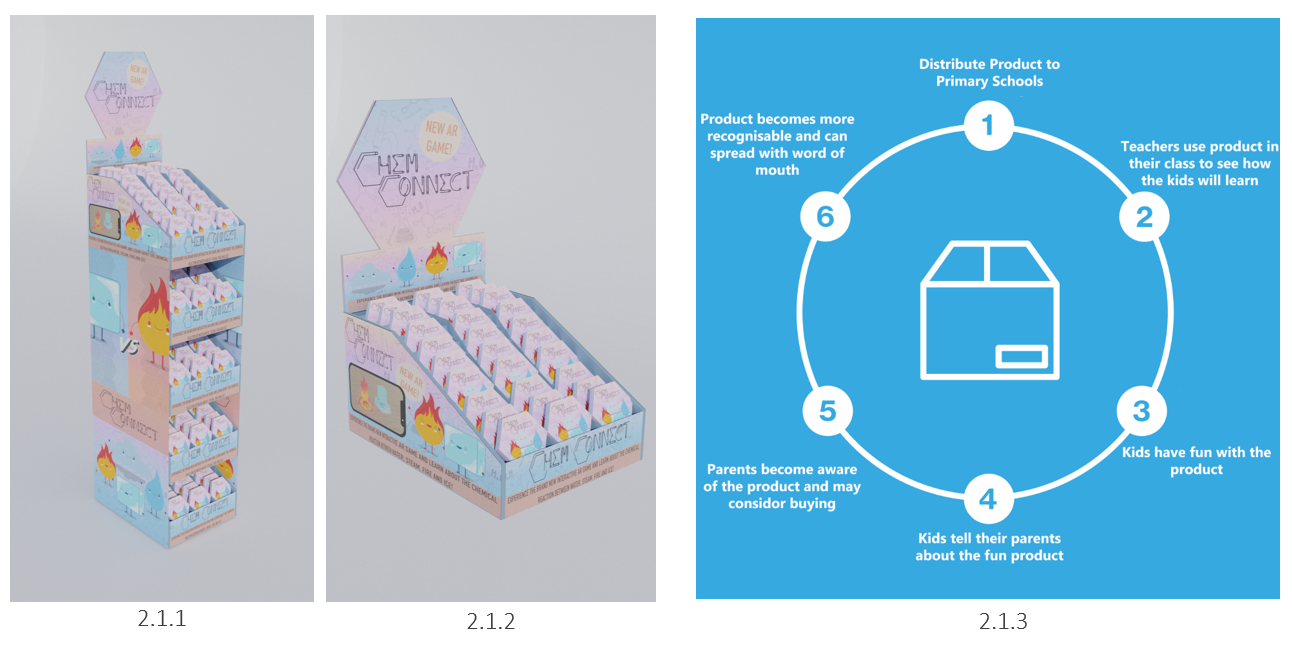
Due to our product being fairly small, we still wanted to make sure it was still eye-catching and easily accessible within shops (2.1.2). We went with these box holders (2.1.1) as our way of being on the market, allowing anyone from our targeted audience to gain interest in our product, whilst in hope to make the product Instantly recognisable to someone who have seen it before!
Marketing:
When thinking about how we’re going to market our product, we initially thought about general posters, and web advertisements. However, we were not really satisfied with those methods as it wasn’t the most effective way to advertise our product. We wanted to reach all 3 of our targeted audiences, being teachers, parents & our main one being primary school children.
We came up with our way of advertising our product (2.1.3)! We want to distribute our product to a few primary schools, allowing the teachers to use them in their classes! This would mean that now the school will be aware of the product, the teachers will know if it’s good for their classes, the kids will acknowledge how fun it is, and if it the product stands out as a fun activity, they would talk to their parents about potentially buying the product for themselves!
In a summary, this would mean that the school now could buy more of our product, and the parents could invest into our product for their own kids due to a unique AR experience that they could introduce, and cost effectiveness.
Why not card packs, why did you choose a box?
We chose not to go with card packs because our product is not a one-time use kind of game since you’re able to replay the game a few times. Not to mention having general fun with the augmented reality characters. The other main reason is we wanted to be more sustainable, since having a box would mean you put it away for later use, whilst card pack packaging you through away.
2.2 Ice Cube - Body, Material & Rigging
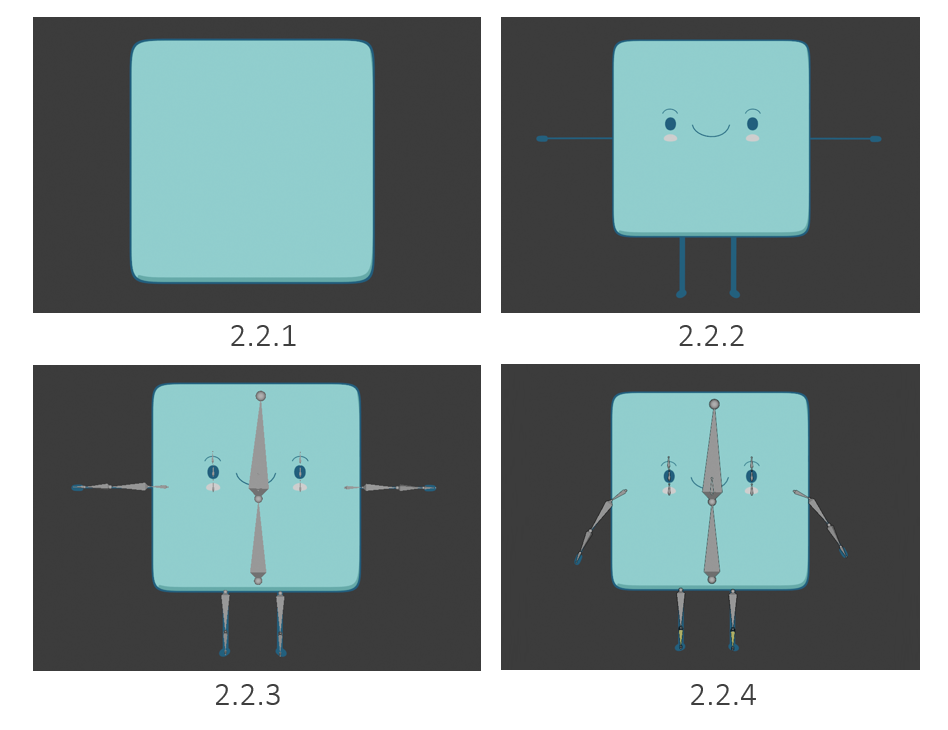
These is the 3D development of my 3D characters that I created using Rodothea’s and Phoebes character designs. To make the Ice Cube character, I started by create the base body (2.2.1). The body is made up of 2 subdivided cubes, the light blue being the main visible body, and a darker blue overlaying to give an outline. The outline was created to simulate a toon shader rim, which was done by selecting ‘Backface Culling’ to hide the back sides of the faces and only leave an outline of the scaled-up cube (2.2.1). I later created the legs and arms using Bezier (2.2.2), including the smile and eye brows as Bezier allows me to alter a curved mesh (2.2.2).
After the T-pose body was complete, I started to rig the character (2.2.3), adding bones to all areas of movement to insure a smoot animation. The character was rigged in a T-pose as when working with applying the bones to the mesh, the weight of each bones will be focused on their dedicated mesh, not linking with any other surrounding ones.
Once rigged, I selected all the whole characters mesh, selected the bone and parented them together with automatic weights (2.2.4). After a few final adjustments to the weight, I positioned the character into an idle pose (2.2.4).
Now since these characters will be done with a Toon Shader in mind, I tried my best to recreate this in Blender by using a colour ramp and an emission node (2.2.5). This is why the character is kept simple in terms of material (2.2.6). This gave me a perfect simulation of a toon shader, allowing me to observe how the dynamic light will be hitting the character (2.2.7).
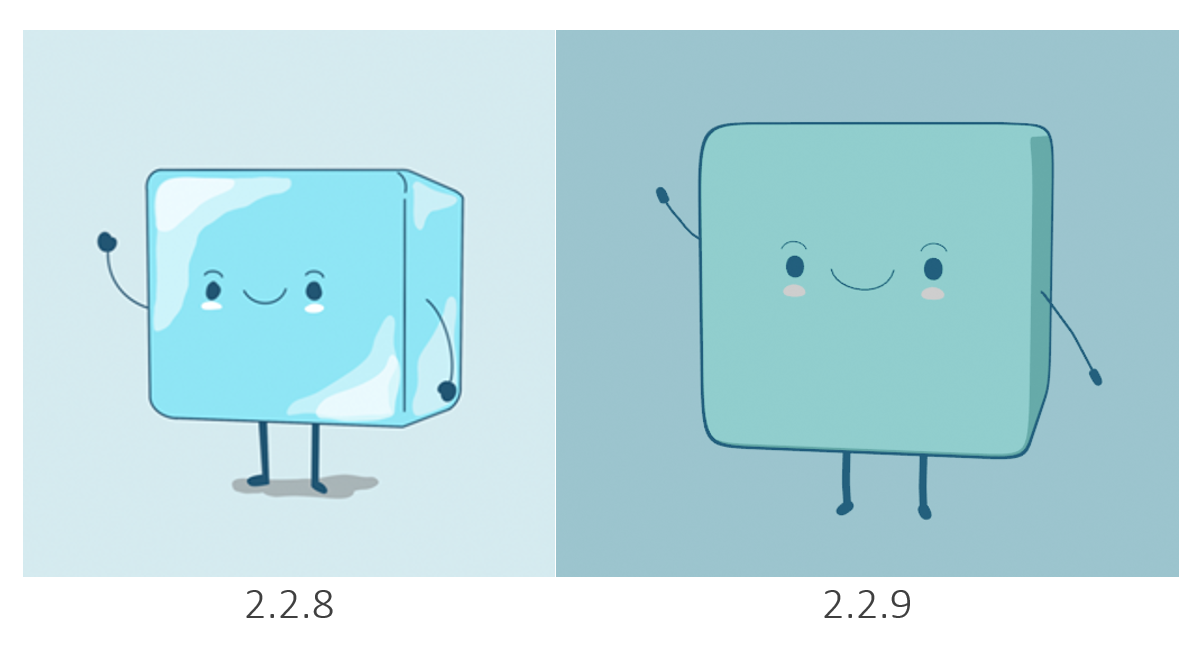
Overall, I think the character resembles the initial design very much (2.2.8 – 2.2.9)! Although there is not edge lighting to show the reflection of the ice character, the team and me agree that the character will work perfectly when used in AR.
2.3 IK Rigging
To every character, I created and IK rig for the legs. This means I would only need to move one bone to move the entire leg without deforming it (2.3.3). To make this, I create 2 extra bones known as IKLegPole and IKLegtarget (2.3.2). With these bones both cleared of parent, I selected the Leg bone and added a constraint (2.3.1). This now means when I move the IKLegtarget, it will move towards the IKLegPole, allowing for smooth and easy movement to be animated.
2.4 Spawn, Idle & Wonder Animations
Spawning (2.4.1):
In order for the character to spawn, I scaled the main body bone from 0 to 100, meaning nothing will be seen to begin with. Whilst the cube us scaled to 0, the arms, legs and face are all compacted inside the cube, coming out as the character stands up.
Idle (2.4.2):
Idle animation is kept very simple, yet being one of the more played animations. The animation includes the characters arms moving up and down while blinking. The blinking was done by scaling the eye bones on the Z axis very quickly, having the key frames set to a short amount of time.
Wonder (2.4.3):
The wonder animation is kept similar to the idle animation, however this time the character looks to his left and right. This animation will only be played if the user has placed down 1 card and is just observing the character, playing the wonder animation every 20 seconds.
2.5 Melting
The melting animation is something I really want to touch upon as it involves new techniques that I didn’t know before which I found very cool! I started by making the ice cube fall down and rotate slowly into the card (2.5.1). Next, I made the character wave their hands in the air as they’re falling (2.5.2).
The interesting part was creating realistic melting! I added a UV sphere and scaled it on the Z axis to make a thin bump, and scaled it to cover the card. With the position set, I created a lattice, cut it into sections and placed it over the puddle bump. With the puddle selected, I added a lattice modifier link it with the lattice box. I shape keyed the puddle (2.5.3) and began adjusting the lattice vertices to make it look like an actual puddle (2.5.4). This adjustment was done with the End Shape Key selected, meaning I can now transform from between a normal thin UV sphere to a spread puddle.
Shape keys save mesh data, kind of like a time stamp. You can create an object and assign it to a shape key to set it as the ‘default pose’. By adding another shape key, you can alter the mesh data in any way you’d like and it would be saved as a shape key, changing the value from 0.00 to 1.00 to transform between the two.
I used a lattice with the shape key because I can set key frames for the lattice deforming, not affecting the actual mesh. This is important as the lattice can be readjusted very easily, even setting it back to default, however with a mesh its more complex and harder to change.
With that in mind, I now have the puddle shape keyed (2.5.5), and adding a scaling shape key to control the speed of the puddle whilst also hiding it when it shouldn’t be visible (2.5.6).
I’m very happy with the outcome of the animation, having a clean and smooth finish (2.5.7). I also added an open mouth to display a sense of panic for the character, as having it smiling whilst melting just didn’t seem okay. To change between the smile and open mouth I applied scaling shape keys to both of mouths and key framed them within the next frame of when one disappears, the other appears.
2.6 Other Reaction Based Animation
These are the other two reaction-based animations. These were done by general bone pose key framing, meaning the character could wave hands (2.6.2), whilst also having steam spawn above (2.6.1). The steam was made of UV spheres parented to a new armature and animated over the character; however, this animation was done later down the line as this is when I created the steam character, allowing me to then come back and finish the animation.
2.7 Fire - Displaced Body
When creating the fire character, I didn’t want to have a stationary fire character as it would just look a bit weird in my opinion. This is where I discovered displacement modifiers! I started by creating a UV sphere and stretching a vertex up using proportional editing to make a rain drop shape. This is where the cool part comes in, I gave the fire body a displacement modifier and linked it with an object, which in this case was an empty plain axis. I adjusted the displacement texture (2.7.5) and made the plain axis move up infinitely, which gave me this amazing result (2.7.1)!
Now since there wasn’t a colour set (2.7.2), I created a gradient (2.7.3) using a colour ramp with mapping node network (2.7.6). This allowed me to control where the gradient will be positioned, making sure it wasn’t in the way. After the colours were made, I got this final outcome of a flame (2.7.4) which just looks awesome! I really like it as its still within the toon cartoon art style!

2.8 Body & Rigging
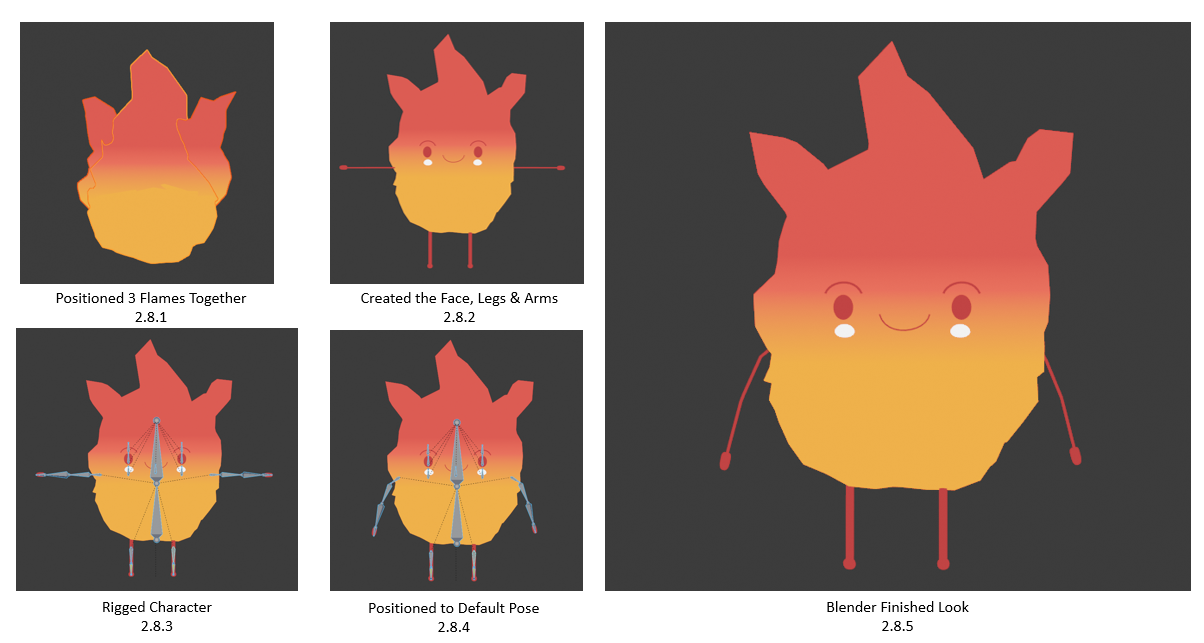
To create the body of the fire character, I started to combine 3 flames together (2.8.1) to create a similar look to the original design. This is then followed by creating the arms, legs and a face, mostly consisting of Bezier tubes that have been thickened (2.8.2). I later rigged the character in a T-pose in order to have better weights applied (2.8.3). Finally, I parented the bones to the mesh and set the character to an idle pose (2.8.4).
With the final outcome completed (2.8.5), I still wanted to experiment with different body styles (2.8.0), making the character big, small, thin, fat. However, I still preferred the original body type (2.8.5).
2.9 Spawn, Idle & Wonder Animations
Spawn (2.9.1):
The Spawn animation was done by rescaling the main body bone from 0 to 100, meaning nothing will be seen to begin with. This is then followed by the arms, legs and face popping out as the fire character spawns, displaying it as growing fire.
Idle (2.9.2):
Idle animation is kept very simple. The animation includes the characters arms moving up and down while blinking. The blinking was done by scaling the eye bones on the Z axis very quickly, having the key frames set to a short amount of time.
Spawn (2.9.3):
The wonder animation is kept similar to the idle animation, however this time the character looks to his left and right. This animation will only be played if the user has placed down 1 card and is just observing the character, playing the wonder animation every 20 seconds.
3.0 Other Reaction Based Animation
These are the other two reaction-based animations. The heating up animation (3.0.1) was done mainly with shape keys, key framing the shape keys to transform the flame from normal to an increased scaled up version. Scaling shape keys were also applied to the facial features, allowing me to keyframe the changes from one object to another.
The extinguished animation (3.0.2) mainly done with scaling the main body bone from 100 to 0 slowly. However, the descaling won’t be seen as the water character will be overlaying the fire character.
3.1 Steam - Body, Material & Rigging
Similar with the fire character, I didn’t want to make a steam character with a stationary mesh. Using the same method, I applied a deform modifier to a UV sphere, controlled by an empty plain axis (3.1.1). I then went to create the body by compiling multiple UV displaced spheres to create a cloud looking shape (3.1.2). In order to reduce the confusion of this character being a cloud, I made sure there was only 1 material allocated to the character. With the character now being animated, I created the arms and face, mainly consisting of thickened Bezier curves (3.1.3).
I purposefully kept the UV spheres separate to make sure I had the access of animating each sphere if needed to do more complex animations. However, after for the idle pose, I connected the spheres (3.1.5). With the character in a T-pose, I positioned the bones (3.1.4) and parented the bones to the mesh with automatic wrights (3.1.6).
3.2 Body Experimentations
Once I was got the basics done for the character, I wanted to further experiment with the body. I added an extra white colour to the toon material to get a better visual of how a clean shape (3.2.1), rougher (3.2.2) and a general spawn idea (3.2.3) would look like. With this, I also played around with the composition and sizes of the spheres, however, in the end I decided to stick with my original design, keeping a clean shape with the original composition.
3.3 Spawn, Idle & Wonder Animations
Spawn (3.3.1):
The Spawn animation was done by rescaling the main body bone from 0 to 100, meaning nothing will be seen to begin with. This is then followed by the arms, legs and face popping out as the steam character spawns, whilst displaying a growing cloud effect.
Idle (3.3.2):
Idle animation is kept very simple. The animation includes the characters arms being stationary while blinking. The blinking was done by scaling the eye bones on the Z axis very quickly, having the key frames set to a short amount of time.
Wonder (3.3.3):
The wonder animation is kept similar to the idle animation, however this time the character looks to his left and right. This animation will only be played if the user has placed down 1 card and is just observing the character, playing the wonder animation every 20 seconds.
3.4 Other Reaction Based Animation
The shoot up & ice melting animation were designed to be card transferring. This means the shooting up animation is the stream character leaving their card, to appear on the designated opposite card (in case the ice characters card) to react, such as melting the ice by getting to close.
All these animations were mainly done by scaling and repositioning bones, keyframing them all to work together!
3.5 Water - Body, Material & Rigging
Similar to the previous fire and steam characters, I added a displacement modifier, but with a different texture type called Stucci which gave a smooth wabble effect. This was applied onto a stretched UV sphere that’s connected to an empty plain axis (3.5.1).
I later created the legs and arms using a Bezier curve into a T-pose. After the T-pose body was complete, I started to rig the character (3.5.3), adding bones to all areas of movement to insure a smoot animation. The character was rigged in a T-pose as when working with applying the bones to the mesh, the weight of each bones will be focused on their dedicated mesh, not linking with any other surrounding ones.
Once rigged, I selected all the whole characters mesh, selected the bone and parented them together with automatic weights (3.5.4). After a few final adjustments to the weight, I positioned the character into an idle pose (3.5.4). I’m quite happy with the final outcome, having water drop look very alive due to the displacement modifier (3.5.6)!
3.6 Vertex Bug - Weight Paint
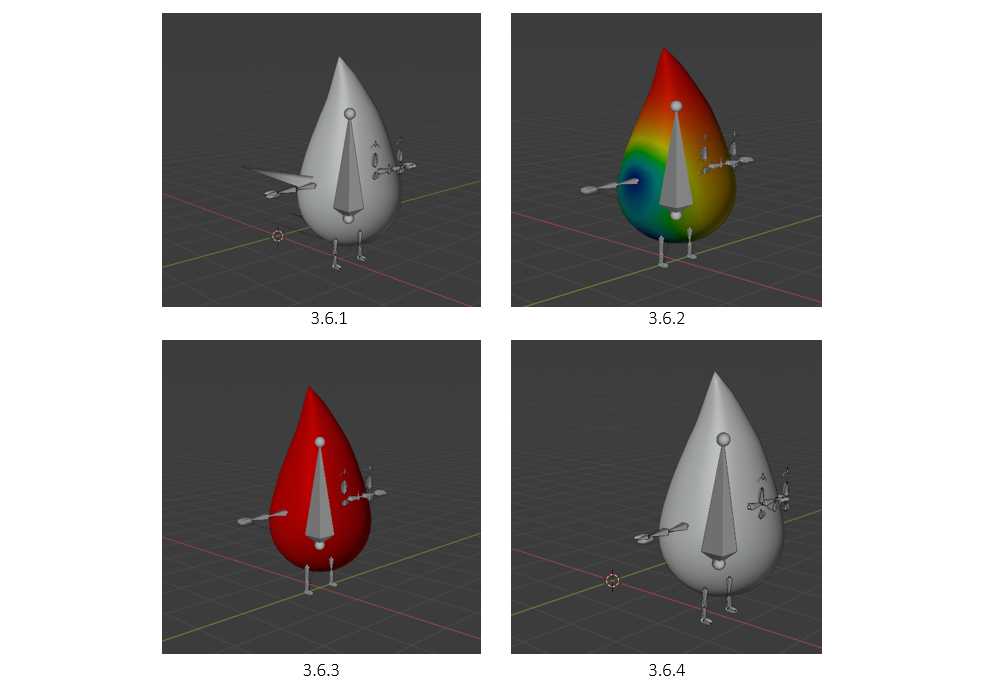
I came across a vertex bug when trying to reposition the wate character, having its body stretch for some reason when it moved (3.6.1). However, I later found out that it was a common wight paint issue, meaning the whole mesh of the body was not 100% covered with a solid weight paint (3.6.2).
To fix this, I simply went into wright paint mode, selected the gradient tool and maxed the strength to 100. This allowed me to completely cover the character (3.6.3). And now the issue was fixed (3.6.4)!
3.7 Shrink-Wrapped & Shape Keyed
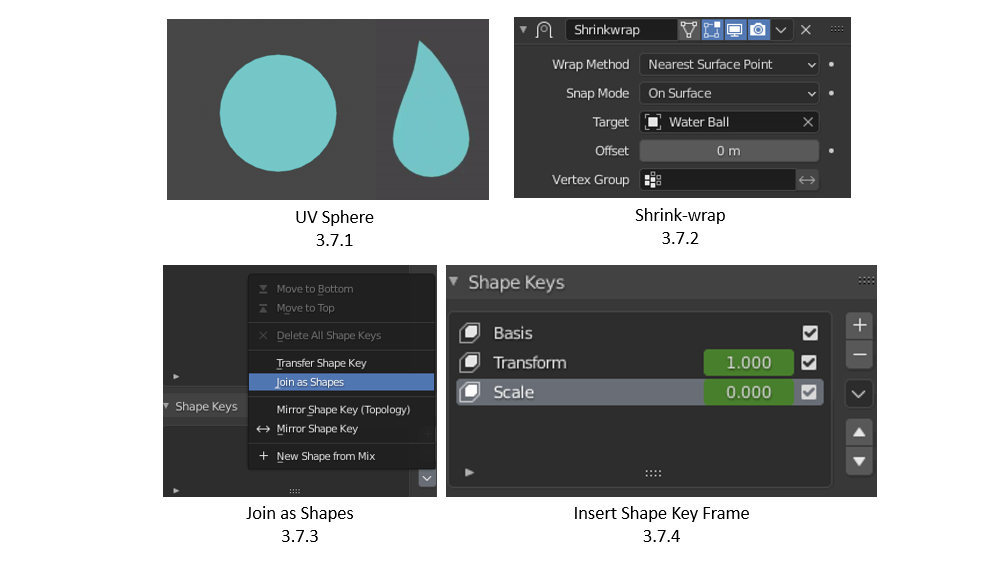
I waned to give the water character an interesting way of spawning. My idea was to make them spawn as a blob of water and transform into his rain drop body! To do this, I started by creating a UV sphere next to the body (3.7.1) and adding a shrink-wrap modifier on the rain drop body (3.7.2). This means that the body is not wrapped around the sphere, recreating the mesh! With this set-in motion, I applied the shrink-wrap modifier and joined the objects as shapes (3.7.3), within a shape key (3.7.4). I can now delete the old sphere and now have a transforming tear drop using shape keys, to which I can completely control (3.7.5)!
3.8 Spawn, Idle & Wonder Animations
Spawn (3.8.1)
The Spawn animation was done by rescaling the main body bone from 0 to 100, meaning nothing will be seen to begin with. This is then followed by the arms, legs and face popping out as the water character spawns. This is followed by the shape keyed body which is transforming and scaling separately.
Idle (3.8.2)
Idle animation is kept very simple. The animation includes the characters arms being stationary while blinking. The blinking was done by scaling the eye bones on the Z axis very quickly, having the key frames set to a short amount of time.
Wonder (3.8.3)
The wonder animation is kept similar to the idle animation, however this time the character looks to his left and right. This animation will only be played if the user has placed down 1 card and is just observing the character, playing the wonder animation every 20 seconds.
3.9 Other Reaction Based Animation
The shoot up (3.9.2) & ice melting animation (3.9.1) were designed to be card transferring. This means the shooting up animation is the water character leaving their card, to appear on the designated opposite card (in case the fire characters card) to react, such as extinguishing the fire by containing it within a ball of water.
The Freeze animation is what will happen when the ice character summons a cloud that will freeze the water character in an ice cube. I posed the bones to make the water character react, and paused the modifier when they’re frozen to add to the effect. The ice cube is a simple shape key that remains at scale 0 until it’s time to rescale over the water character.
4.0 MDD Characters Import / Export Blender
If I exported my characters to unity as they were (4.0.1), their displacement modifier will not work. This is because it’s a modifier, and modifiers cannot be carried over to another engine such as Unity. After lots and lots of research, I found an addon known as MDD (4.0.2) (Lightwave Point Cache). This addon allows me to apply the displacement modifier onto the mesh as shape keys, every frame being shape keyed.
To do this, I exported my characters displaced body as an MDD file and re-exported it back into blender (4.0.3 – 4.0.4). To make sure it played back the original animation perfectly, I cleared it as parent so it won’t get played twice. Finally, in the shape keys menu, I removed Basis as a shape key, making frame_0001 the default frame (3.0.6)
Now that’s all complete, the character is able to be exported as an FBX, due to all the object data being part of the body (4.0.7).
4.1 FBX Export / Import
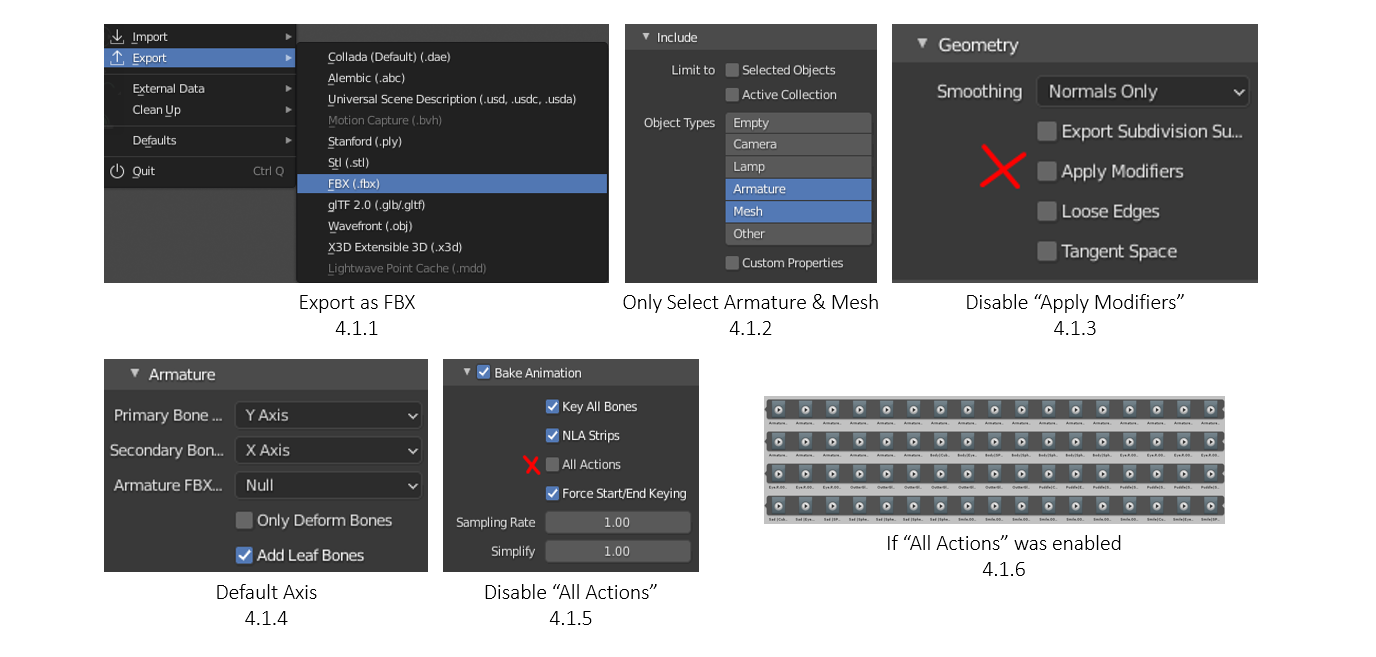
I exported all my characters as an FBX file (4.1.1) due to the characters being animated. In the export menu, I selected “Just the Armature and Mesh” (4.1.2) to make sure nothing else like the camera or empty would be exported. In the geometry tab, I disabled “Apply Modifiers” as the characters body is done via shape keys, so by applying them all would remove the MDD animation (4.1.3). Within the Armature tab, I kept the default axis as my character was facing the correct way (4.1.4). Finally, I disabled “All Actions” as I only wanted to export the FBX animation. If I was to enable “All Actions”, my FBX character file would look like this (4.1.6), which are animations of every single mesh, something I don’t need.
4.2 Common FBX Bugs
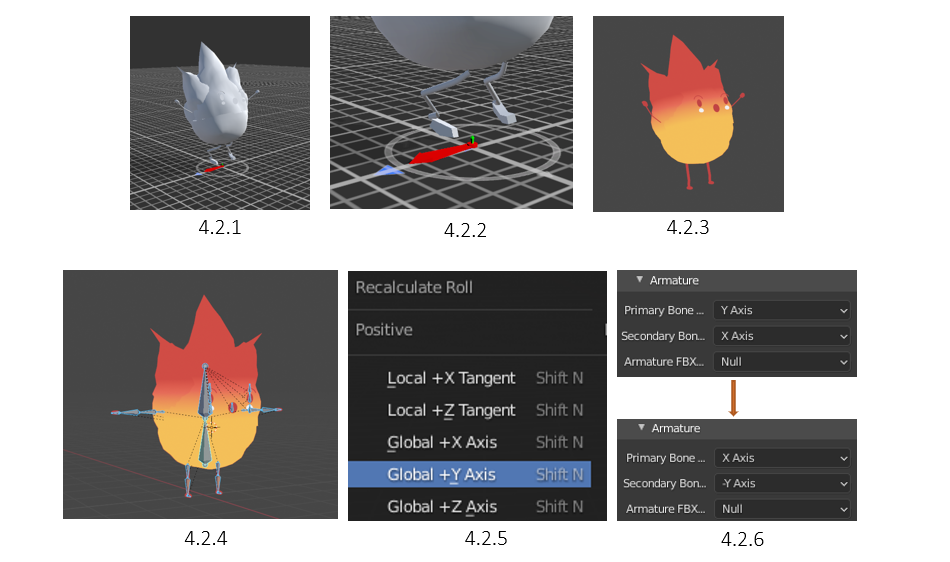
I came across an FBX issue when exporting my fire character. Every time I exported the, the legs would look more like chicken legs every time (4.2.1 – 4.2.2), despite looking fine in blender (4.2.3).
To fix this issue, I selected all the bones of the character in pose mode (4.2.4) and recalculated the rolls to Global +Y Axis (4.2.5), making all the bones face one way. With this now set, I simply re-exported the character again but altered the Armature axis to make them match with the new recalculated rolls (4.2.6).
4.3 Importing Animations to Unity
Importing to unity can be done via drag and drop, or going to file > import (4.3.1). Once I imported a character, I checked the FBX file to see if the animation was there and if it works as it should (4.3.2 -4.3.3). There are 2 steps required to make sure the animation works, the first being to check the animation data file via the inspector (4.3.5). The second is to simply apply the animation onto the character as an “Animator Controller” (4.3.4) to see if the mesh works with the animation.
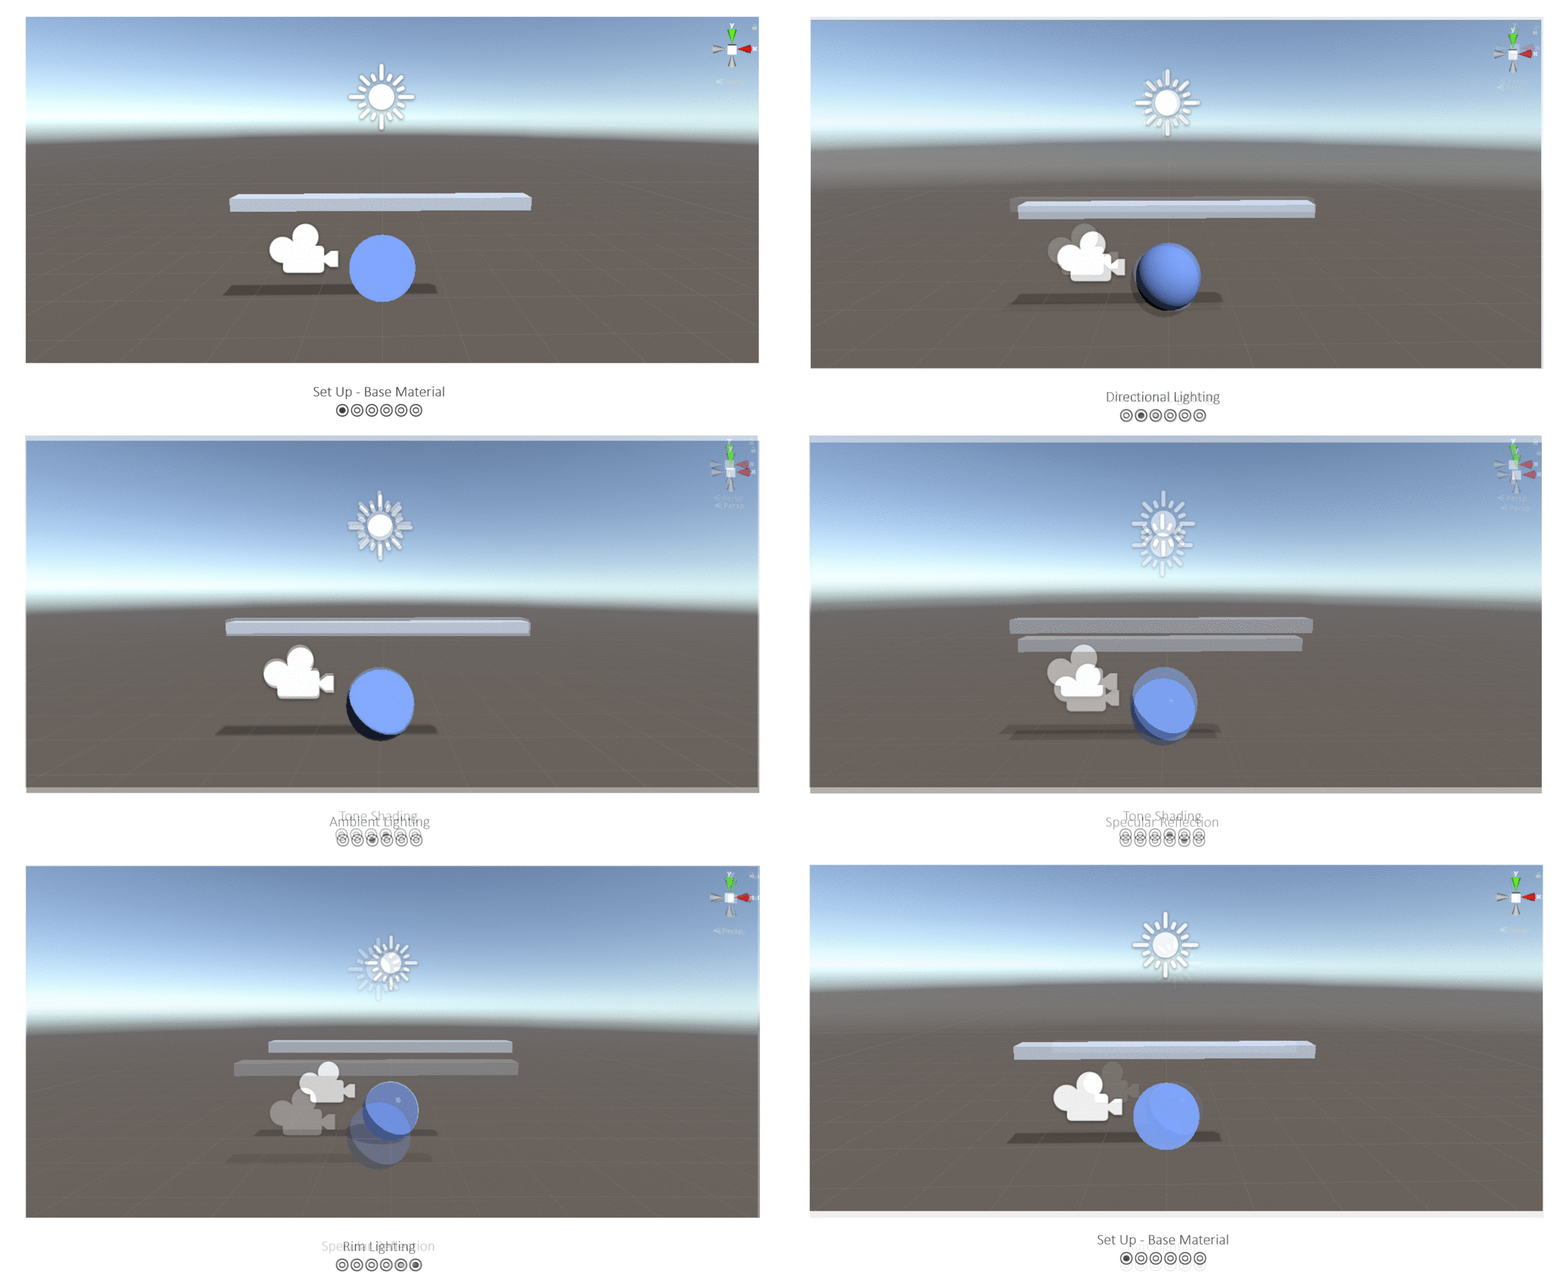
4.4 Unity Toon Shader
To make a Toon Shader, I followed a well-documented page by Roystan. I started with the base set up and materials. Next I added directional lighting in order to make the sun light be able to affect the sphere. To add the Toon part of the shader, I proceeded to add ambient lighting to the sphere, followed by the toon shading, allowing to later change the colour of shading.
The final steps were to add the specular reflection in order for the light to become dynamic, and finishing off by creating a rim lighting to create a soft outline of the material!
You can find the Full Documentation here
Shader "Roystan/Toon"
{
	Properties
	{
		_Color("Color", Color) = (0.5, 0.65, 1, 1)
		_MainTex("Main Texture", 2D) = "white" {}
		_AmbientColor("Ambient Color", Color) = (0.4,0.4,0.4,1)
		_SpecularColor("Specular Color", Color) = (0.9,0.9,0.9,1)
		_Glossiness("Glossiness", Float) = 32
		_RimColor("Rim Color", Color) = (1,1,1,1)
		_RimAmount("Rim Amount", Range(0, 1)) = 0.716
		_RimThreshold("Rim Threshold", Range(0, 1)) = 0.1
	}
	SubShader
	{
		Tags
		{
			"LightMode" = "ForwardBase"
			"PassFlags" = "OnlyDirectional"
		}

		Pass
		{
			CGPROGRAM
			#pragma vertex vert
			#pragma fragment frag
			#pragma multi_compile_fwdbase

			#include "UnityCG.cginc"
			#include "Lighting.cginc"

			#include "AutoLight.cginc"

			struct appdata
			{
				float3 normal : NORMAL;
				float4 vertex : POSITION;
				float4 uv : TEXCOORD0;
			};

			struct v2f
			{
				float3 viewDir : TEXCOORD1;
				float4 pos : SV_POSITION;
				float2 uv : TEXCOORD0;
				float3 worldNormal : NORMAL;
				SHADOW_COORDS(2)

			};

			sampler2D _MainTex;
			float4 _MainTex_ST;
			float _Glossiness;
			float4 _SpecularColor;
			float4 _RimColor;
			float _RimAmount;
			float _RimThreshold;

			//Vertex Shader
			v2f vert (appdata v)
			{
				v2f o;
				o.viewDir = WorldSpaceViewDir(v.vertex);
				o.pos = UnityObjectToClipPos(v.vertex);
				o.uv = TRANSFORM_TEX(v.uv, _MainTex);
				o.worldNormal = UnityObjectToWorldNormal(v.normal);
				return o;
				TRANSFER_SHADOW(o)
			}

			float4 _Color;
			float4 _AmbientColor;
			float4 frag (v2f i) : SV_Target

			{
				float3 normal = normalize(i.worldNormal);
				float NdotL = dot(_WorldSpaceLightPos0, normal);
				float shadow = SHADOW_ATTENUATION(i);
				float lightIntensity = smoothstep(0, 0.01, NdotL * shadow);
				float4 light = lightIntensity * _LightColor0;
				float4 sample = tex2D(_MainTex, i.uv);
				float3 viewDir = normalize(i.viewDir);

				float3 halfVector = normalize(_WorldSpaceLightPos0 + viewDir);
				float NdotH = dot(normal, halfVector);

				float specularIntensity = pow(NdotH * lightIntensity, _Glossiness * _Glossiness);
				float specularIntensitySmooth = smoothstep(0.005, 0.01, specularIntensity);
				float4 specular = specularIntensitySmooth * _SpecularColor;
				float4 rimDot = 1 - dot(viewDir, normal);
				float rimIntensity = rimDot * pow(NdotL, _RimThreshold);
				rimIntensity = smoothstep(_RimAmount - 0.01, _RimAmount + 0.01, rimIntensity);
				float4 rim = rimIntensity * _RimColor;

				return _Color * sample * (_AmbientColor + light + specular + rim);


			}
			ENDCG
		}
			UsePass "Legacy Shaders/VertexLit/SHADOWCASTER"
	}
}

You can find the Full Documentation here
4.5.1
4.5.2
4.5.3
4.5.4

4.5 Applied Toon Shader & Animations Preview
All Unity Character Animations
With the base toon shader done, I went to create all the necessary materials for each character (4.5.5 – 4.5.8). I added the material by simply drag and drop onto the characters, which worked out perfectly (4.5.1 – 4.5.4)!
For the fire character, I created a gradient using photoshop and applied it as texture onto the toon material (4.5.6 + 4.5.2)!
4.6 Reaction Animations Preview
All Unity Character Animations
I created a preview for how these reactions will react with each other. Water x Fire (4.6.1), Steam x Ice (4.6.2), Ice x Water (4.6.3) and Fire x Ice (4.6.4). When showing this to my team, they all loved seeing their design work and concept ideas being brough to 3D and seeing it all happen was a very nice progress preview!
4.7 AR Prototype
I sent all the characters as a Unity Package to our developer, William, which he used to create a prototype of our product in real life! Me and the whole team loved seeing our creations being brought to life into the real world and we’re all very proud that we were able to get this far!
The preview shows the Ice Character (4.7.1), Cloud Character (4.7.2) and Ice Character (4.7.3) being scanned by Vuforia Unity to come to life! I we were to finish the whole project; our developer would have applied this VR camera to a mobile app and connected the animations! So not too far off from a finished product!
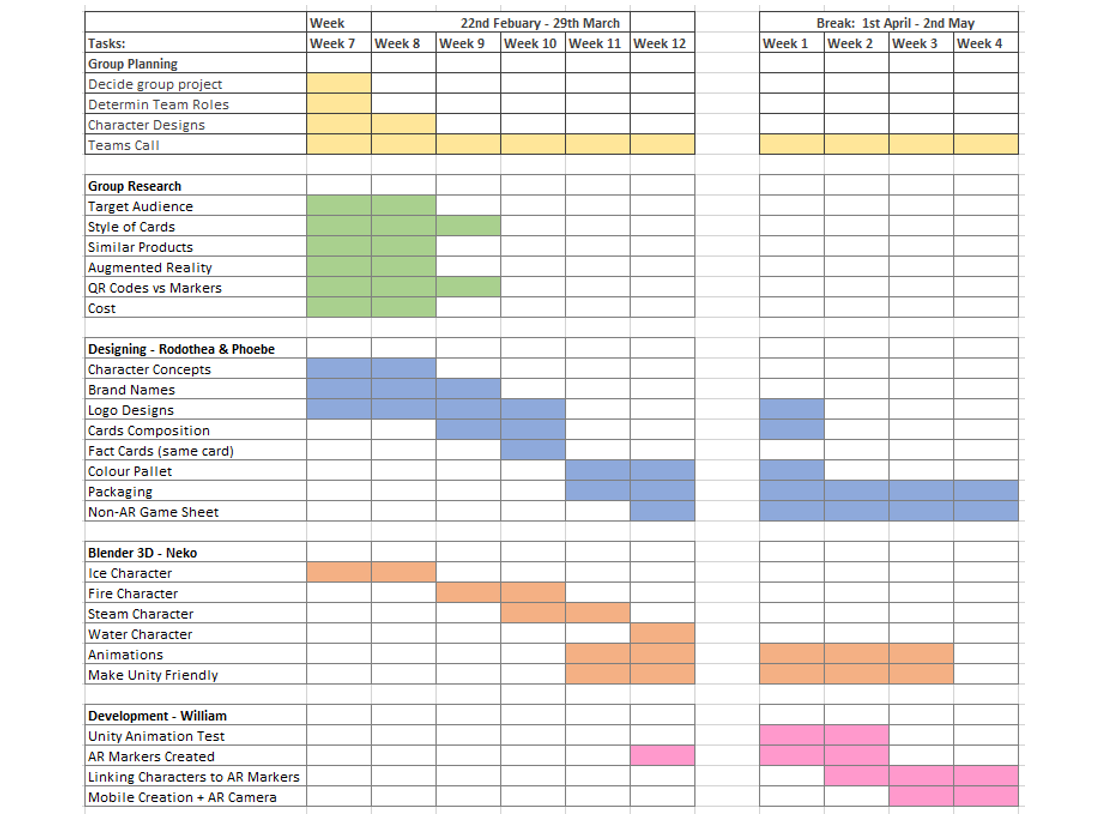
4.8 Time Sheet & Conclusion
This is an excel Time Sheet displayed by weeks, from the starting weeks of our project, to the very last. Thoughout the project we have at least 2 teams calls a week (Monday & Friday) to make sure everyone was kept on track and progressing in the project! Group Planning and Research was done by everyone on the team, which meant it didn’t take too long to finish. The blue section “Designing” shows the progression of all design work done by Rodothea & Phoebe. The orange section “Blender 3D” shows my progression with all the 3D Character Creations and animation, and unity work! Finally, the pink section “Development” shows our developer, William, the progress he has made, noticing how it interlinks with my own as I pass him my finished animations!
Overall, me and my team are all thrilled to get a working prototype of our product that was just an idea! I personally loved working on this project, it was so fun learning new techniques in Blender, and not to mention the Unity Toon Shading! I’m not very familiar with Unity, however I did all the research necessary and got past the knowledge barrier! This was defiantly a challenge as there was a lot I didn’t now and was unsure of to begin with, but as I progressed with my team, my skills developed, and now I definitely feel more confidant in working with more harder projects!