River Hamble App | RHCP Adventure | Client Project
Brief
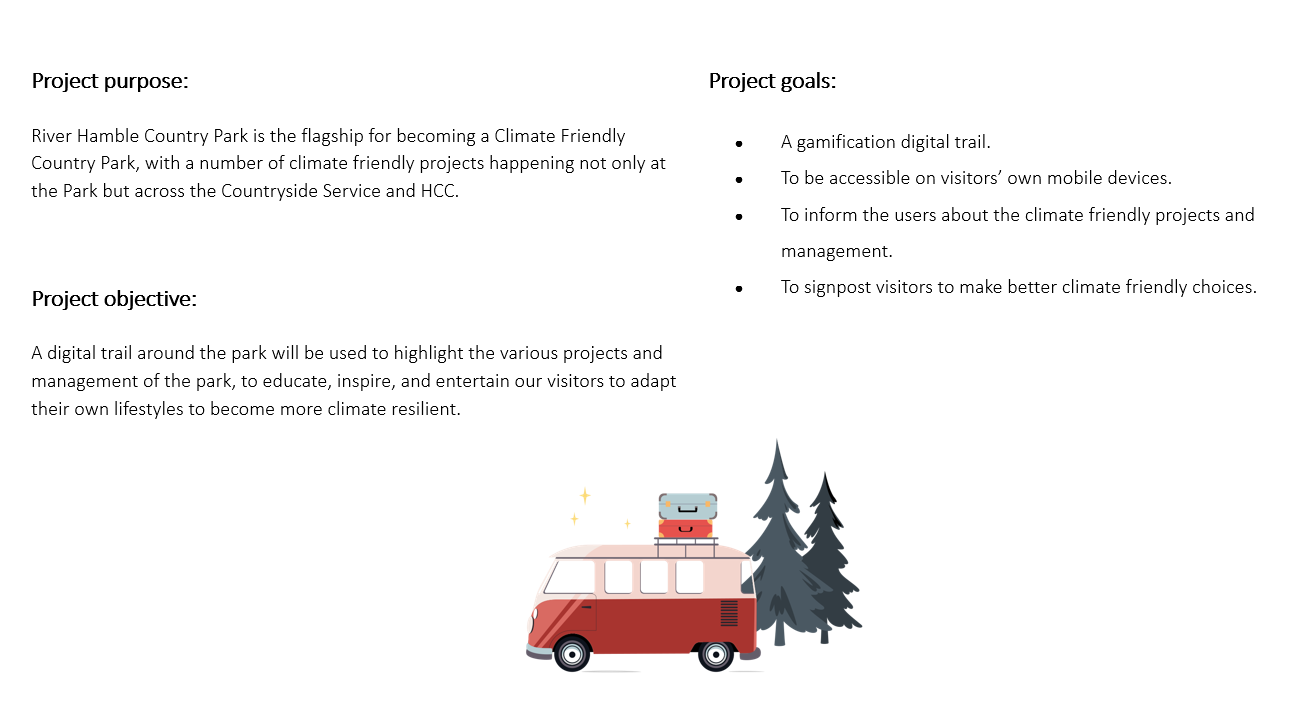
A digital trail around the park will be used to highlight the various projects and management of the park, to educate and inspire our visitors to adapt their own lifestyles to become more climate resilient.
Goal
Create a functional app with AR features designed for River Hamble, aiming to give a fun,
engaging and informative experience for families with younger children!
Role in Project
Developer
Software
![]() Unity 2020.3.27f1
Unity 2020.3.27f1
![]() Vuforia Engine
Vuforia Engine
Prep & Research
1.0 Project Breif
1.1 Research | Mobile Apps
1.2 Research | Existing Games
1.3 Personas
1.4 Colour Pallet Ideas
1.5 Primary & Secondary Audience
1.6 Inspiration & MoodBoard
1.7 Initial Ideas
1.8 Wireframes & Ideas
1.9 Bracelet Research
2.0 Bracelet Concept
Vuforia x Unity
2.1 Image Target
2.2 AR Setup
2.3 3D Model Flickering
2.4 AR Build Prototype
2.5 AR Scene Button
2.6 AR Build UI Prototype
App Development
2.7 Menu UI
2.8 Map Setup
2.4 Mixing Textures
2.9 Map Panning & Zoom
3.0 Bottle Counter
3.1 Saving Data
3.2 Cloning Scene
3.3 New Activity Designs
3.4 Map Zoom Development
3.5 Informative Scroll
Final Results
3.6 Final Outcome
2.8 Selected Focuses Accomplished
3.7 Time Management & Conclusion
3.8 Hand Over Document
Introduction to Project | Concept Trailer
Trailer By Ervins Puksts
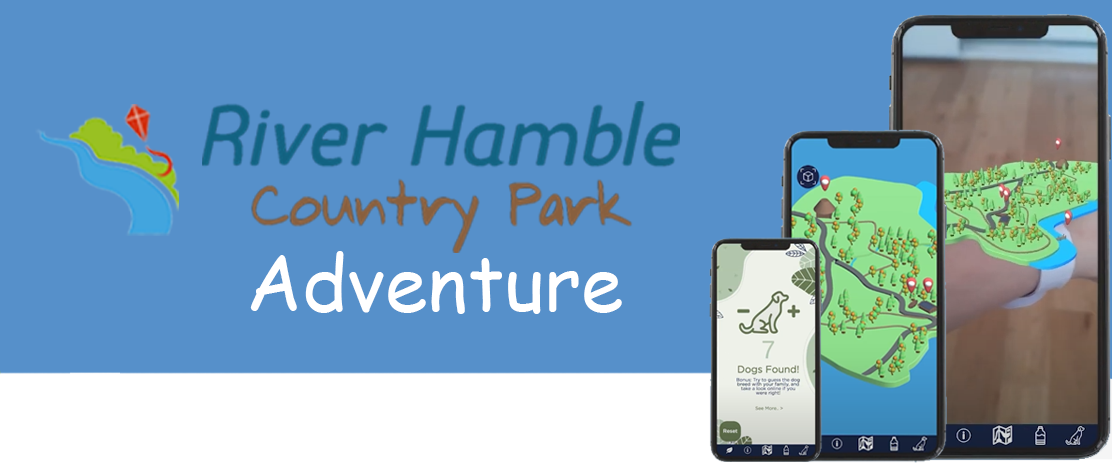
The River Hamble Country Park (RHCP) Adventure App aims to highlight the various projects and management of the park, educate and inspire our visitors to adapt their own lifestyles to become more climate resilient. The app also contains AR (Augmented Reality) functions to help engage the user even more throughout the trial! This was a very fun project to work on, having to surpass a whole new learning curve of scripting, so excuse any comments made by my subtle frustration of having to spend 20+ hours learning C++ to get the fundamental functions made. However, it was nice in the end to have all the scripts working and the app actually functioning!
1.0 Project Breif
Biophilic Design is the concept of adding more nature into your workspaces, such as plants, natural light & general visual connections with nature. The concept was introduced by E.O. Wilson, a biologist, and University Research Professor, in his 1984 book Biophilia. His research outlined a fundamental tendency of human beings to be attracted to nature and emulate its processes and structures in everyday life. Essentially, it creates natural environments for us to live, work and learn whilst unconsciously reconnecting to nature.
1.1 Research | Mobile Apps
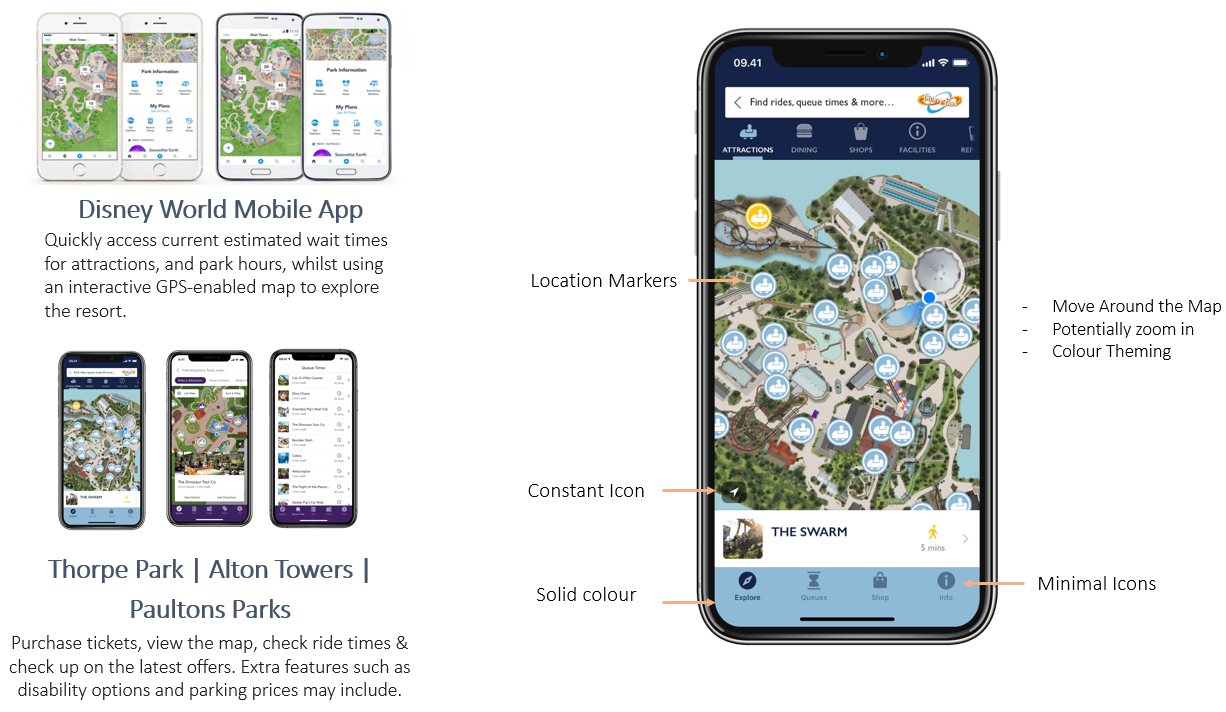
I did some secondary research on existing mobile apps that displayed a map, with various UI features! I found that this was quite popular for big parks, so I took a deeper dive into the Disney World & other various roller coaster parks! Using one of the references, I analysed what can be found on the app, and what aspects I could incorporate into my own!
1.2 Research | Existing Games
1.3 Personas
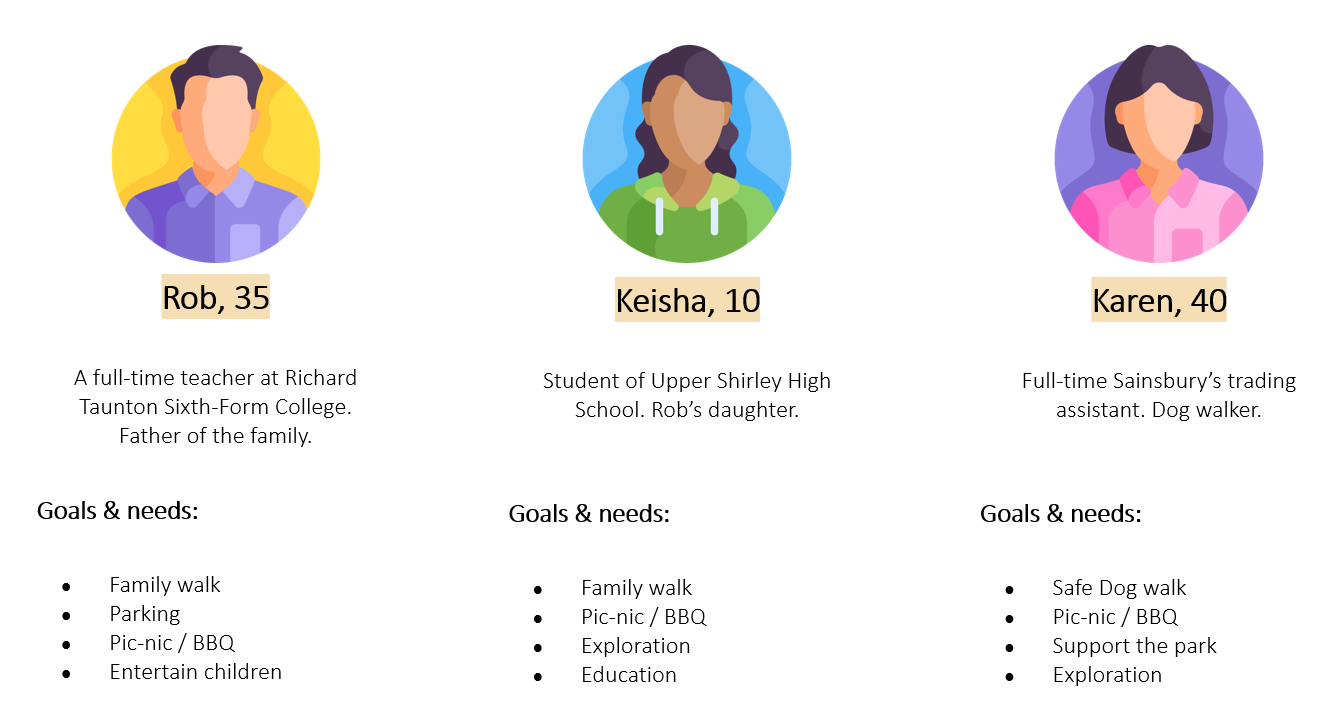
1.4 Colour Pallet Ideas
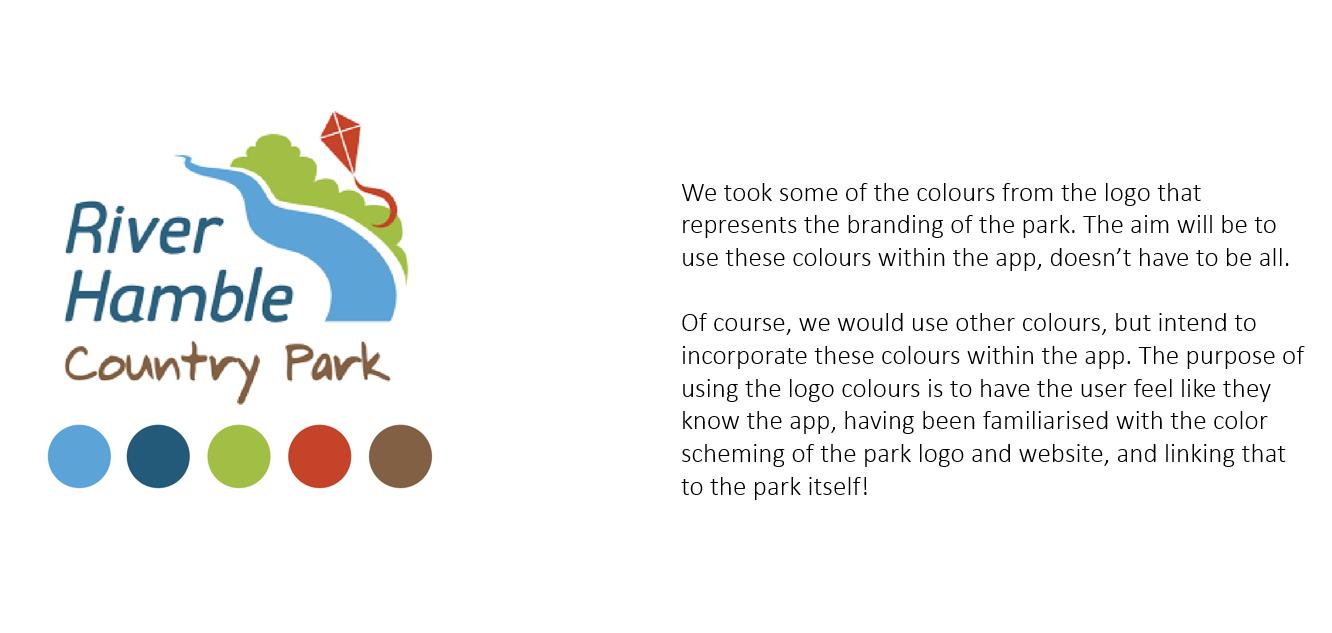
1.5 Primary & Secondary Audience
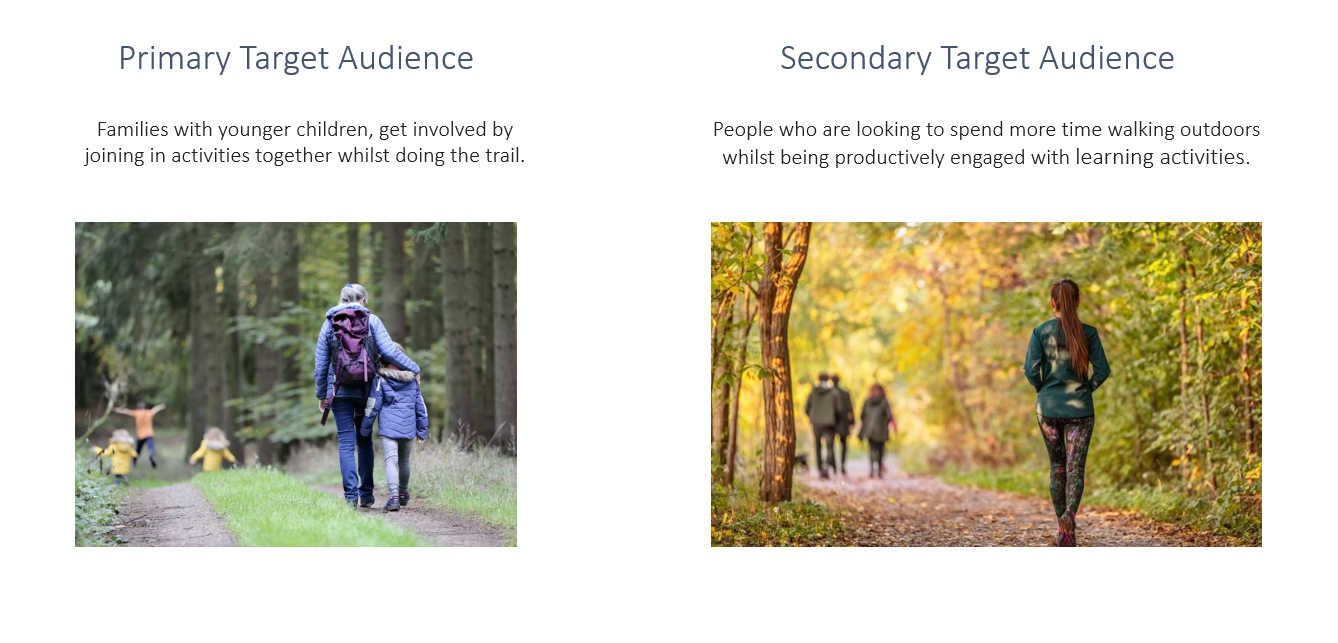
1.6 Inspiration & MoodBoard
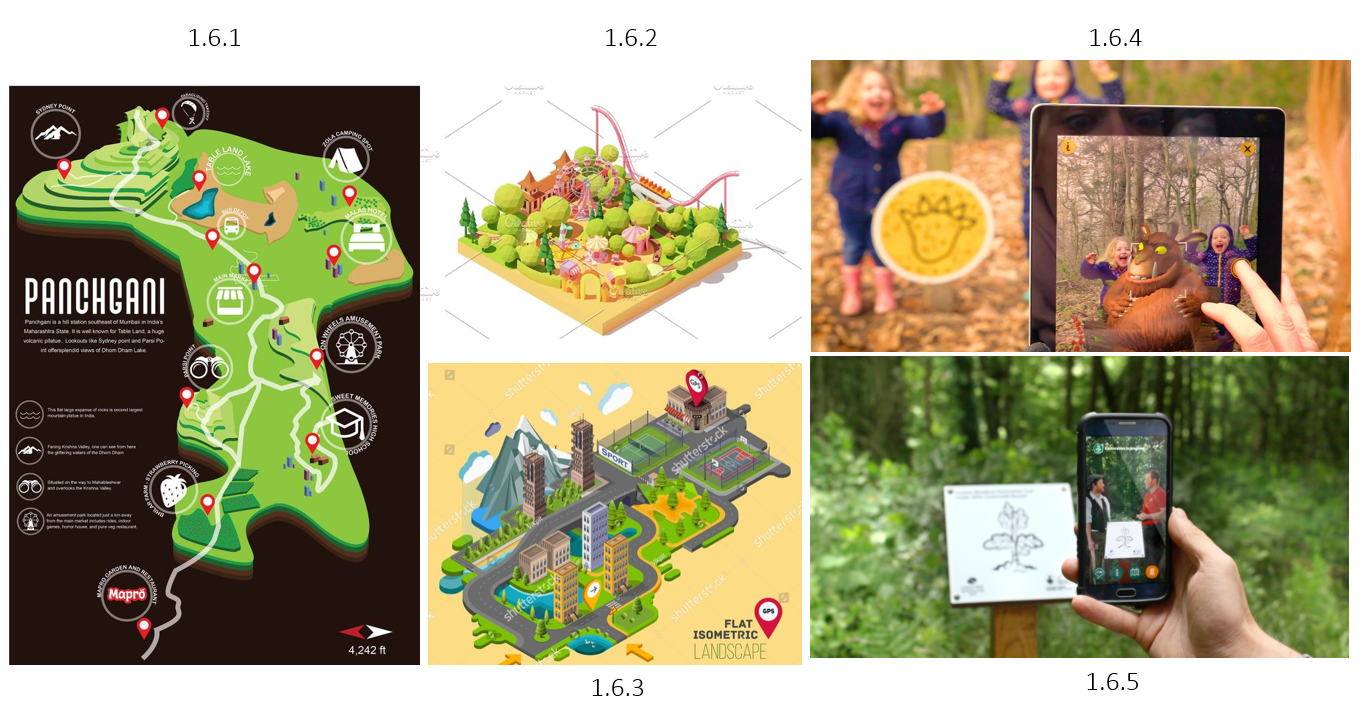
After some good research, I found some interesting ideas of
what could be incorporated into the app. The map (1.6.1) (1.6.2)
(1.6.3) would be 3D and kept isometric, having a good view of
the whole area without having longer out-clipped perspectives.
I quite liked the minimal looking map (1.6.1) as it’s kept simple
yet informative, having various icons shown for the attractions,
whilst the colour scheme is kept simple too.
The image top right (1.3.4) shows an interesting AR experience.
The woodlands seem to have various image targets spread across
the area, and once you hover your camera over the image (within an app),
a creature appears! I thought this was a fun idea, however, I don’t
believe I had the time to implement this feature!
Following the same narrative (1.3.5), in this case, it shows
informative experiences! It seems that 2 people appear and talk
to you about a certain leaf/plant/tree within that area! This was
also something I wanted to implement, however, due to other processes
of the app taking longer than anticipated, I couldn’t implement this feature too
1.7 Initial Ideas | Brainstorming
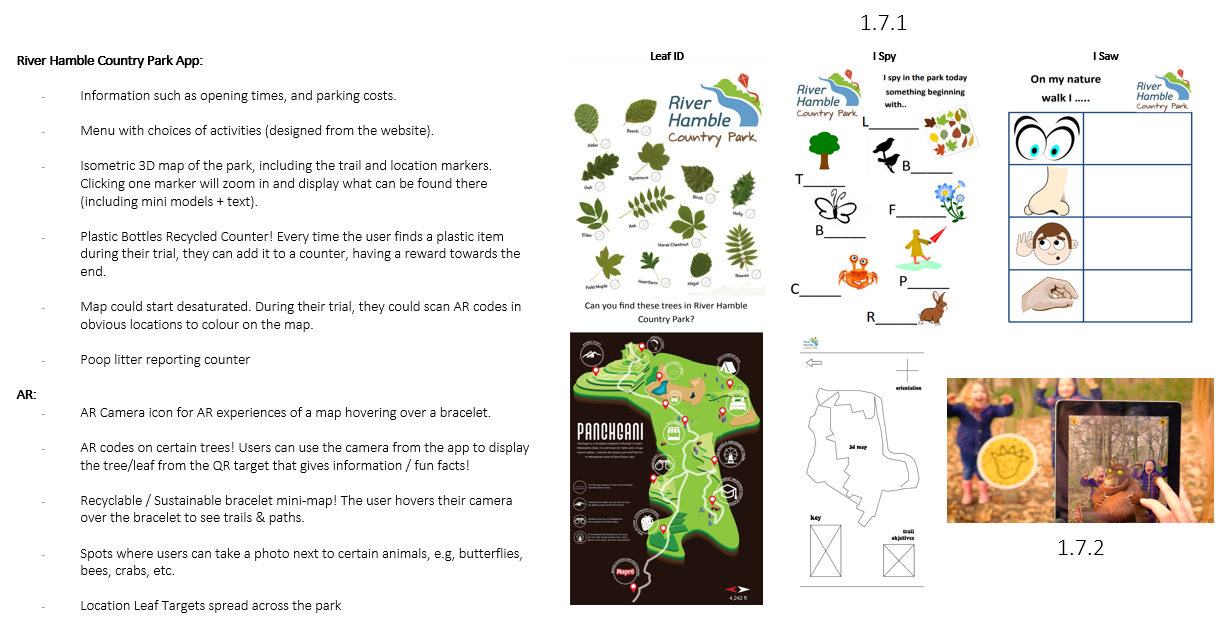
We began brainstorming ideas for what else can be included in the app, essentially making a list of ideas. However, not everything was touched upon due to various ideas taking longer to complete than expected. We sectioned the list into two parts, one being the app essentials, and the other being possible AR features. The app and AR ideas were referencing what was found on the River Hamble website (1.7.1), having 3 activity sheets for kids to do, so we thought why not implement those! We still quite liked the AR target spread across the park idea (1.7.2), however in the end we were not able to complete that idea.
1.8 Wireframes & Ideas | Sketches
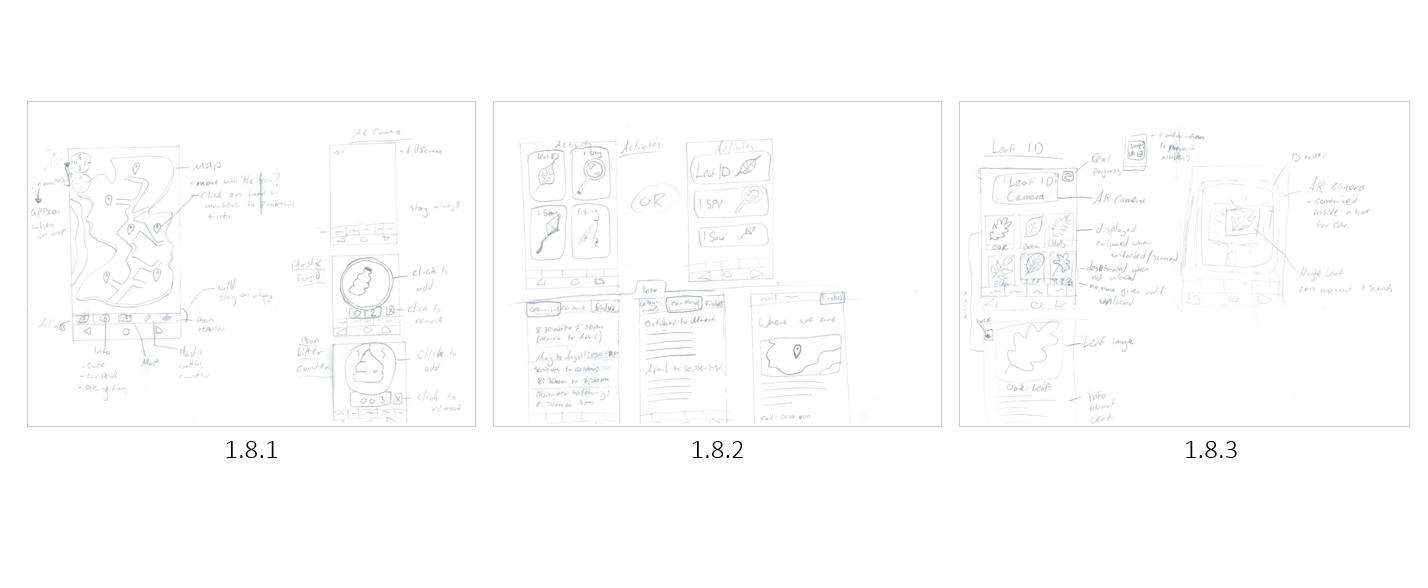
With ideas in mind, I began drawing visual wireframing, displaying what can be seen in the various parts of the app! (1.8.1) Shows my plan for the main menu, having a 3D Isometric-look map fill the screen, having various location markers, followed by a compass on the top left! Unfortunately, I was not able to incorporate the compass within the project due to other aspects taking longer than anticipated. On the right (1.8.1) I’ve drawn how the AR camera, bottle counter, and litter counter (later revamped to dogs found). The AR camera mode was set to have a back button on the top left, however, I later made the main menu map button, leading the user back from the camera mode. Both the bottle clicker and dog litter were designed to be similar, as they both had the same concept of keeping track.
(1.8.2) Displays the extra activities used from the River Hamble website. The idea was to implement them digitally and not waste paper, as they originally print them out. The sketch shows two different styles of displaying them.
(1.8.2) Also shows my initial design for the information about the park, such as car parking, locations, café, toilets etc. This was later implanted as a scrolling function, making it easier for the user to get to certain information.
(1.8.3) The idea was to make a “Leaf Trail“, having AR targets spread across the park, and when the user will scan one, a 3D leaf will pop out and you would get some info about the leaf & tree. This also was not implemented as intended due to other aspects taking longer to complete, however, I did create an AR tracker later down the line!
1.9 Bracelet Research
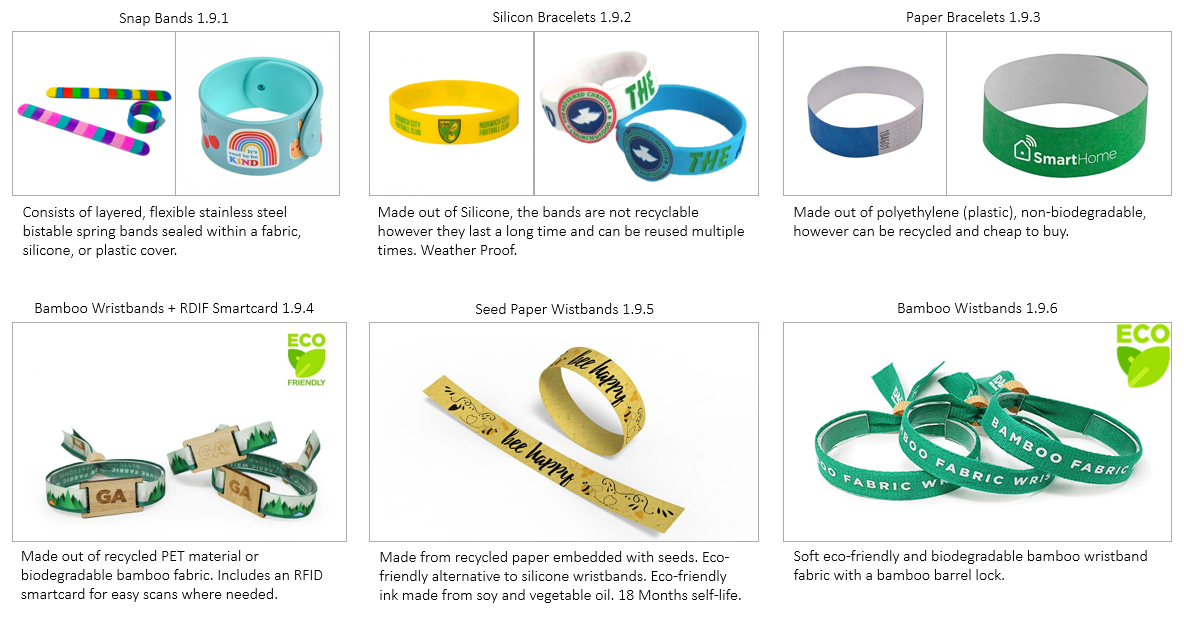
Touching upon the AR map being displayed when the user hovers their phone over the bracelet, I wanted to see what kind of bracelet we could use if this was further developed. I separated this research into 2 sections: Common easy-access & eco friendly. The common wristbands (1.9.1) (1.9.2) (1.9.3) were made out of either silicon or polyethene plastic, however, they are cheap and easy to order on a lot of websites. However, due to the client wanting to focus on more eco-friendly aspects of their park (and if the child loses the band), I sought to find some sustainable ones. It was interesting to find that there were quite a few bamboos and even biodegradable wristbands available, and not cost too much! I especially was fond of the Seed Paper Wristband (1.9.5), because if one loses the band, it will simply biodegrade and plant some flowers!
However, after sending this research to the client, I did not receive a response. This also made me think that instead of relying on custom wristbands to have a drawn logo, an alternative 3D printed band attachment could be developed, attaching on any bands, even watches!
2.0 Bracelet Concept
This is a quick animation to show off how the 3D printed band attachment would look and work. The idea is that instead of having various wristbands bought with a unique logo, the 3D printed attachment will attach to any brand and allow you to slot in a different card piece for various AR experiences! The piece itself would of be 3D printed using PLA, a non-toxic biodegradable material!
The video (2.0.1) shows how the attachment works, using a snap band as an example. A closer look (2.0.2) shows where the slot is, and the attachment pieces underneath! Due to time constraints, I wasn’t able to print this out and give it a proper prototype test, but the concept in theory (and visually) does seem to work!
2.1 Image Target | Vuforia
I was introduced to Vuforia, a software development kit (SDK) for creating Augmented Reality apps. I first made a new 3D core project in Unity, making sure to check “Android Support” as I will be testing the builds on my Android phone, not having to manually download JDKs, NDKs, or SDKs. I then went back to Vuforia and imported their software into Unity, making sure to add the software license to remove the watermark.
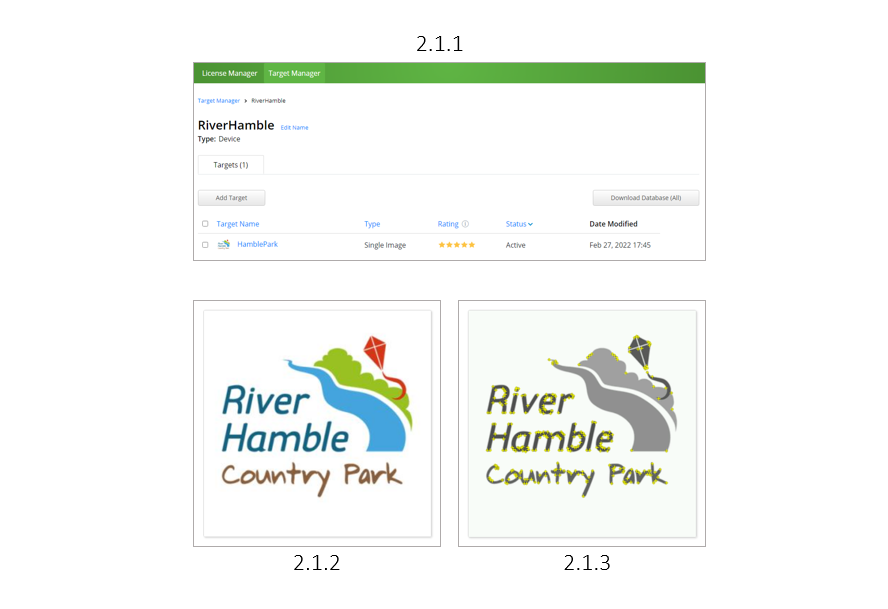
With the software being ready to use within Unity, I began adding an image target to Vuforia (2.1.1), using the River Hamble logo (2.1.2). To see how well the image was being tracked, I had a look at what Vuforia was looking for within the image and found that the text was the main focus, whilst the vector wasn’t (2.1.3).
2.2 AR Setup | Unity x Vuforia
Prototype Map Model Created by Ervins Puksts
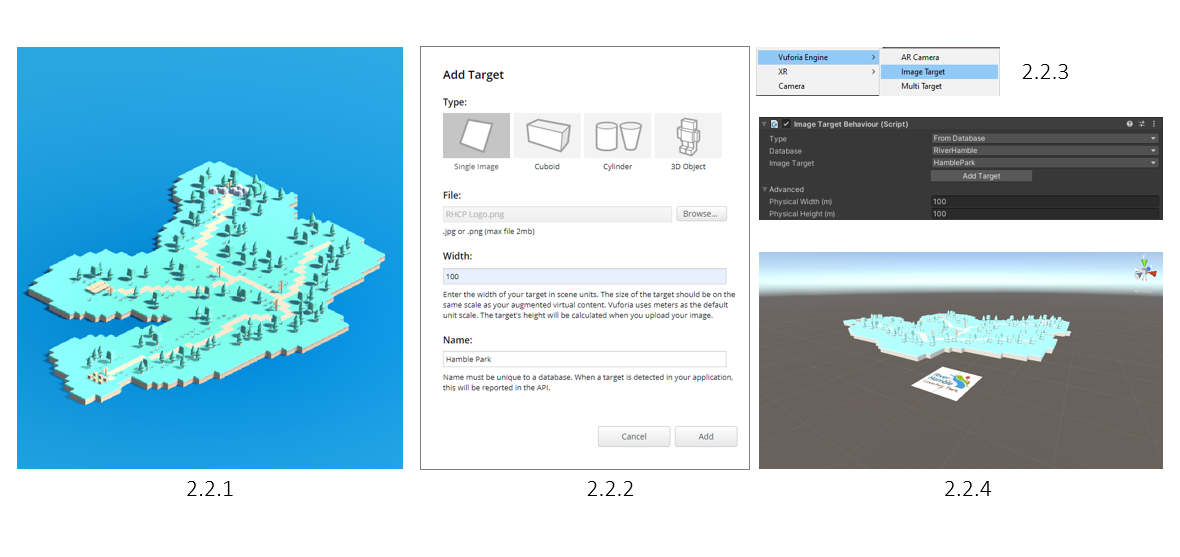
The setting up of the AR was actually much simpler than I thought! With Vuforia Engine imported into Unity, I created an image target within the Hierarchy “Vuforia Engine > Image Target” (2.2.3). After saving the image target on the Vuforia website (2.3.2), It was a simple import update within unity. Selecting from the database, I selected the image, making sure the width and height were set to 100 for quality scaling.
The process of making the AR work was simple from that point onward! Using the 3D prototype map FBX model (made by Ervins) (2.2.1), I scaled and positioned the model above the image target (2.2.4). It took some playing around with the scaling as I didn’t know how big the model was going to be when seen by the camera, but I figured it out later when testing it in Unity!
2.3 3D Model Flickering | Unity
After some playing around, I got our prototype map model to show up (2.3.3)! I had some issues at first with the model flickering, however, after many hours of research, I figured it out!
During this project, I was working on other projects simultaneously, one of which was the Transmedia Project! Both projects involved AR and had the same flickering issue with any 3D model that wasn’t made in Unity (2.3.1). The issue was solved by making the appropriate changes to the AR camera (2.3.2). The main adjustment was the Clipping Planes, setting Near to 2 and Far to 2000. With the flickering fixed, I was able to progress, having to build the app and begin making the UI!
2.4 AR Build Prototype
Before building the app, I set the icon and splash screen to the River Hamble logo, primarily to see what it did, and how it looked (2.4.1). Finally, it was important to set the “Minimum API Level” as this is what dictates what android phones can be used. I used “Android 6.0 Marshmallow (API Level 23)” as this was the lowest version that Vuforia would work on, allowing more users to use the app (2.4.2)! With all that set, I built the APK and gave it a test run, to which it was a success (2.4.3)! The 3D map was tracked correctly with no issues!
2.5 AR Scene Button | Scripting
My next steps were to add some UI. I started by adding a Device Simulator from Unity’s Package Manager (2.5.1), making my screen resemble any phone I require! With this setup, I created an extra scene for the main menu and began adding the buttons “UI > Button” to the appropriate size and position (2.5.4).
With the buttons in place, I began making the script! Scripting was quite hard to learn, having spent hours understanding what variable means what, however, in the end, I had a basic understanding of scripting! With my basic knowledge, I managed to make a script that changes from scene A to scene B, making sure the names were not misspelt or missing capitals (2.5.3) (2.5.2)!
With all that done, I made another button to go back for testing purposes, and see how the scenes switch between each other! All that was left was to test a build.
2.6 AR Build UI Prototype
When building the app, it was important to load the new scenes with “Add Open Scenes”, otherwise when you build the app, the scene won’t be included. It was also important to order the scene in the correct order, as the one with the lowest number will load first (2.6.1). The prototype build seemed to work as intended, with functional buttons whilst the AR was still in working order (2.6.2).
2.7 Menu UI
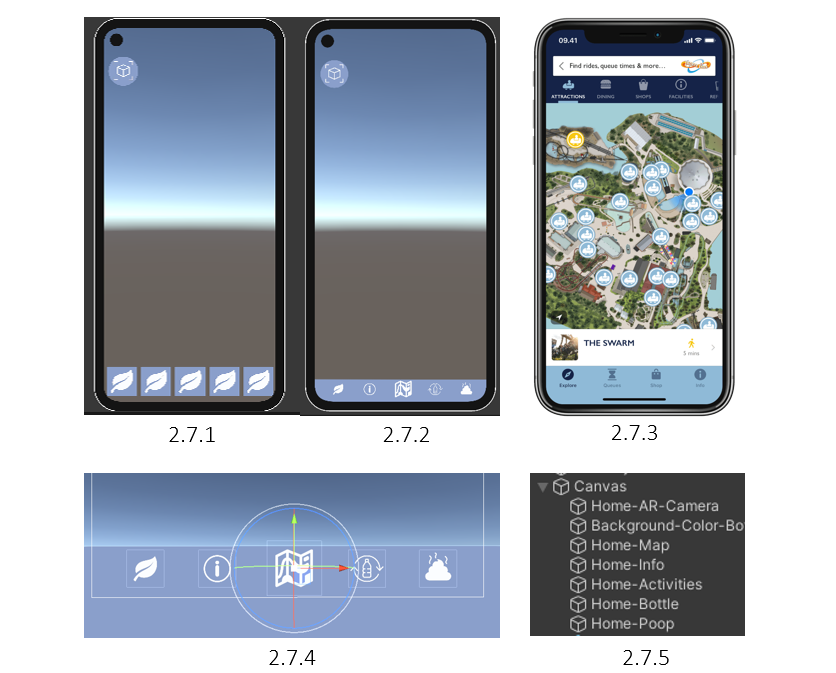
With my knowledge of how to create UI buttons and change scenes, I began making the menu UI. My initial attempt (2.7.1) was to have each button include an image and the background colour, however, I found that the buttons will have space around them!
To move past this, I found that I could make the button on its own transparent png (2.7.4), and have a background bottom layer going far down, meaning there will be no void for any phone (2.7.2).
It’s worth noting that to make a UI button, you have to convert them to a “2D Sprite” in order to retexture a button within a canvas. This is how I retextured all buttons, including the AR button (2.7.2).
I’ve also removed the “back” button when in AR mode and re-attached the scene change script to the middle map icon, as I later copied the menu buttons across all scenes!
My previous research on the phone app designs (2.7.3) was quite useful, as this is what I was basing my menu design on, making new users feel comfortable and ready to use the app! It was also the reason why I made my icons smaller (2.7.2)!
With all the buttons made, I’ve named them accordingly (2.7.5), keeping organised from the start!
2.8 Map Setup | Scene Development
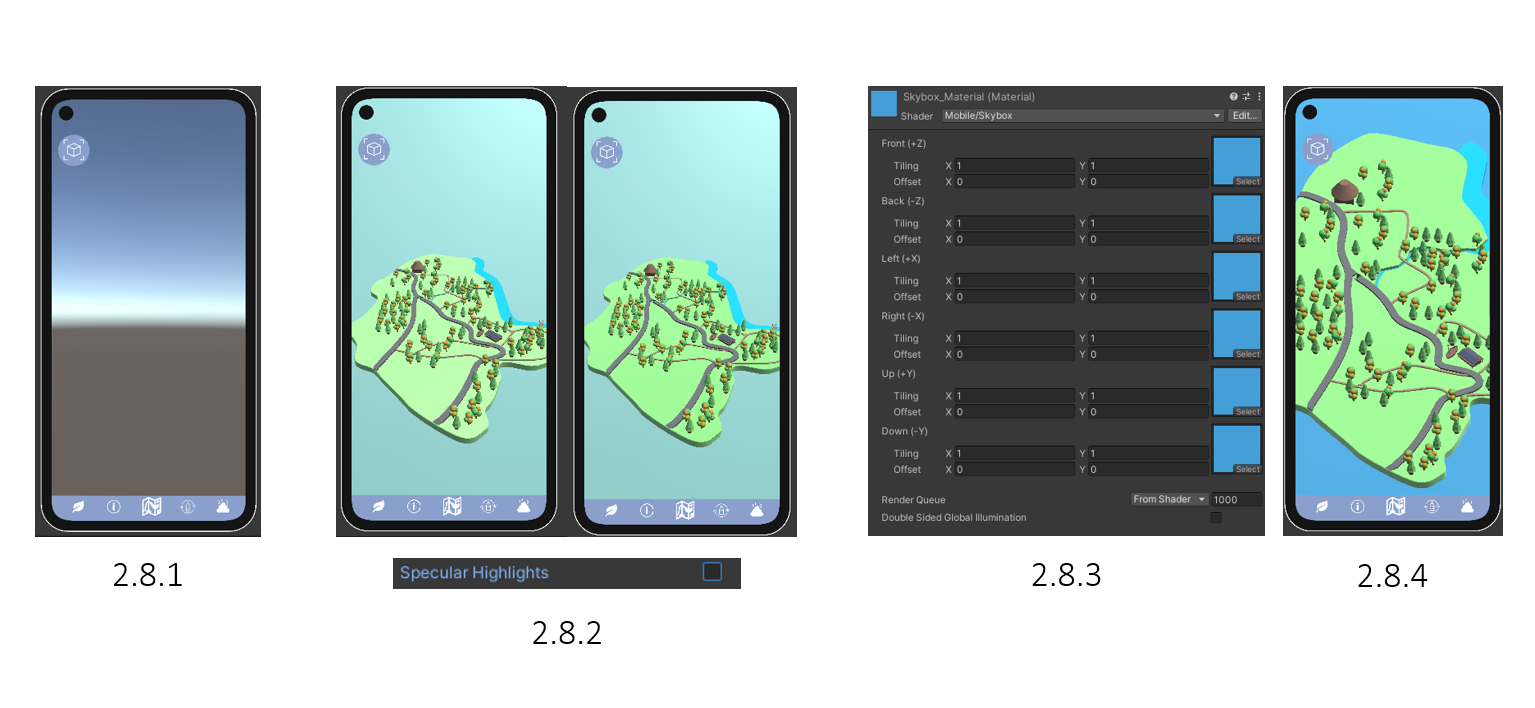
With the main menu scene set up (2.8.1), I began adding the new map designed by the 3D Visualization team member (Ervins Puksts) [link to their map creation]. Once the FBX map was imported, I instantly adjusted the material to remove “Specular Highlights” (2.8.2), as this would change the colour of the map when you move around in the camera. By that point, I tried to make a skybox by simply making a 3D plane far back and very big (2.8.2), however, I found that there was a skybox material you could create and apply (2.8.3)! I also didn’t like how the map looked with a perspective camera, so going with my initial plan from my mood boards, I set the camera to Orthographic mode and adjusted the map position from there (2.8.4)!
2.9 Map Panning & Zoom | Scripting
So to do simple stuff in Unity, it turned out that a lot more script had to be done. I’d like to note that it was a lot harder to figure out how to zoom in and out with an orthographic camera, as moving forward and backwards doesn’t change anything. So after a lot more hours researching Unity’s Documentation on scripts, I become more aware of new variables that can be used to create a pan and zoom script (2.9.1)! Turns out that you can alter the scaler of the orthographic camera to essentially zoom in and out, so the script is set that when your fingers pinch, the camera scales up or down.
Public variables were quite useful as they allowed me to edit them without having to open and save the script each time (2.9.2)! I was able to adjust the zoom & out, whilst experimenting with rotation (set as a tick box), but thought it was better to be left out as it could complicate some things (2.9.3).
And a quick note that I changed the green material and adjusted the rotation of the map for a better view.
3.0 Bottle Counter | Scripting Activity #1
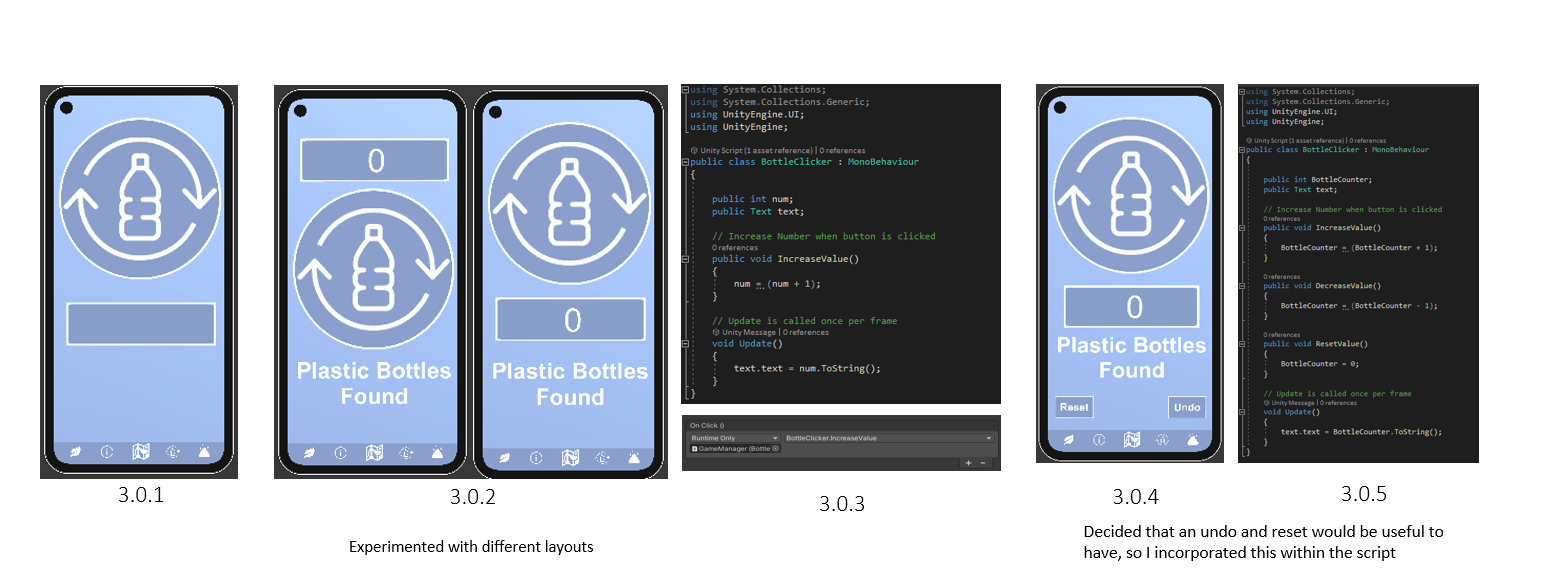
To begin the bottle counter, I first created a button, UI>button, retextured it and created a simple box container by UI>Image (3.0.1). Next was to add some text, UI > Text. I first created the number count text and positioned it in front of the box container, and followed up with a normal text “Plastic Bottles Found”. I also had a quick look at different layouts (3.0.2), however, I stuck with the original as it seems to fit the eye more.
Next was more good old scripting (yes scripting drove me mad, but I’m happy I was able to learn and adapt)! I created a small script that increases the number by +1 each time it was pressed (3.0.3). To attach the script to the text, I created and attached the script to an empty “GameManager”, and attached the GameManager to the button “On Click ()” action. The UI number text was linked within the code, so in the end it all syncs up!
Finally, I found that there was no way to remove the numbers, so I added them to the existing script to reduce and reset the value (3.0.4) (3.0.5)! It was good to use once scrip as I can attach it to all buttons and simply change what part of the script to use (3.0.3)! In the end, this was the final result (3.0.6)!
3.1 Saving Data | Scripting
I later realised that I needed to make it that the user’s score is saved, so I jumped back into scripting! My initial plan of saving data was to make add a system clock, resetting the score after 24 hours. However, after thinking about it, the user may want to see how many bottles they’ve found after it’s been a few days since their last park visit. Instead, it would write to a file, save it, and load the file back up when you return to the scene (3.1.1). With the script done, this is how it looks (3.1.2). And yes again, this took me many hours to figure out, as each aspect of this app had new things that needed to be made.
3.2 Cloning Scene | Scripting Activity #2
To make the next activity, I cloned the bottle counter scene, retextured the button and changed the text! I also copied over the script and changed the variables to link it with the number text! Dog litter was later changed as I felt that this wasn’t “the fun experience” you’d want your child to look out for when on a walk.
3.3 New Activity Designs
Designed by Keira Geary
As I was developing the 2 activities, I gathered that it should at least look nice when passing it over to the client. Due to the 2 designers we had at the start of our project not being able to continue with the project, we outsourced a first-year designer Keira Geary
[link to her workflow can be found here]. The team consisted of 1 3D Environment Artist (me), and one 3D Visualization (Ervins Puksts), and neither of us had the designer’s eye
Keira redesigned everything to a more natural/eco-friendly look (3.3.1), which definitely suited the app more! The design was done via Illustrator, so after receiving the file I began to break it down. I first removed all text (3.3.2) as the text would be later added within Unity. I then separated the background from the icons (3.3.3) (3.3.4), saving them individually as PNGs.
Within Unity, I retextured the icons, saving time than having to re-add everything (3.3.6). For the “See More..>” I added a button component, created an “open URL” script with a public variable (not having to edit the file directly every time), and attached it to the button “On Click ()” (3.3.7). I also made a quick adjustment to the main menu colour, matching the River Hamble dark blue colour from my previous research.
3.4 Map Zoom Development | Scripting
I will say now that although this script looks simple enough, this aspect of the project took me the longest by far. The orthographic camera was quite hard to work with, as you couldn’t simply zoom in to a point every time. After 20+ hours of research (I’m not joking), I’ve found a solution that seemed to work! I created a Unity 3D sphere and positioned it within the prefab FBX icon model, and attached the script to the object. Within the script (3.4.1), I prototyped the click & zoom function, scaling the orthographic camera to zoom in within a certain position, and having a 3D plane appear (3.4.2). To hide the plane as you load up the app, I made a mini script that essentially scales the 3D plane to 0 on all axis, to which the main script scales it to the correct position (3.4.1).
With the script ready, I applied an image texture on the 3D planes and attached the same “Open URL” script to the plane. This whole process was repeated across all location markers and 3d planes, and this is the result (3.4.4)!
3.5 Informative Scroll | New Scene + Scripting
Due to time constraints, I was able to create one more final feature within the app, the Informative Scroll section. I thought this would be a nice feature, as users could quickly check the app for either dog walking or general trails, whilst making the donations more known. This would be followed by general information about opening times and park parking, whilst also including a map of the parks’ locations!
Using a previously used background, I laid out the contents of what is shown in what order (3.5.1). Moving into Unity, I imported the images and transformed them into 2D Sprites (3.5.2). Next, I created a Panel (UI > Create) and renamed it “ScrollPanel”. Next, I created a container to hold all the imported images, parenting them to the container, and parenting the container to the ScrollPanel (3.5.3). I then recreated the order within Unity (3.5.4), having them placed on a UI Image. Within the ScrollPanel, I added a “Scroll Rect” component, creating the scrolling function (3.5.5). I Changed the movement type to “unrestricted”, scroll sensitivity to 1, and ticked only vertical mode (3.5.5). To make sure there wasn’t a visible long row of images, and overlapping the menu, I added a mask component, only displaying within the container (3.5.6). Similarly, as I did before, I gave the UI image a button component and applied the Open URL script (3.5.7), opening various links when tapped (3.5.8). This is the result (3.5.9)!
3.6 Final Outcome
Trailer By Ervins Puksts
3.7 Time Management & Conclusion
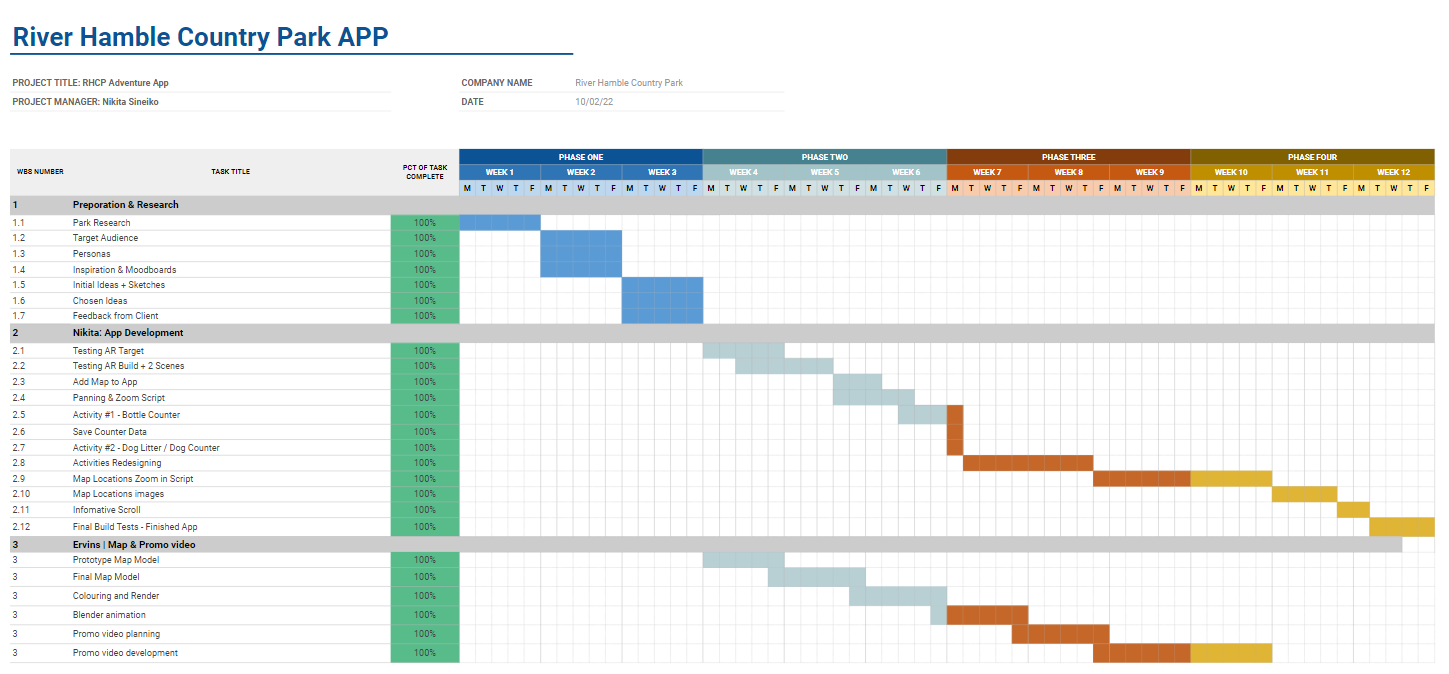
This is an excel Time Sheet displayed by weeks, from the starting weeks of our project to the very last. As a team of 2, we had a teams call once, sometimes twice every 1 to 2 weeks. This was mainly due to us knowing what we need to do, so when we did a team call or meet up at University, we went through various updates and checked if we were on track. Group Planning and research took longer than expected due to the implications of 2 previous team members not being active or communicating with the rest of the team, resulting in having only 2 people left in total. This meant we could no longer wait for their responses and proceeded with our own actions and ideas.
The general progress of the project afterwards went smoothly, having to learn a whole new engine, communicate any issues, and brainstorm together on various ideas! I will say that this project held a learning curve, as before I started this project, I did not know half the stuff that I’d develop, so I’m quite impressed with myself! I’m also quite thrilled that we got a decent prototype of the app working! Of course, not all features were implemented due to other aspects requiring a more in depth learning curve, but I’m still happy with the result!

3.8 Hand Over Document