Hilda Project | UE5 Environment
Personal Brief
Design and develop a still-rendered stylized environment in Unreal Engine 5.
Goal
Create a stylized environment in reference to a Netflix show Hilda, recreating an existing scene into a 3D still render.
Role in Project
Lead 3D Environment Artist
Softwares
 Unreal Engine 5.1
![]() Substance Painter
Substance Painter
![]() Blender 3.4
Blender 3.4
Scene Set Up
1.0 Introduction to Project
1.1 Inspiration MoodBoard
1.2 House Model
1.3 Wind Turbine Model
1.4 UE5 Setup
1.5 Updating Models
Grass & Mountains
1.6 Grass Inspiration & MoodBoard
1.7 Landscape Colouring
1.8 Wind Noise Texture
1.9 RVT Grass
2.0 Grass Painting
2.1 Grass Normals
2.2 Wind Noise & Colour
2.3 Current Scene Result
2.4 Landscape Size | Painting the Path
2.5 Backgroung Mountains
2.6 Background Mountains
Cel Shading
2.7 Post Processing Cel-Shading
2.8 Post Processing Outlines
2.9 360 Preview
3.0 Current Progress | Cel Shading & Wind
3.1 Extra Outline Material
3D Enhancements
3.2 House Textures
3.3 Wind Turbine Animation
3.4 Camera Movement Preview
3.5 Skybox & Fog
3.6 Trees
3.7 3D Walls
3.8 3D Roof Tiles
3.9 2D vs 3D | Before & After
Substance Foilage
4.0 Darkness Factor Adjustment
4.1 Camera Preview
4.2 Modelling Logs
4.3 Baking Mesh Maps
4.4 Baking Process
4.5 Log Painting
4.6 Applying Normal Maps
4.7 Scene Preview
4.8 Stylized Rocks
4.9 Flowers
5.0 Scene Preview
Animations
5.1 Wind Particles
5.3 Day & Night Cycle | Sequencer
5.2 Day & Night Cycle
5.3 Final Outcome
1.0 Introduction to Project | Still Render
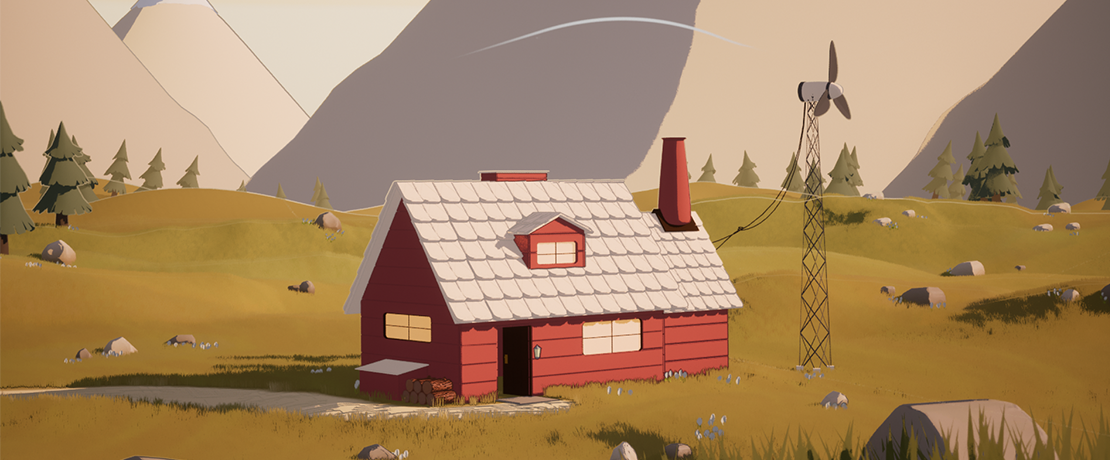
For my personal project of my final year, I decided to create a stylized environment within Unreal Engine 5. This was something I’ve always been meaning to do, having loved the stylized art style for years, I finally got the chance to learn and create this passion project! The environment is based on a Netflix Series known as Hilda, a fearless blue-haired girl, who travels the wilderness full of elves and giants with new friends and mysterious creatures. This scene is from episode one, the house where Hilda lives, within the forests and mountains.
Due to the art style of the show, a stylized art direction was necessary for this environment, making sure the still render resembled the existing scene, whilst showing off its 3D aspects. It was definitely a challenge figuring out new software, such as UE5 & Substance Painter, and working in a stylized art style properly for the first time. From making custom materials, lighting, skybox, and animating in 24 frames per second, it was really a fun project to work on, seeing the still render come to life!
1.1 Inspiration MoodBoard
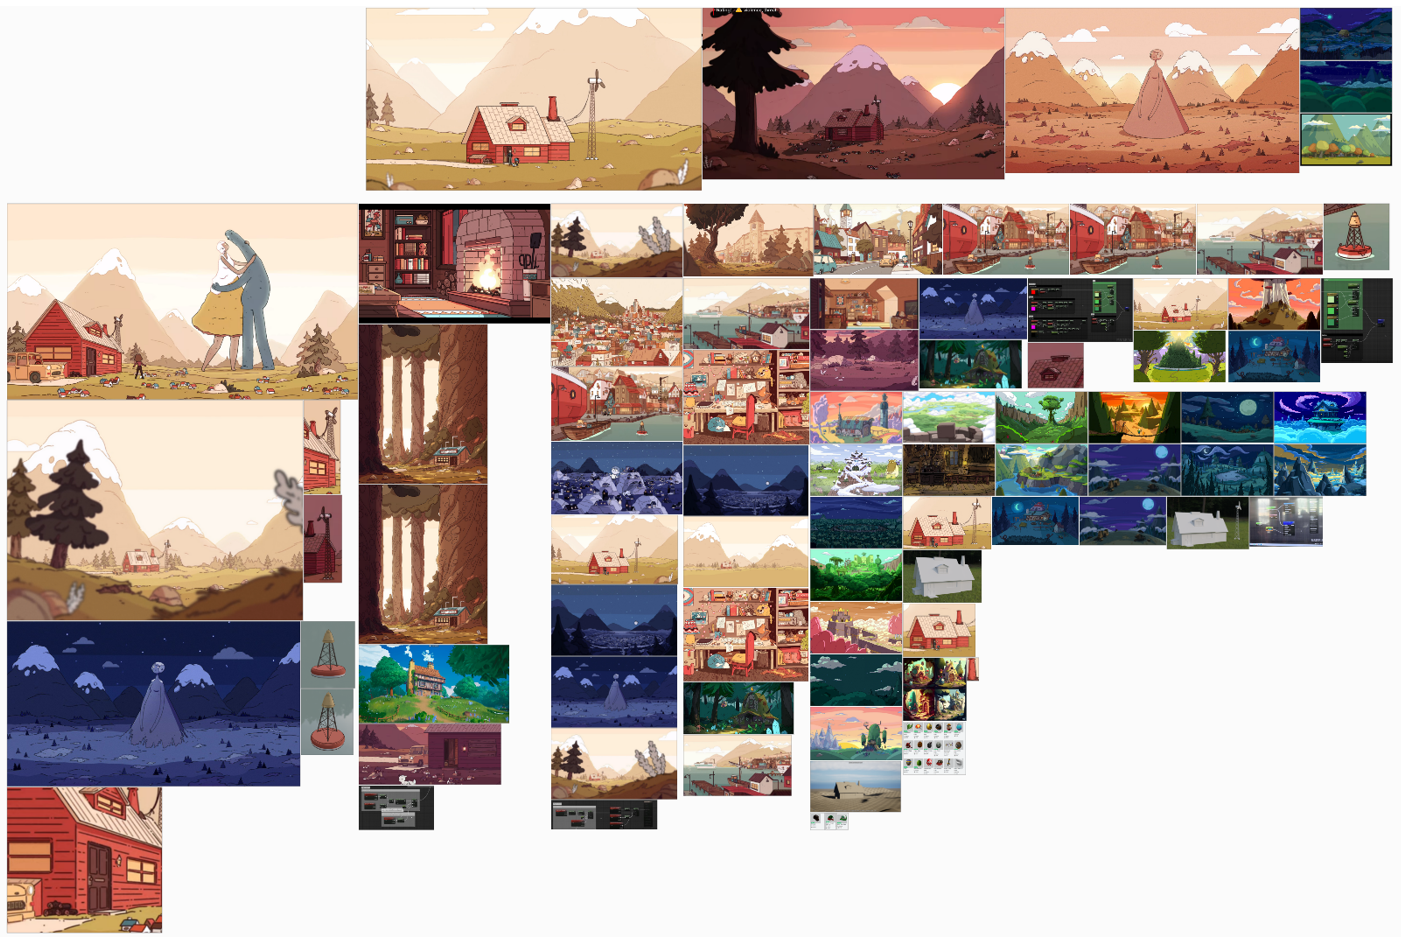
When thinking about what I wanted to do for my final project, I knew that a stylized environment had the be the outcome. My initial plans started with a cartoon series known as Adventure Time, popular for its adventurous, overexaggerated, yet surreal world. However, after further research, and some suggestions from various colleagues, I found that Hilda was a great match for what I wanted to do.
Hilda had the balance I needed at the time, an interesting environment that utilises various skills and techniques to accomplish, whilst not being too complicated and overwhelming. Looking at the mood board, it’s clear how my interest developed throughout the research, showing my major interests through larger images.
1.2 House Model
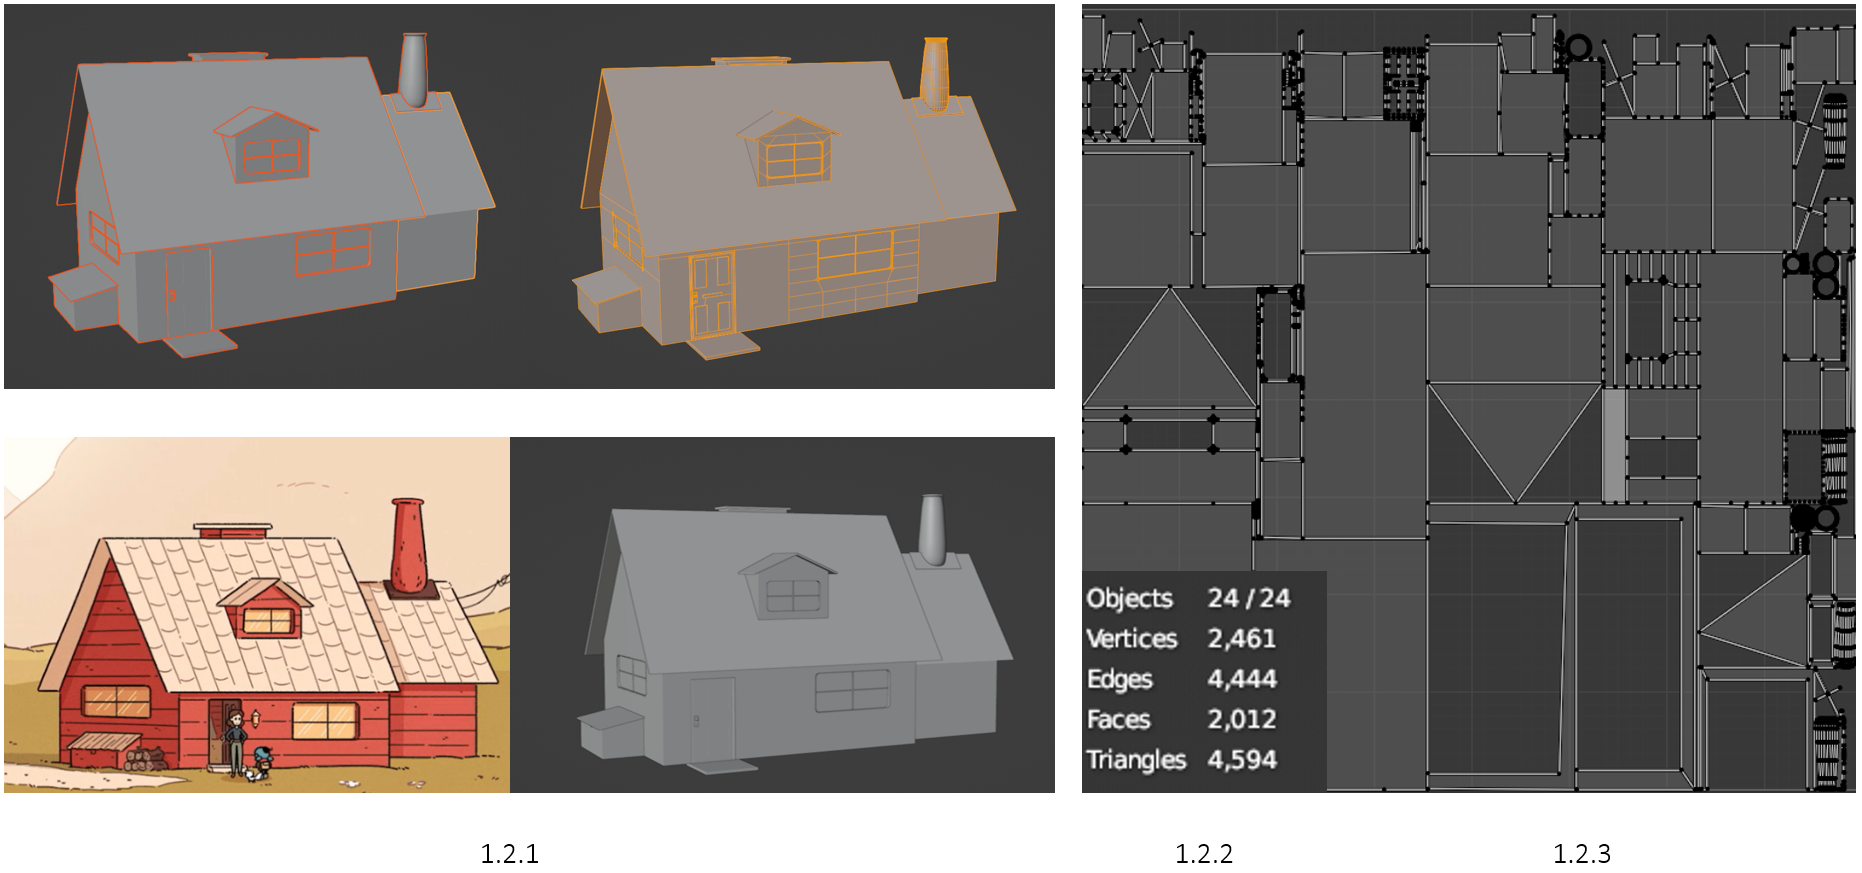
I started by aligning the reference image with the camera, allowing me to make the initial walls (1.2.1). The outcome of the house resulted in 24 separate objects and a total poly count of 2000 (1.2.2). Initially, I connected all objects together and UV unwrapped them as one (1.2.3), however, this was later changed to better align textures.
1.3 Wind Turbine Model
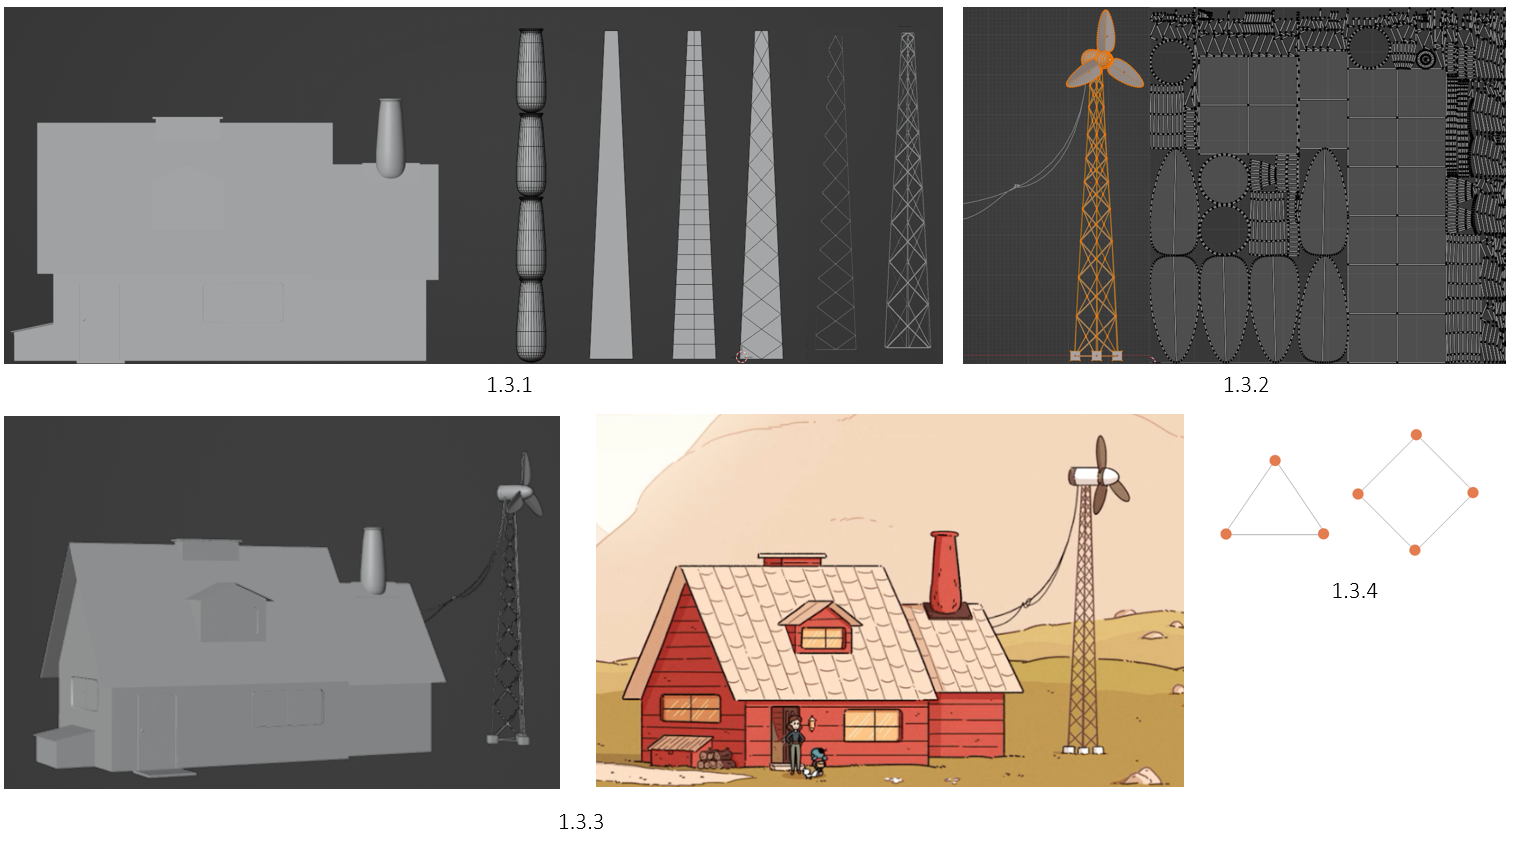
I measured the wind turbine via chimneys from the reference image and later the same in 3D (1.3.1). With a general size found, I started by creating a rectangular plane, loop cut 21 times (same as reference), subdivide and wireframe modifier (1.3.1). I UV unwrapped it to give it different materials, however, later making all objects separate (1.3.2).
I aligned the wind turbine as per the reference image (1.3.3) and created the wires using a curve>convert to mesh. I had to question if the turbine had 3 stumps or 4 (1.3.4), but after looking back at my reference images, I found it was 3 stumps.
1.4 UE5 Setup
With the house & wind turbine models finished, I figured it was best to have each object separate and unwrapped individually (1.4.1). Opening UE5.1, I created a flat world and sculpted a starter landscape (1.4.2). It was super helpful to use PureRef, a mood board program, as it allowed me to overlap the camera and adjust the opacity. This made it much easier to align various objects, getting closers to the reference image (1.4.2) (1.4.3).
1.5 Updating Models
Since able to see an accurate alignment between the reference image and the 3D environment, I noticed some objects in the house were the wrong size and position. After making the adjustments, I reimported the models back into UE5, right-click the object, and “replace selected actor”.

1.6 Grass Inspiration & MoodBoard
I knew the first step was to make the grass, so I started by looking at some references on how I wanted the final result to be. When looking at my reference image (1.6.1), I knew the grass had to have no shadows and blend in. I found some interesting methods and references (1.6.2), and began the development.
1.7 Landscape Colouring
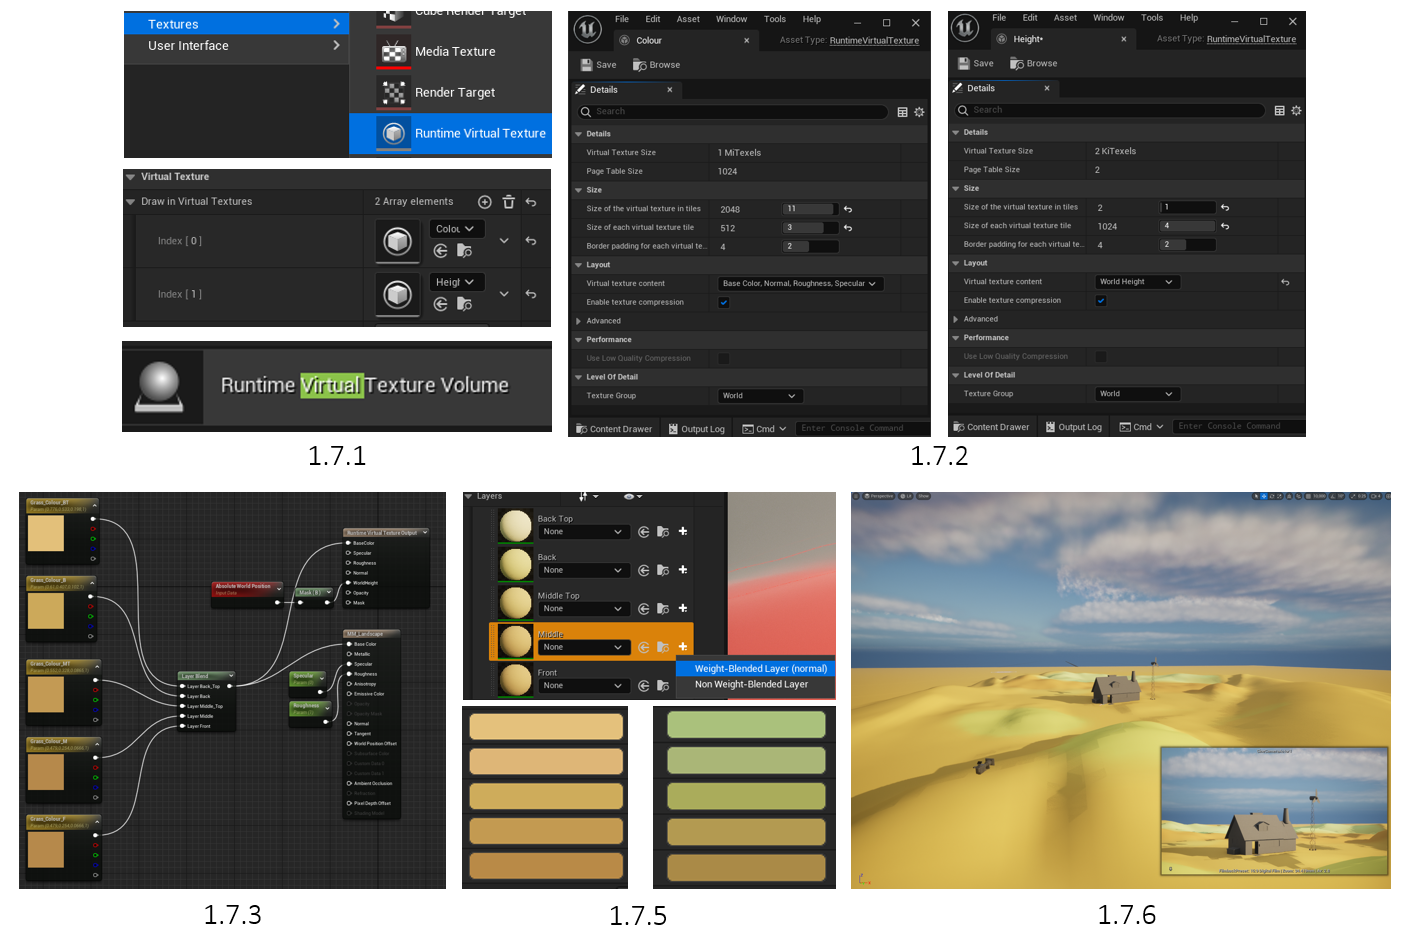
The first step was to create a landscape virtual texture material in order to blend colours. I started by creating two Virtual Textures, colour & height (1.7.1). Virtual Texturing was used because it reduces texture memory overhead when using larger texture sizes, primarily needed for the landscape.
Runtime Virtual Texture Volume goes into the world (colour & height) (1.7.1). Each RVT tile size was adjusted, and changing the RVT content for colour and world height (1.7.2). These were then placed into the world to take effect. With the RVT set-up, I made a master landscape material and created a colouring network (1.7.3). What the network is doing is blending each colour, and outputting to the base colour of the landscape material and RVT. This is followed by the Absolute World Position, which outputs the absolute world position of a pixel on a mesh in the scene. The mask (set to blue) would be important later, masking the colour of the noise texture. This is finalised with specular and roughness parameters, allowing me to edit them dynamically.
Opening the painting tool in landscape editing, I’ve added 5 parameters, which would be the 5 colours (1.7.5). Each colour had its blend weight set, allowing me to set the default colour for the whole landscape, and paint others on top (1.7.6). I found later that I needed to change the colour palette (1.7.5), however, I did this several times throughout the project.
1.8 Wind Noise Texture
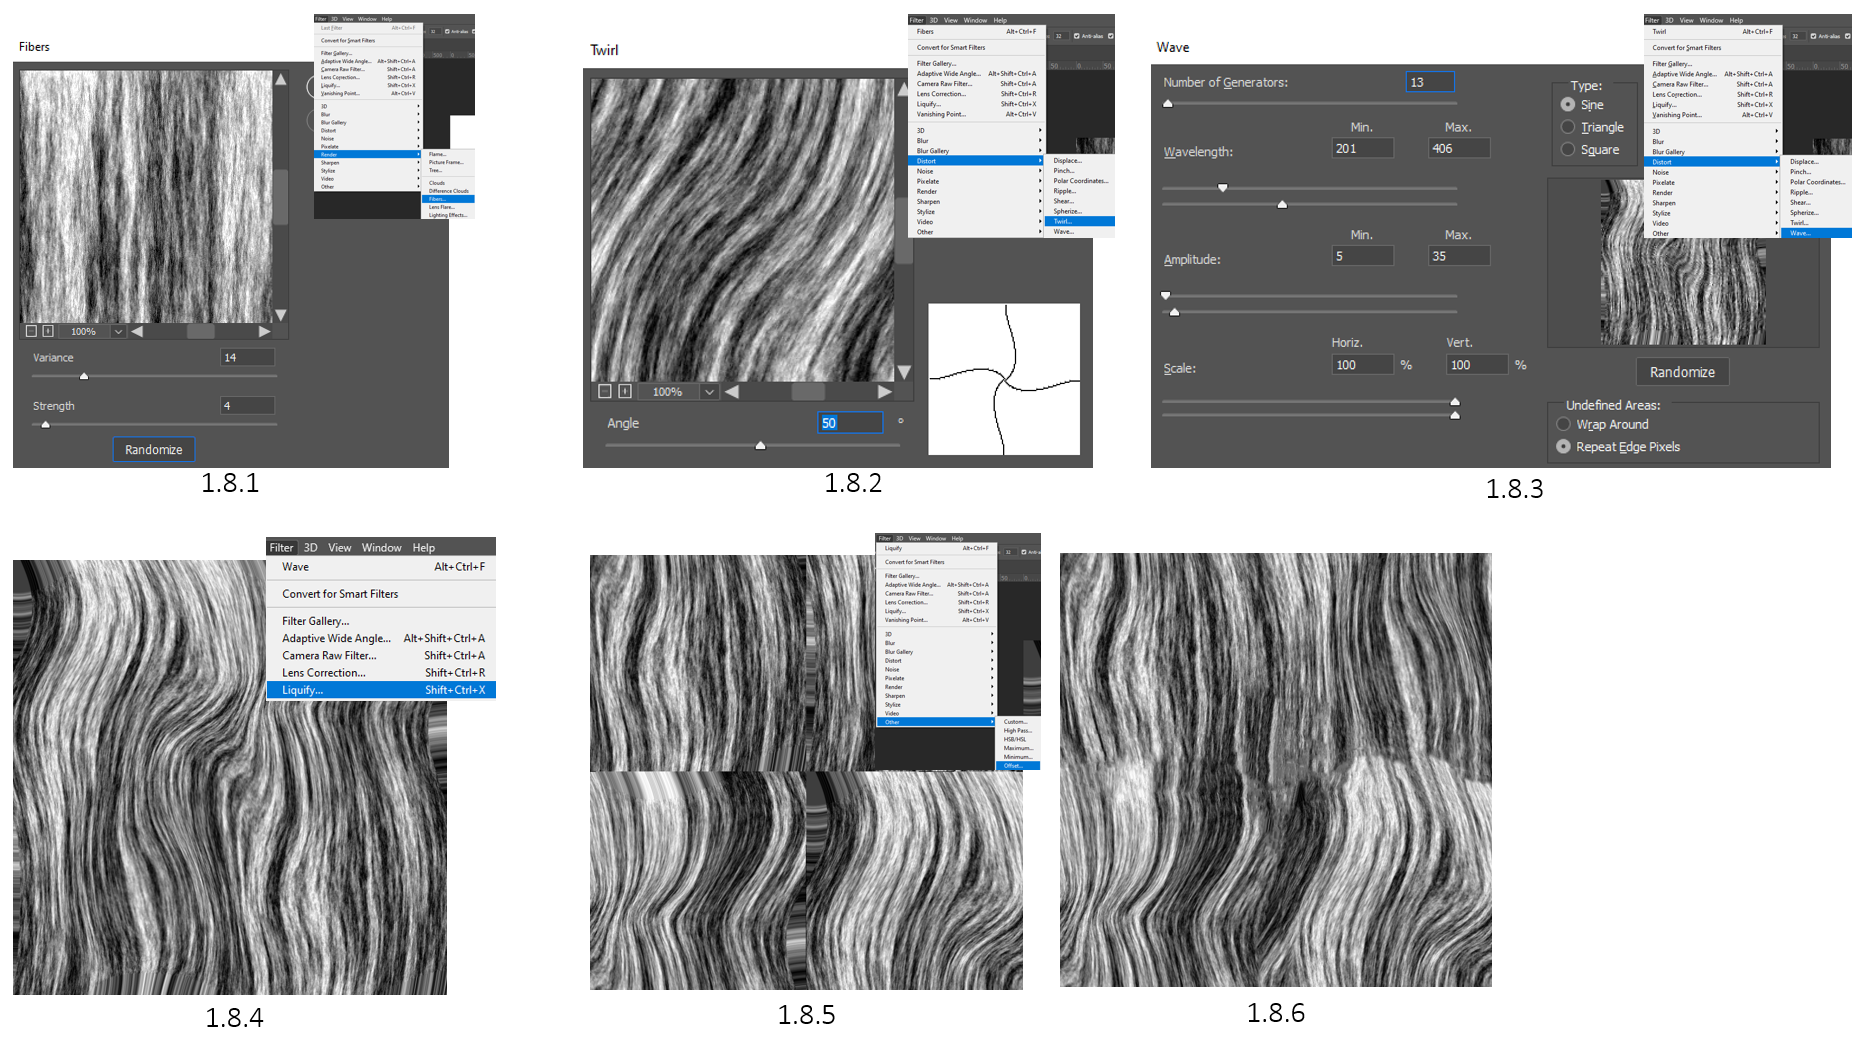
I knew from my research I wanted to make the grass move, but to have a natural feel, not just all moving left and right. One of the best ways I found was to make your own noise texture and to do this, I used Photoshop.
I made a Fibre Texture (1.8.1), applied a twirl effect (1.8.2), and adjusted a Wave effect (1.8.3). To give it a more wave effect, I applied a liquify filter (1.8.4). Finally, to create more variations without doing the same process, I applied an offset filter to create tiles of 512 x 512, since the overall texture will be 1k (1.8.5). I used the healing tool to the cut look slightly more natural (1.8.6).
1.9 RVT Grass
The making of the grass model was the easy part, using a character reference on the size, I extruded and loop-cut a few planes and placed them in randomised positions (1.9.1)
It was now time to make the RVT material for the grass (1.9.2). The blue area controls the colour of the noise, set to a parameter to allow live changes, and going into a lerp to blend the two values. The green area calculates the absolute world position of the wind (noise texture), having parameters of how thick the lines are, and how fast they’re going. The orange area links back to 1.7, masking the colour blue, limiting the area of effect inside of a material, in this case, the mask was set to blue. This is being multiplied with a TwoSidedSign node, allowing the material to see the light on the backside of the objects, able to simulate thin translucent surfaces, in this case, the grass planes. Finally, the purple area is the wind effect itself, having various parameters on how the grass is affected by the wind speed, and intensity, going into the WorldPositionOffset output.
The result of this RVT material looks like this (1.9.3), (1.9.4), having the grass wave naturally from its pivot point, whilst alternating colour from the landscape colour and wind colour due to the noise texture.
2.0 Grass Painting | Pivot Issue
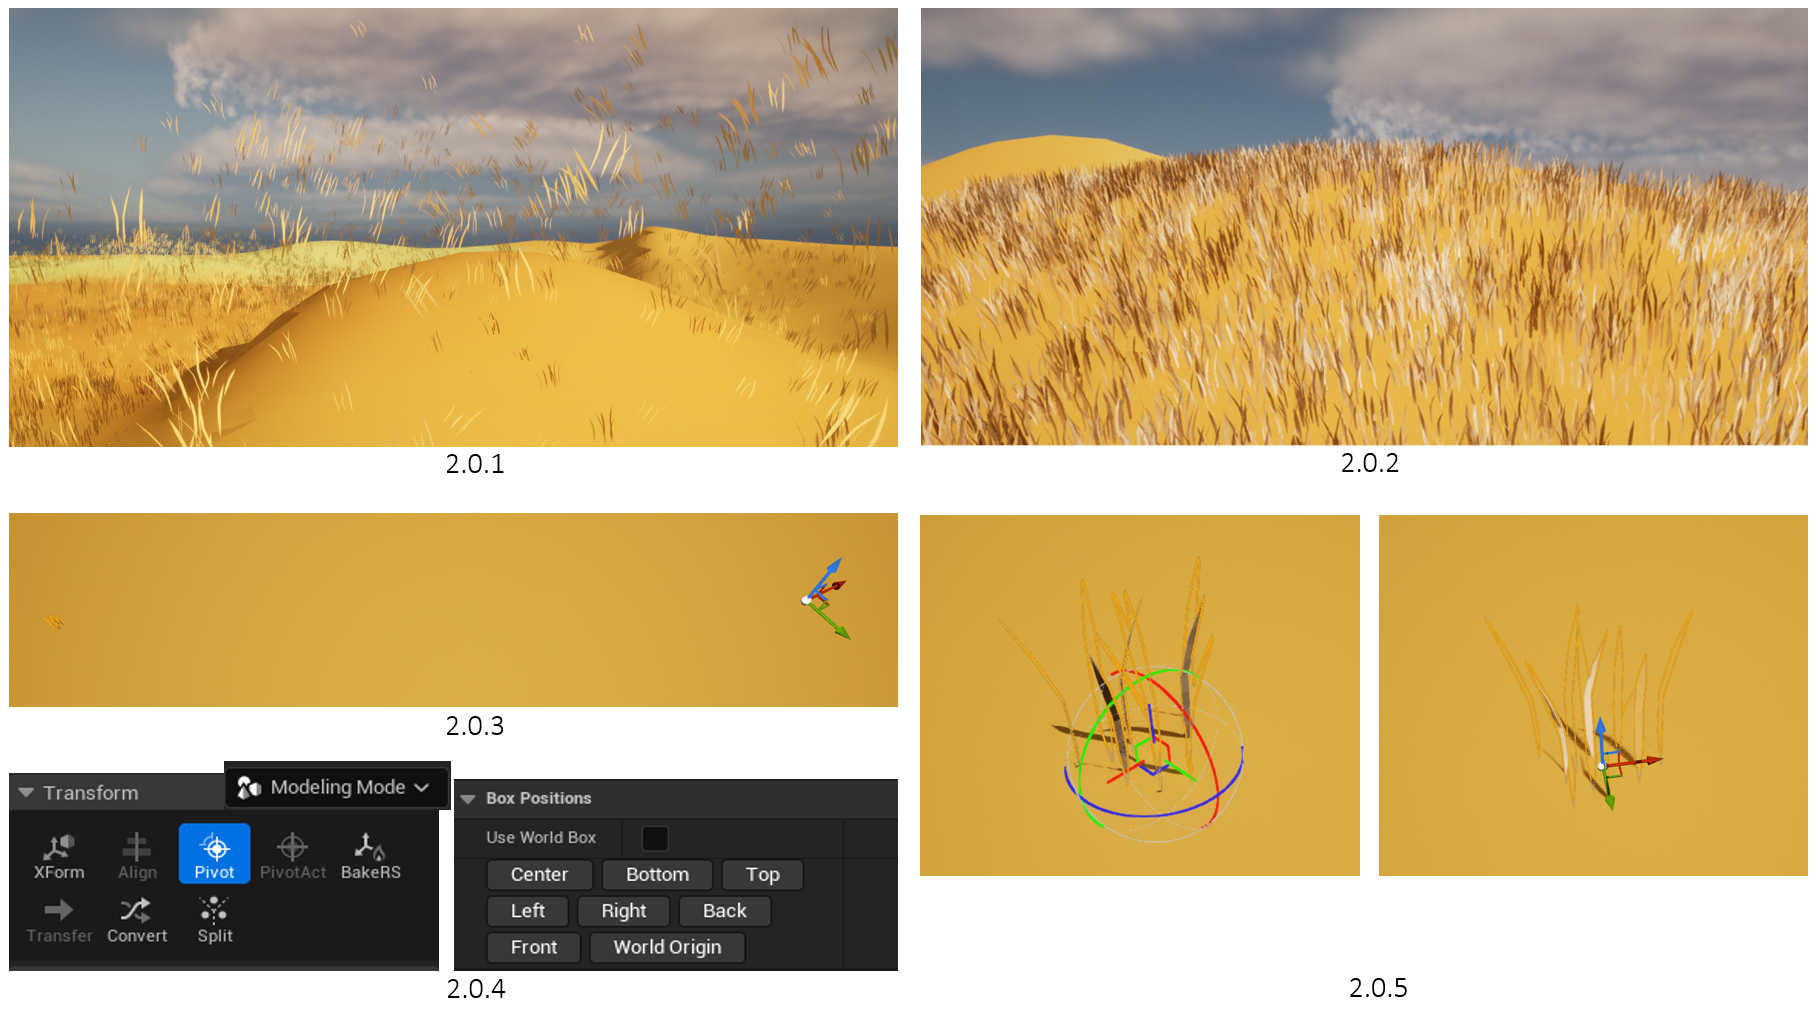
With the grass set up, I added the model to the foliage painter and began painting. However, there were some issues, one of which the pivot point was not set up correctly (2.0.1). This was most likely due to the pivot being imported incorrectly from Blender (2.0.3). To fix this, I went into modelling mode>transform (2.0.4) and adjusted the pivot manually (2.0.5). However, there were a few other issues, the grass had shadows and not all faces could be seen due to each blade of grass being a plane that faced different directions (2.0.5) (2.0.2).
2.1 Grass Normals
With the pivot issue resolved, the grass still had that ugly look with the shadows and directional viewing issue (2.1.1). To resolve this, I went back into Blender and adjusted where the point normals to face up, since that’s how the camera will be looking at the grass (2.1.2). The outcome results in fixing the directional viewing, able to see each more of each grass blade (2.1.3). This in turn fixed how the scene looked (2.1.4), whilst making some adjusting on how shadows were catsed.
2.2 Wind Noise & Colour
This is primarily a showcase of how the colours blender (2.2.1) and how the wind noise texture takes effect (2.2.2).
2.3 Current Scene Result
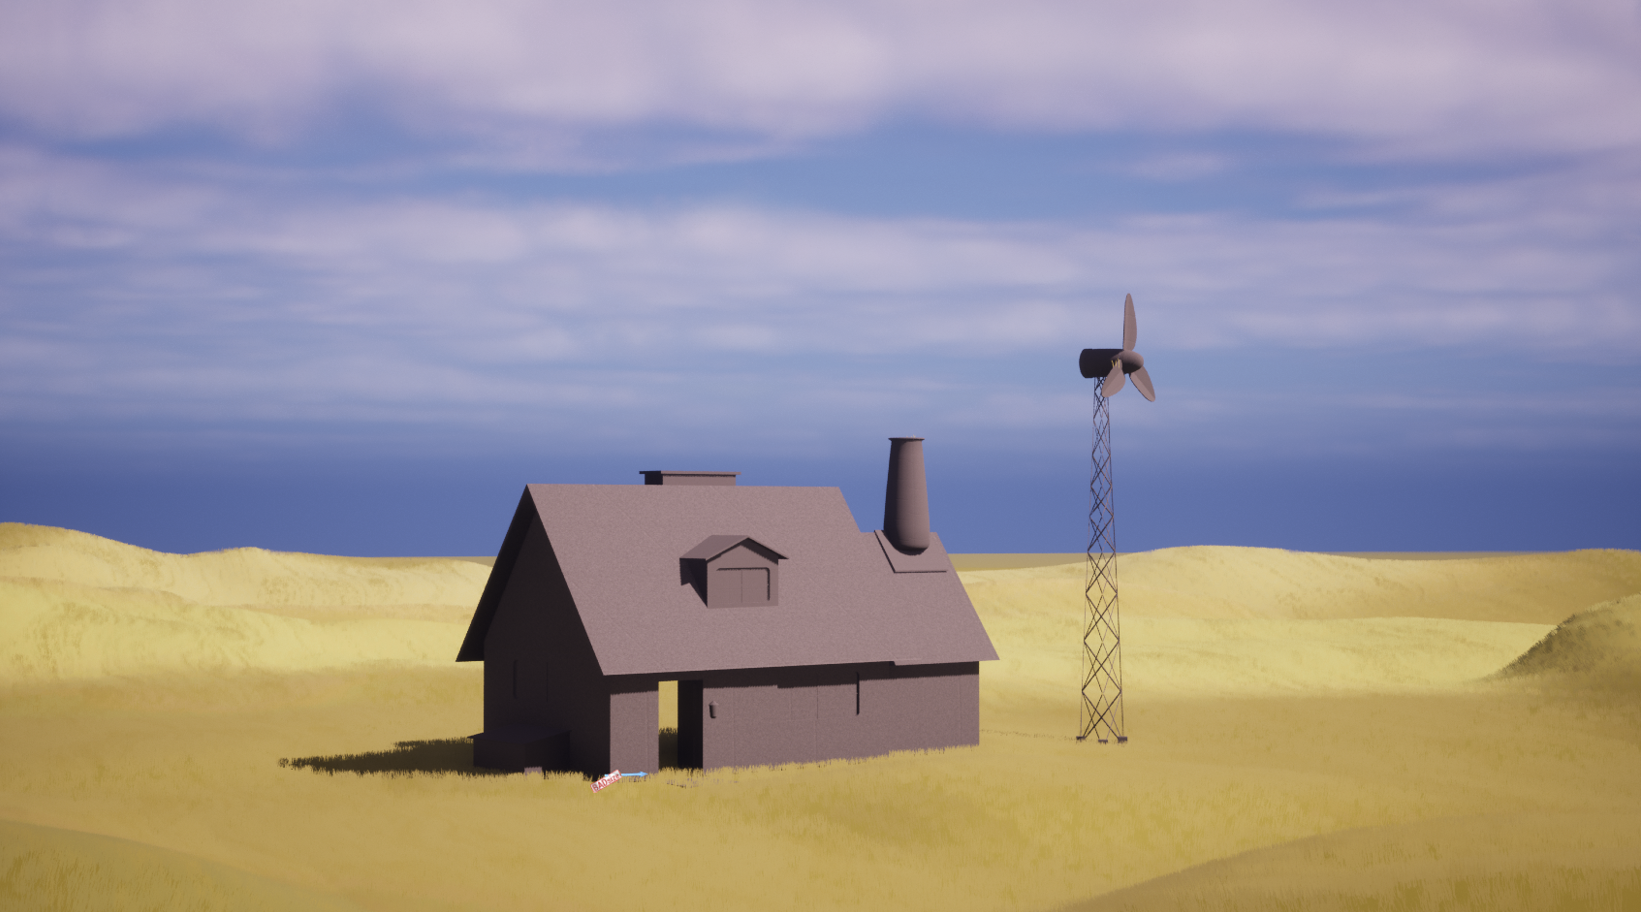
This is currently how the scene looks, the house and wind turbine are in position, and the landscape is terraformed.

2.4 Landscape Size | Painting the Path
I found later that when painting the path, the blending was very pixelated. The original section size was 63x63 Quads (2.4.1). I upped the Quads to 127x127 (2.4.2), but it wasn’t enough. I finally upped it to the max of 255x255 Quads (2.4.3), finally fixing the pixilation issue (2.4.4).
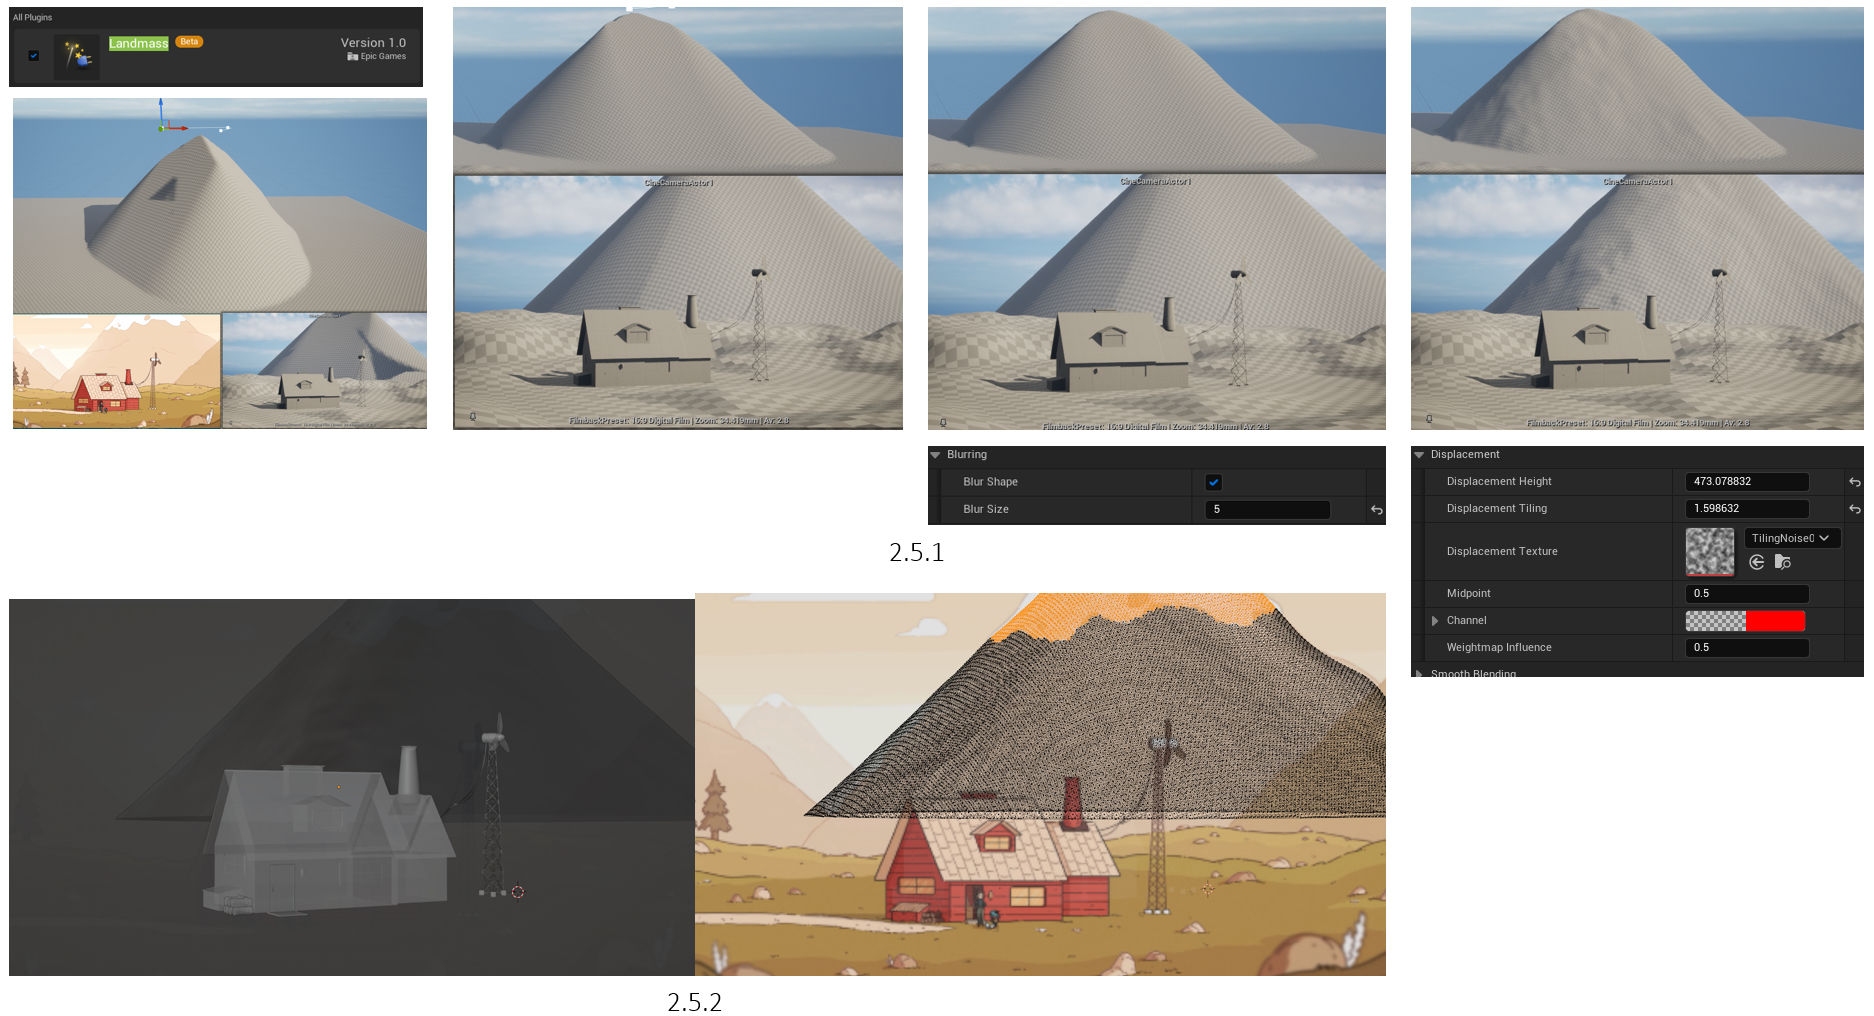
2.5 Backgroung Mountains | First Method
This was my initial plan in making the background mountains, using the landmass plugin within UE5 (2.5.1). This allowed me to procedurally extrude a mountain and shape it, whilst adding a noise texture to make it seem more natural. This also allowed me to export the mountain into Blender and align it for the camera, highlighting the faces of the snow, making it separate and accurate to the reference (2.5.2). However, I knew there had to be an easier way, as the poly count was too high, and could be better optimised.
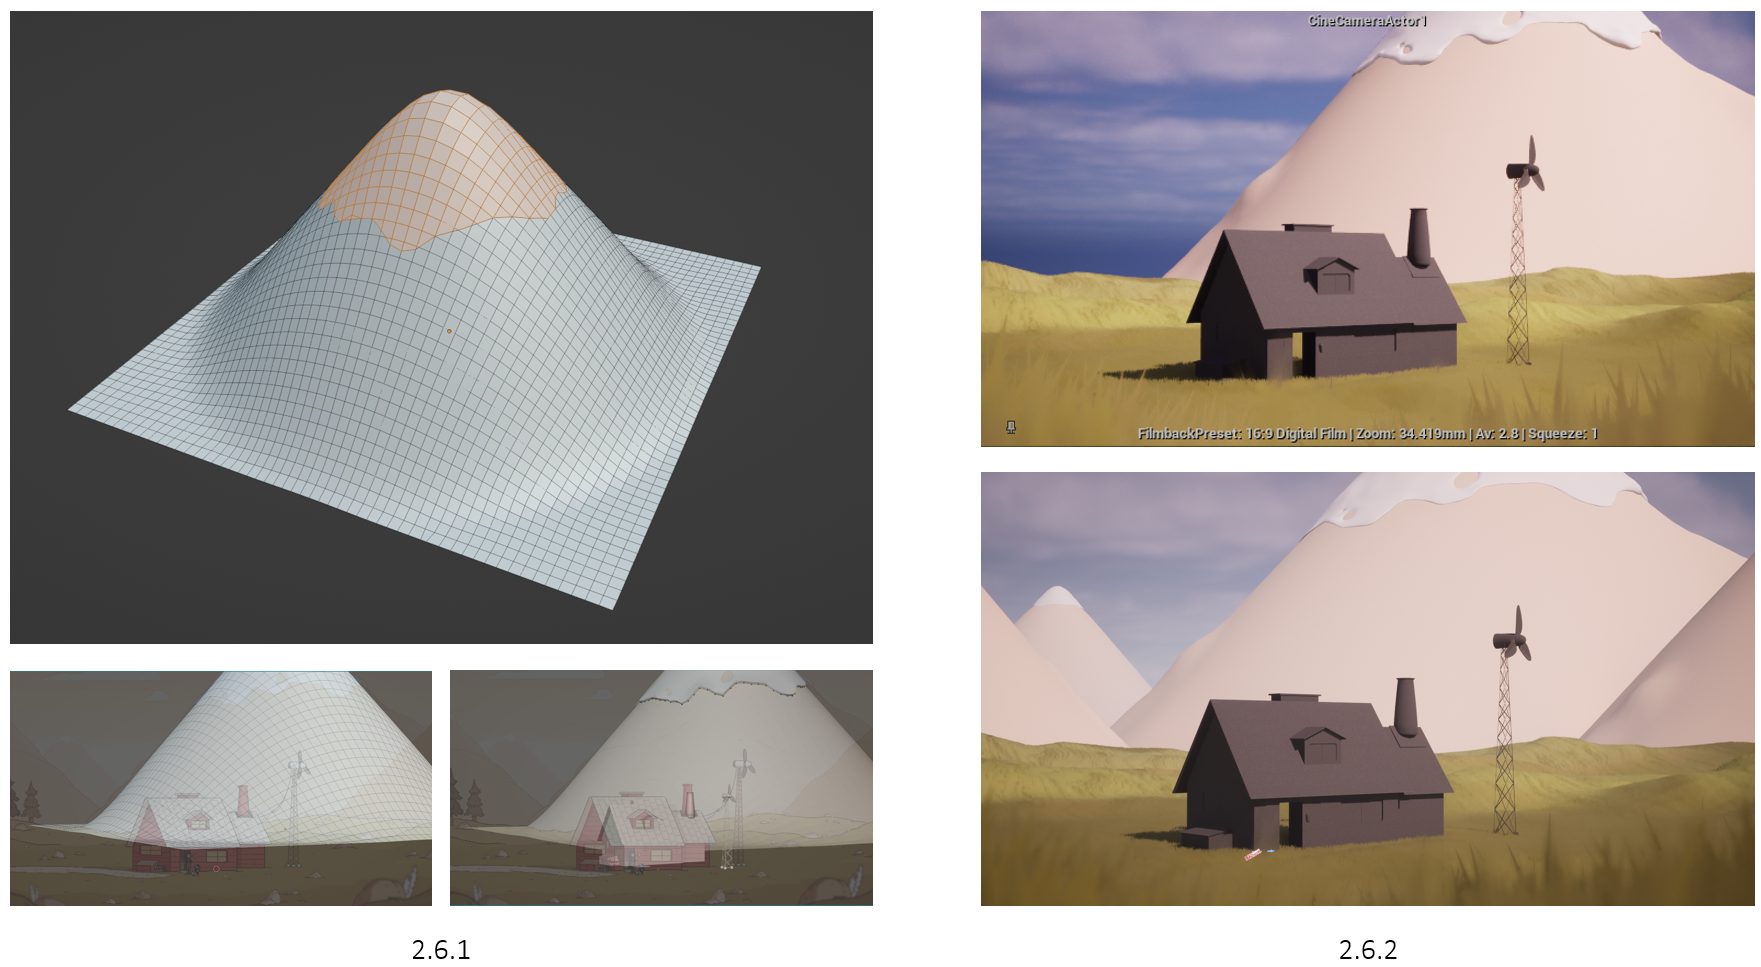
2.6 Background Mountains | New Method
This time around, I started in Blender and extruded a subdivided plane, and used the knife tool to cut the shape of the snow from the reference (2.6.1). Using the solidifying and smooth modifiers, the snow came out as intended. I imported this into UE5 (2.6.2) and turned off the ‘cast shadow’ to make it look more cartoon-like from a distance. Finally, I made some mountain variations and applied them as per the reference (2.6.2).
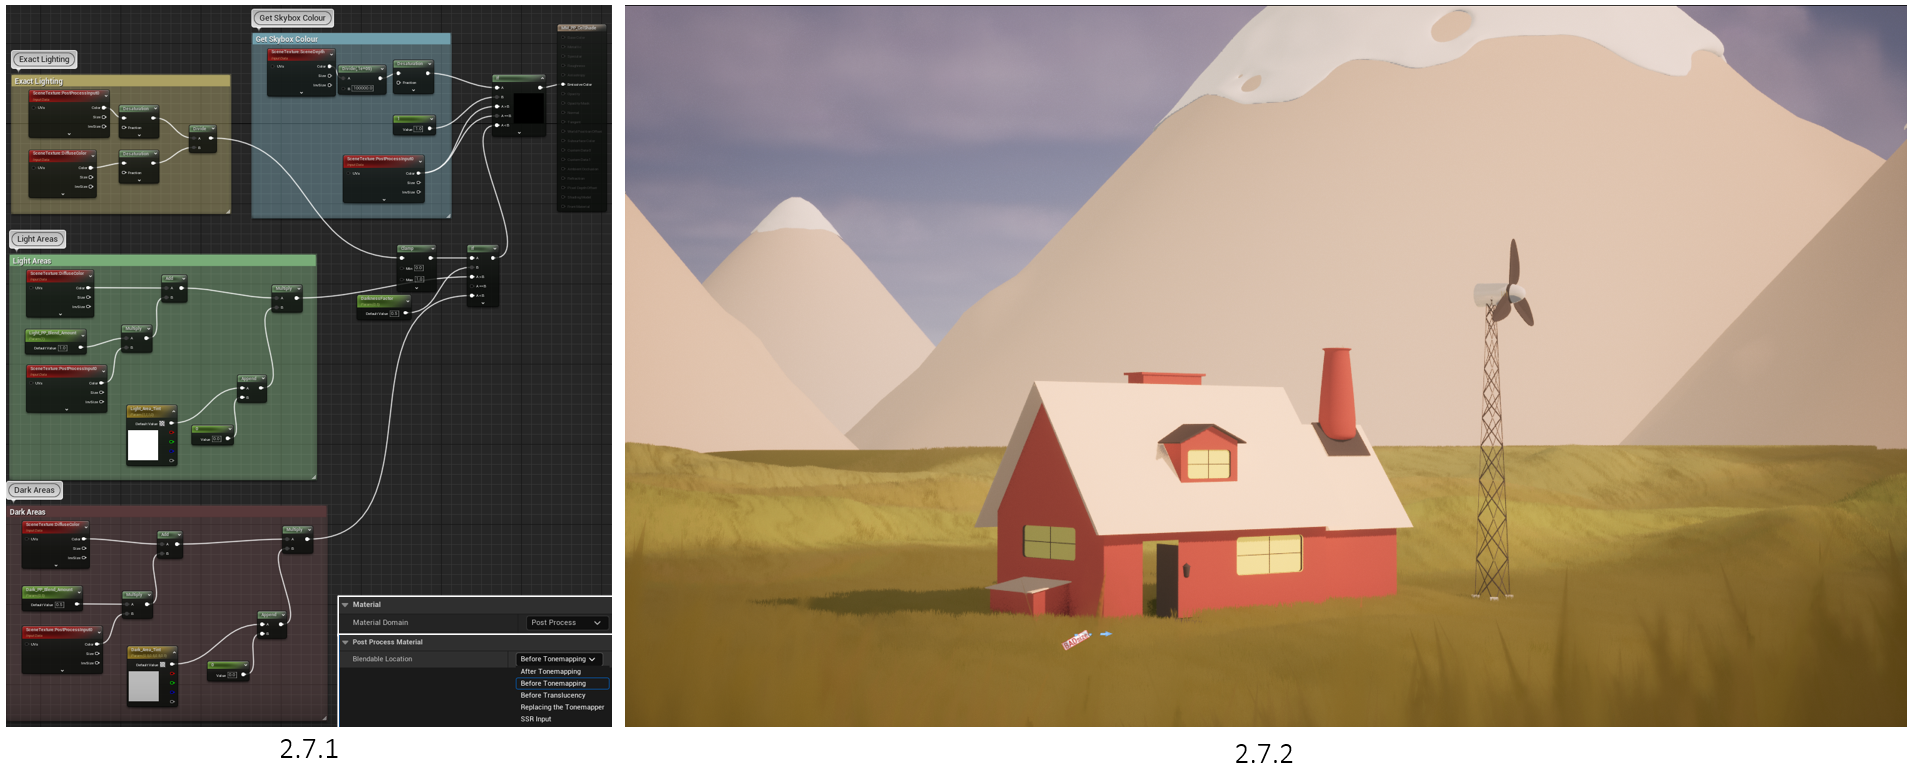
2.7 Post Processing Cel-Shading
The overall logic is the material extracts the desaturated lighting of the scene to get the black-and-white colour of the extracted lighting (0 to 1). The scene lighting can have any shade depending if the light is greater or less than 0.5. Then adding the original post process to the scene to get the light colours back. I then out-mask the skybox with scene depth and give it the original post-process effect. This also allows me to use custom depth to mask the objects you want to cel shade.
It’s important to note that this all goes into the emissive input, essentially making everything display light. This means I won’t be able to use UE5’s dynamic lighting properly since having night and day will cause the scene to go very bright, and very dark, not stylized at all. This is why later on I will show how I created a day & night cycle through post-processing alone.
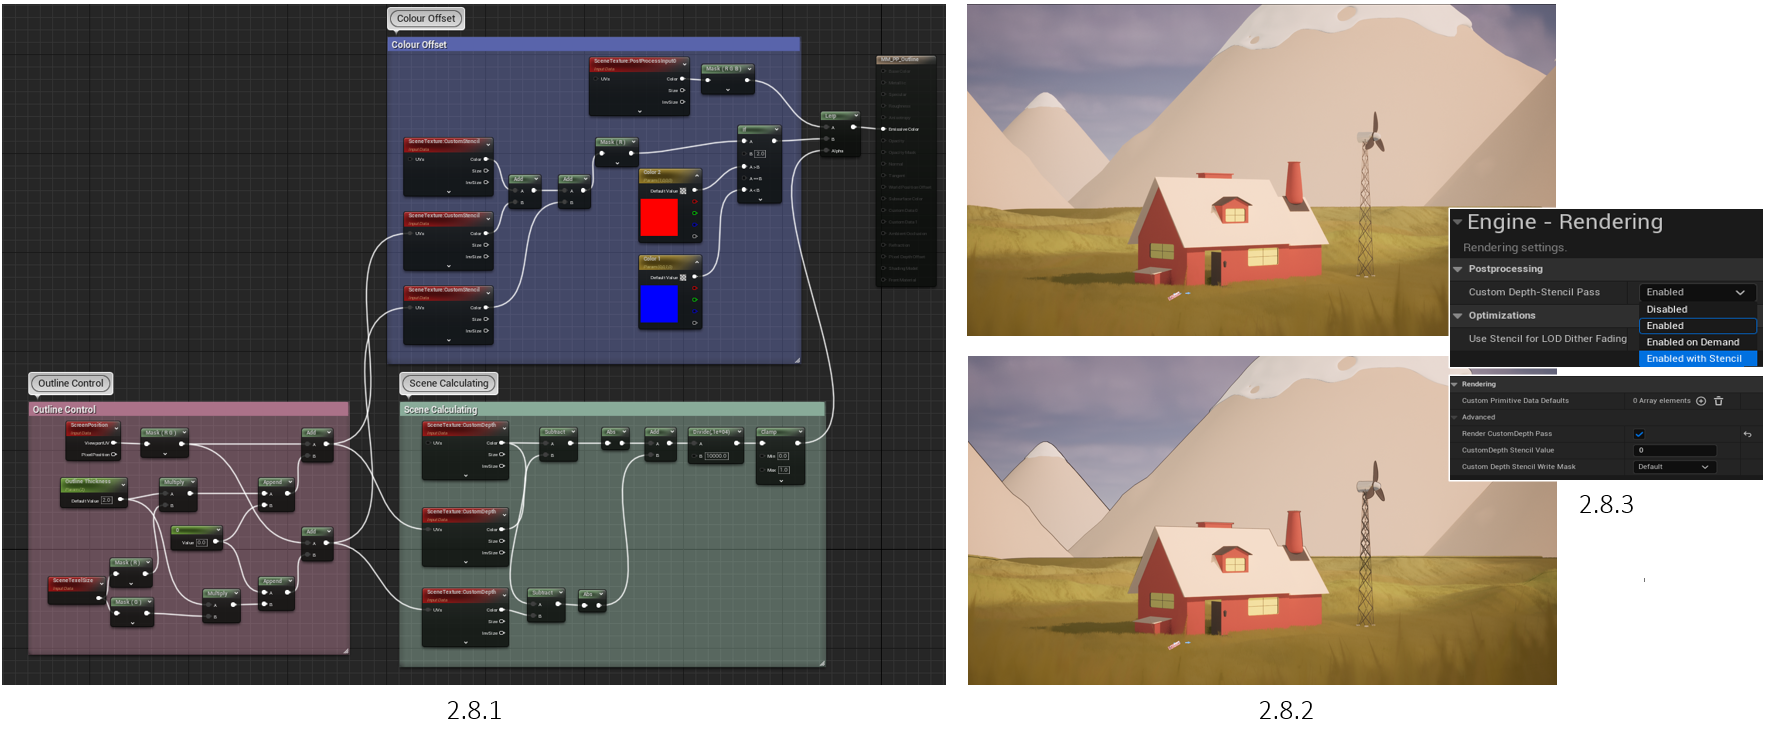
2.8 Post Processing Outlines
The node setup is separated into 3 different sections (2.8.1), outline control, scene calculating, and colour offset. The outline control is the math for the outline itself, whilst allowing me to adjust the thickness. The scene calculating is using the outline math to calculate how the outline should be displayed, where, and why, going into SceneTexture-CustomDepth to do this.
Finally, the colour offset is adding colour into the equation, using SceneTexture-CustomStencil to wrap the object with a stencil outline, followed by a component mask to get only the red and green channels to append a small value of the horizontal axis in order to create an offset for the outline. The colours are set to red and blue in order to see what object is affected, and if they display the correct outline intention.
The final outcome looks like this when compared before and after (2.8.2), giving the assets a more cartoon look. It was handy to have the clamp node, switching between 0 and 1 to set the colour with post-process input using the custom depth (2.8.3). It was
2.9 360 Preview
This is a quick 360 fly-round preview of how I’ve set up my environment, showing where all my assets are and how my work layout looked.
3.0 Current Progress | Cel Shading & Wind
At this point, I was happy with how things were progressing, having the key aspects implemented, such as cel-shading, outlines, and wind. Of course, I knew the wind on the grass wasn’t perfect, but due to the number of times I changed the colour of the landscape, my plan was to move forward with other aspects first. I also noted down that interior wall were needed since you were able to see through the inner walls.
3.1 Extra Outline Material
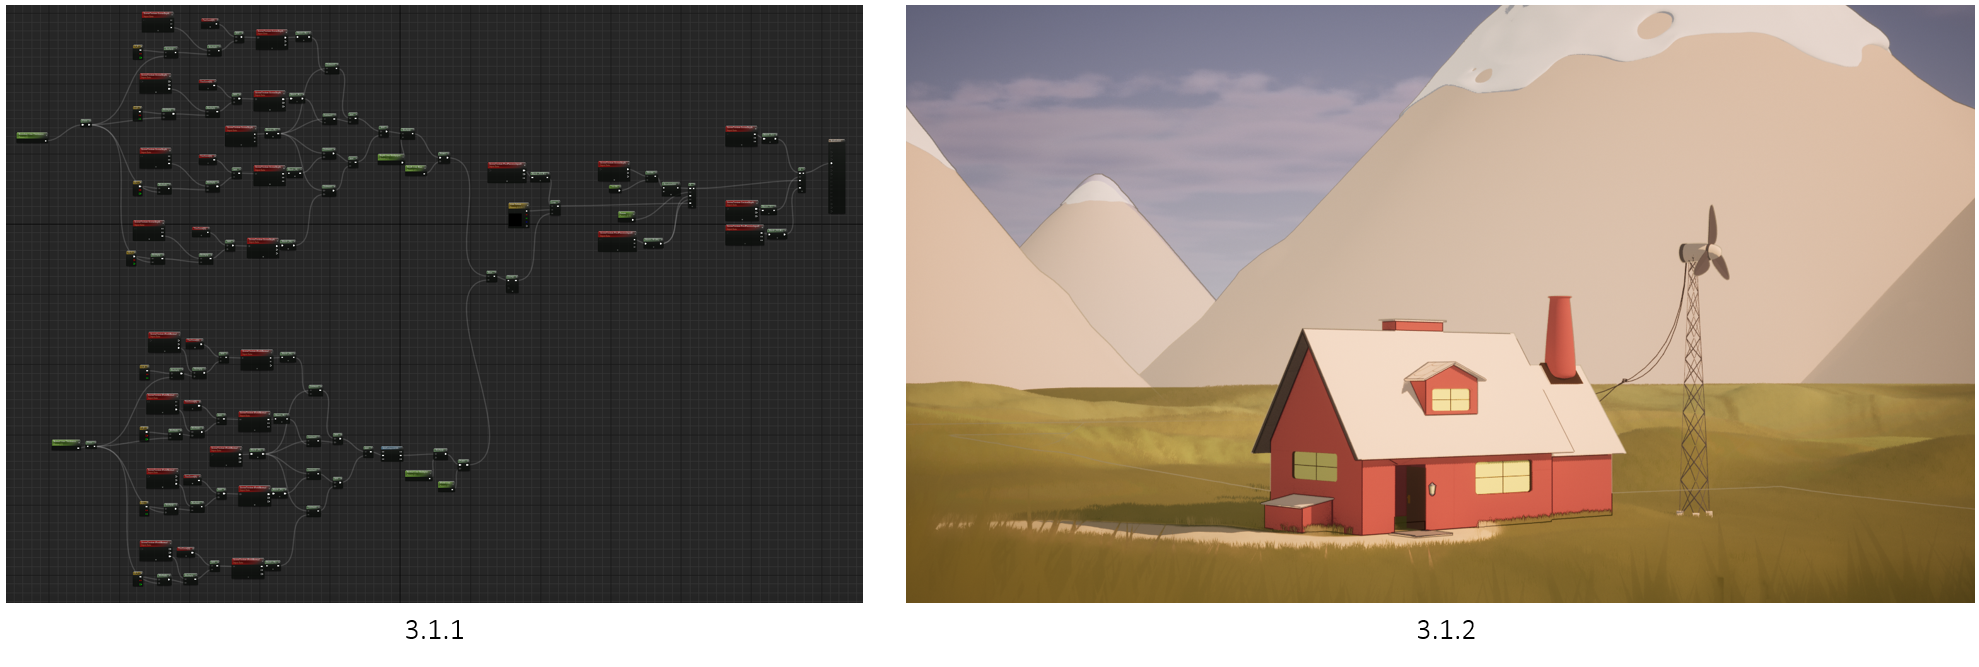
Although I was happy with the current post-processing outlines, I did some research on how to add extra outlines that the stencil didn’t touch upon. This node network (3.1.1) essentially does the same thing as the stencil, but uses the object offset instead, essentially showing all outlines of an object, not just the outside. This node network was shown by an Unreal Engine developer on YouTube and later developed by another general developer.
The link can be found Here.
The result of this extra outline post-process looks like this (3.1.2), really adding a great look.
3.2 House Textures
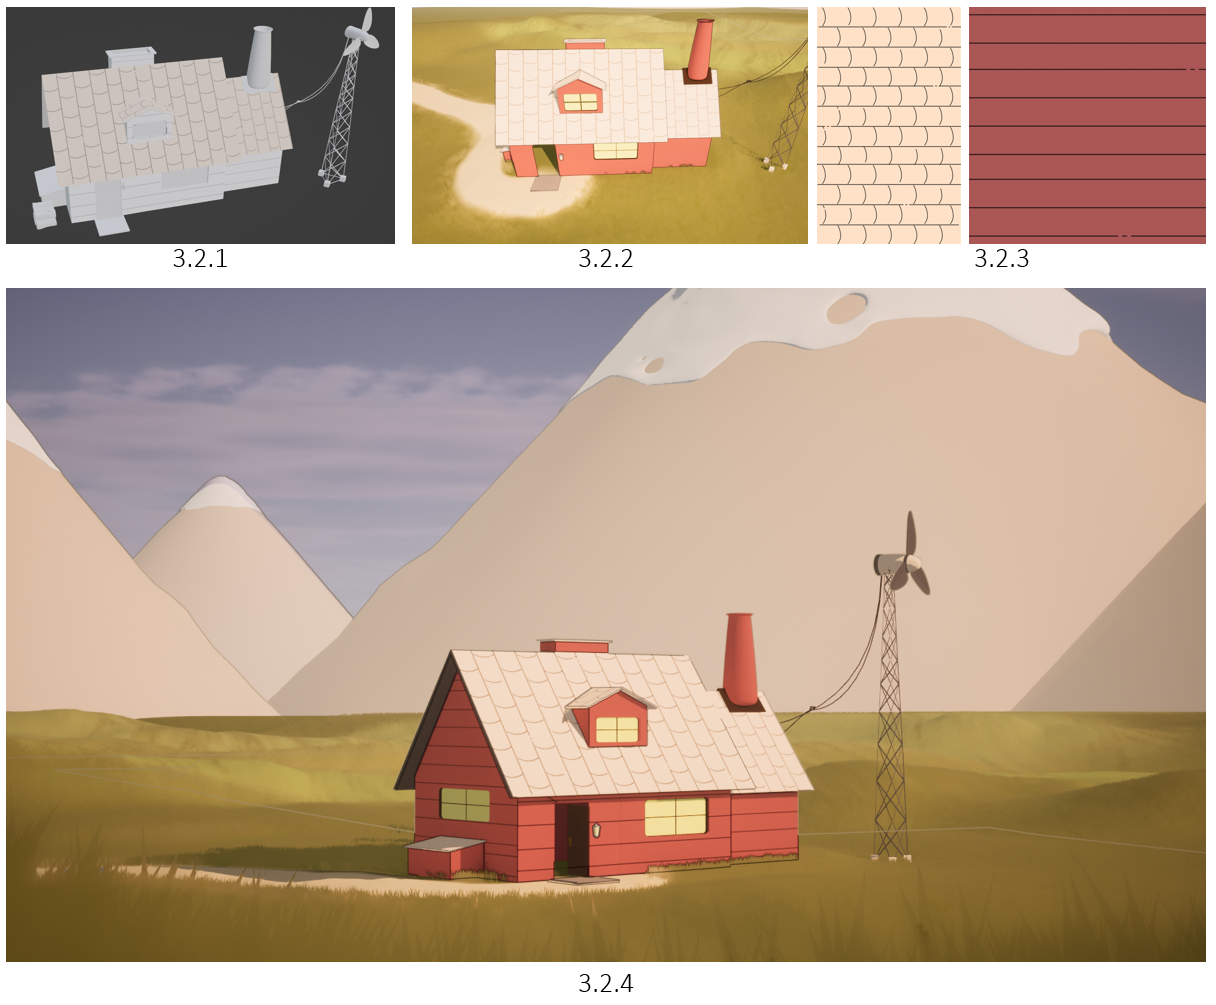
In Blender, I UV unwrapped each roof and wall face and applied the textures (3.2.1), (3.2.2), and (3.2.3). The textures were drawn up in Photoshop, using the UV unwrapped faces as blueprints. The results were quite accurate to the reference image (3.2.4). I received feedback saying that the house looked too flat, even though it matches the intended design. It’s for this reason I later made 3D roof tiles and wooden walls.
3.3 Wind Turbine Animation
My next step was to animate the wind turbine. To do this, I parented the wind turbine with a circle shape, allowing me to rotate locally and accurately (since the pivot wasn’t 100% accurate). I then applied a Rotating Movement Component to the shape, setting the Z axis to 50, controlling the rate of the rotation (3.3.1). This animation will only play when you press play in the engine.
This leads to my next step, the camera animation. I’ve always intended this to be a still render but wanted to add a lead-up shot, emerging from the grass to behold the scene. This was when I was introduced to UE5 Sequencer, allowing me to essentially make shape keys, having full control (3.3.2). This process was easy to understand due to how similar this is to Blenders Shape Keys timeline.
3.4 Camera Movement Preview
3.5 Skybox & Fog
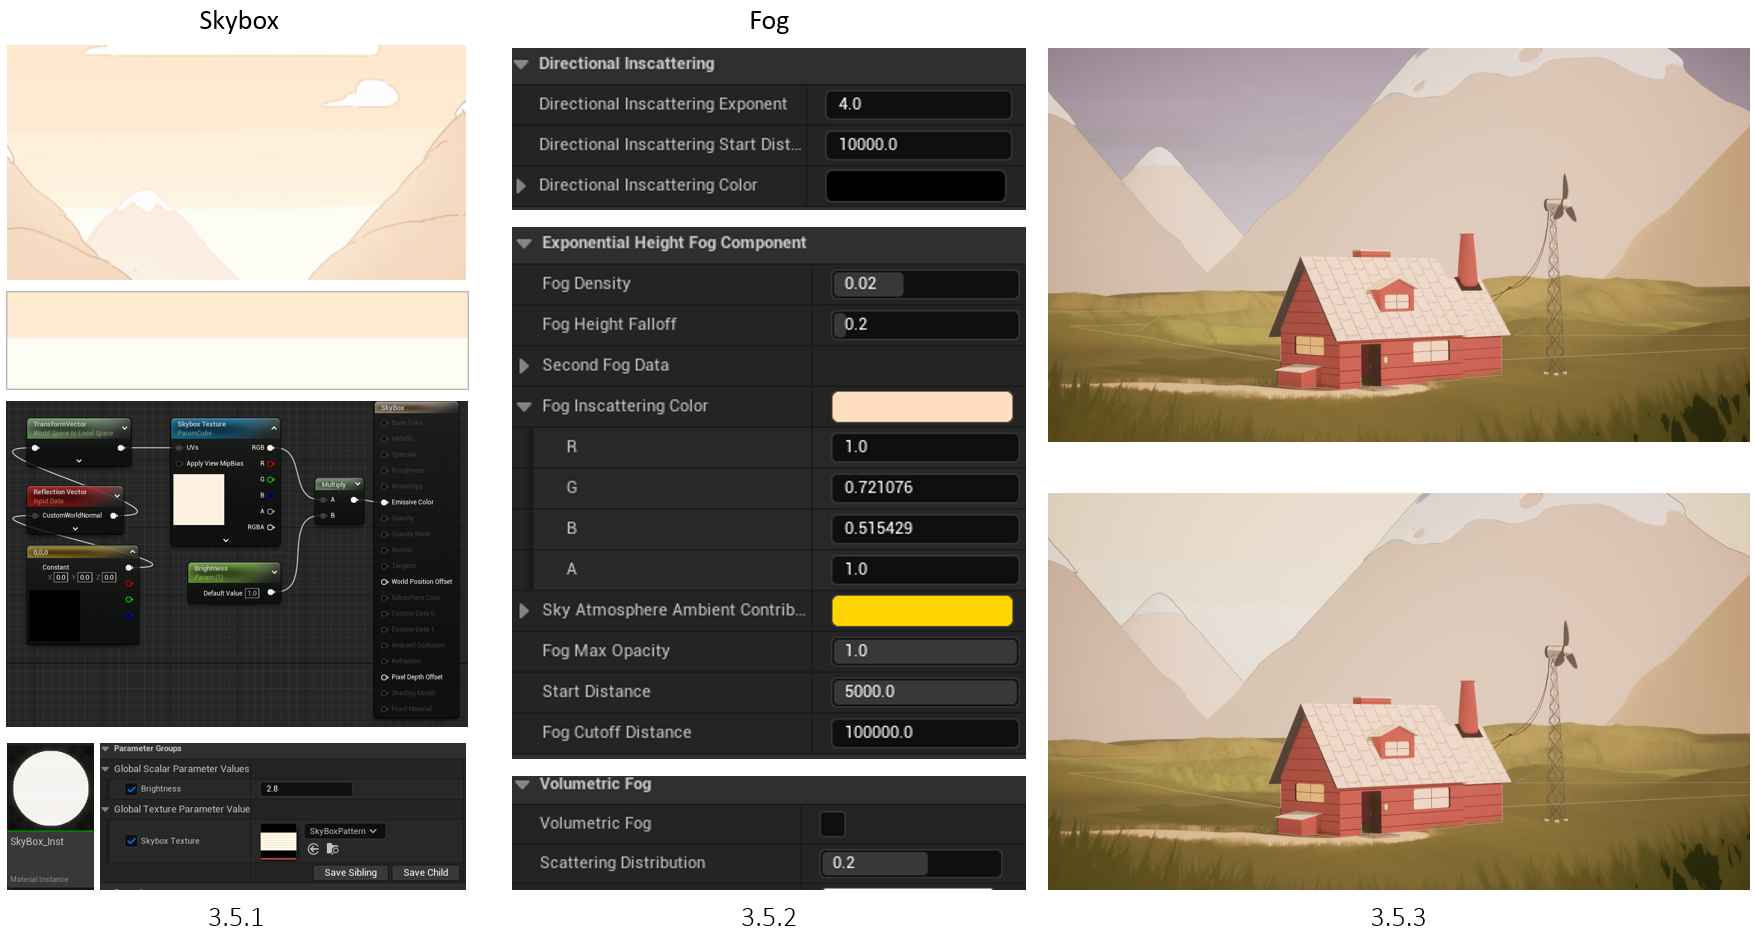
The Skybox was interesting to make, having looked for various methods, this was the best one at the time. I created a 4k texture following the reference image patterns, having the 3 different colours within the same palette (3.5.1).
The PNG texture was converted to an HDRI, allowing it to be used as a sky box. Following this, I made a material, and applied the texture, brightness parameter, a transform vector and a reflection vector, allowing me to control the position of the skybox with simple rotation.
The fog was also a key aspect (3.5.2), as I wanted to remove the blue background, alongside making the mountains look more in the background and far away. The outcomes show quite a difference before and after adding a skybox and fog (3.5.3).
3.6 Trees
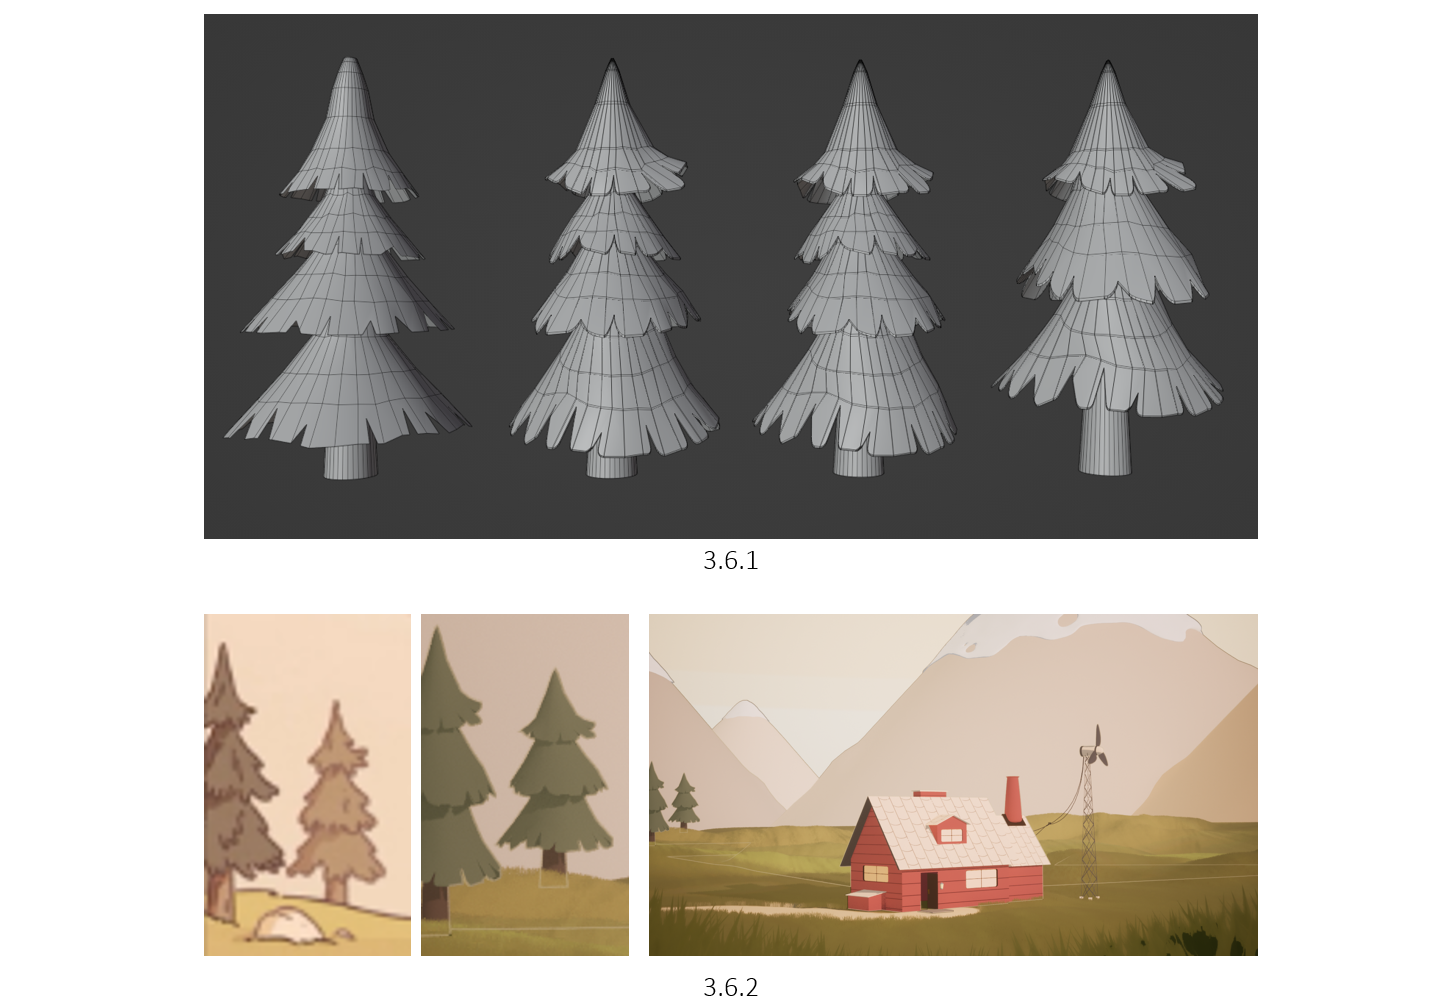
I started by creating a circle, subdividing, and proportional editing to create a point. This was followed by using the knife tool to cut out triangles, creating natural leaf cuttings. Later, I used proportional editing, set it to randomise, and adjusted each section of the tree to make it look more real, not static. The finishing touch was made by solidifying each section of the tree, making it look less paper thin. I later realised that the reference image had 3 sections, not 4, meaning I needed to remove one, and adjust accordingly (3.6.1). Looking at the reference image, I aligned the trees accordingly and applied a simple material instance with a colour parameter (3.6.2).
3.7 3D Walls
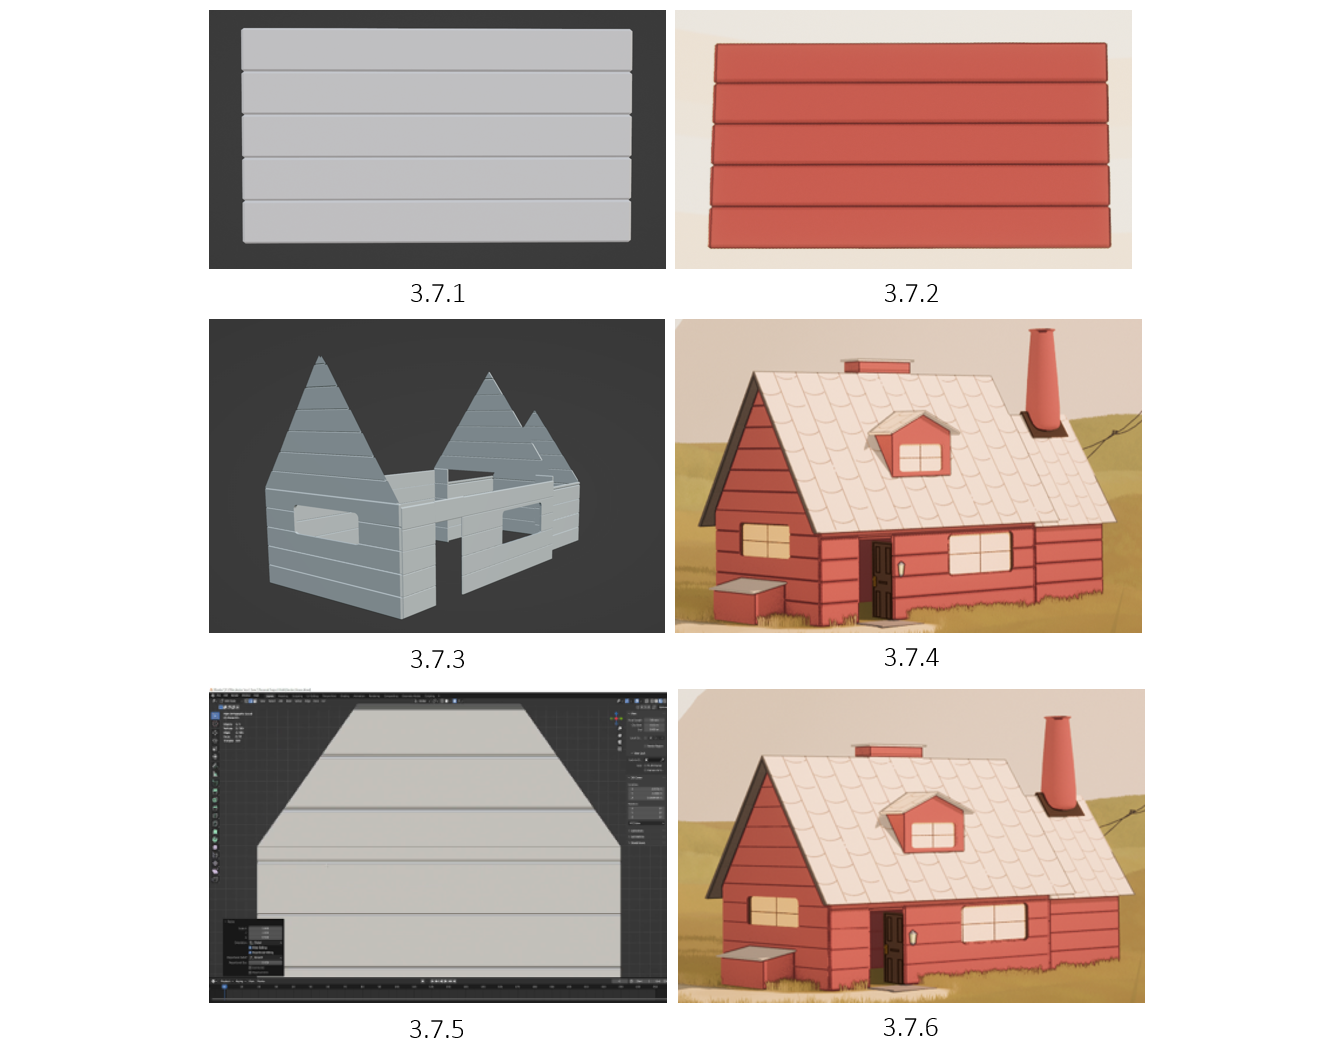
The Wall consisted of an extruded rectangular plane, that’s been bevelled and set to an array modifier for consistency (3.7.1). I exported this test model into UE5 to see how it would look with the colour and custom depth outline (3.7.2), which at the time seemed fine. Following the original method, I created the outer walls of the whole house (3.7.3) and exported them to UE5 (3.7.4). However, I didn’t take into account that the camera distance makes the outline slightly larger, but having a limit to the thickness and thinness
This meant I went back into Blender and adjusted each gap with proportional editing (3.7.5), making a macro of key bind commands to speed up the process (S + Z 0.5). The outcome looked a lot better (3.7.6), with thinner lines as per the reference image.
3.8 3D Roof Tiles
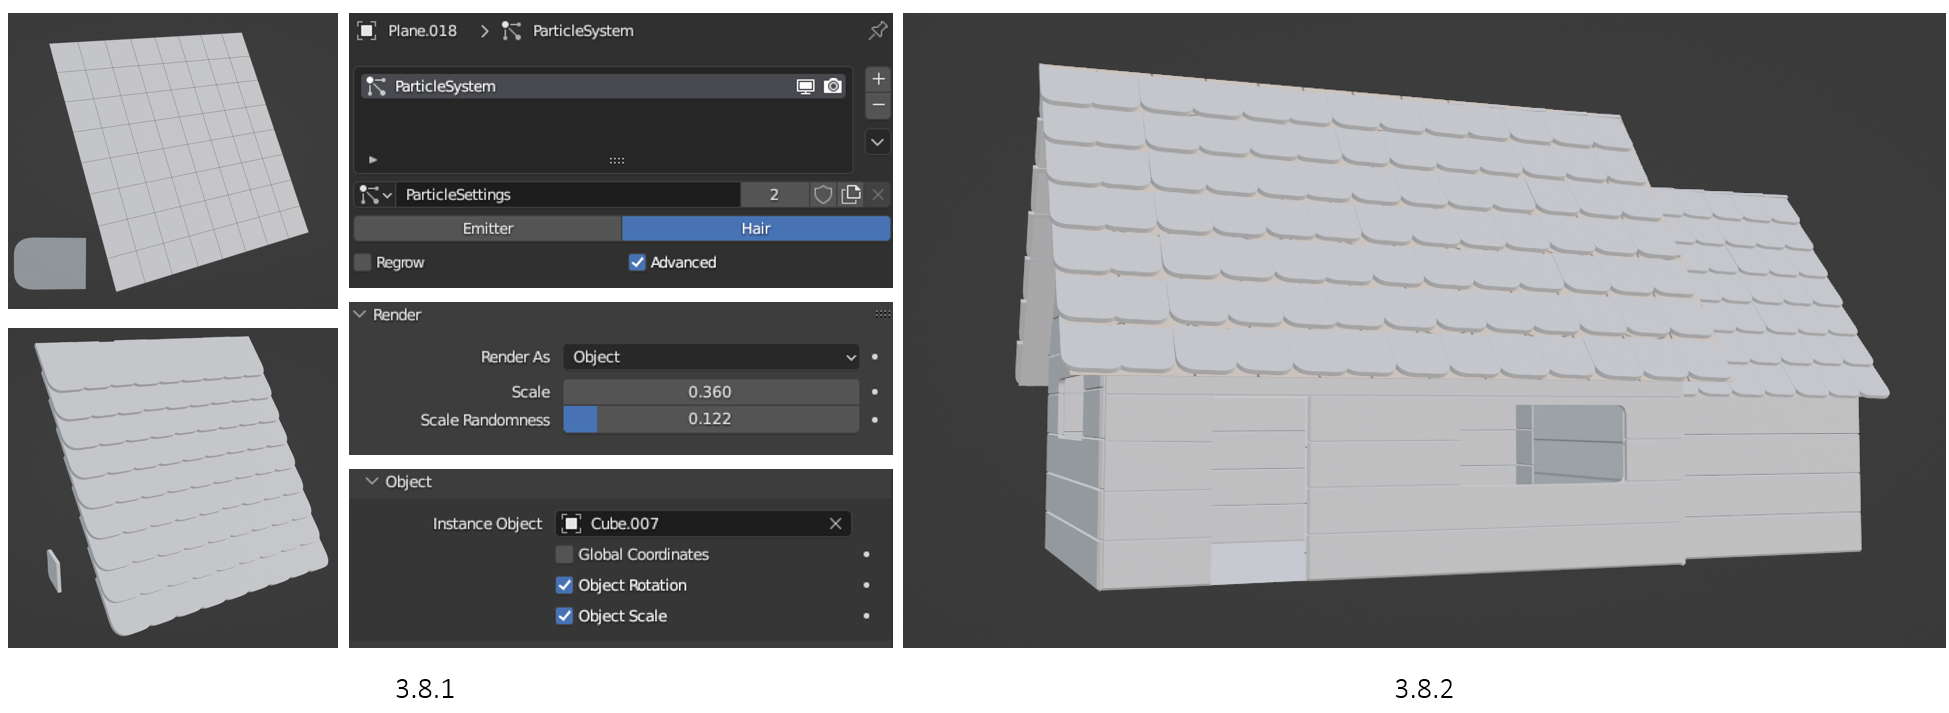
The roof tiles were interesting to make, as I decided to use a particle system. I started by creating a single roof tile, then subdividing a plane with the same amount as per the reference, and applying the object to the particle system (3.8.1). This allowed me to control the XYZ axis and size of each roof tile simultaneously. The outcome was perfect, a much more efficient way than copying over an array modifier in my opinion (3.8.2).
3.9 2D vs 3D | Before & After
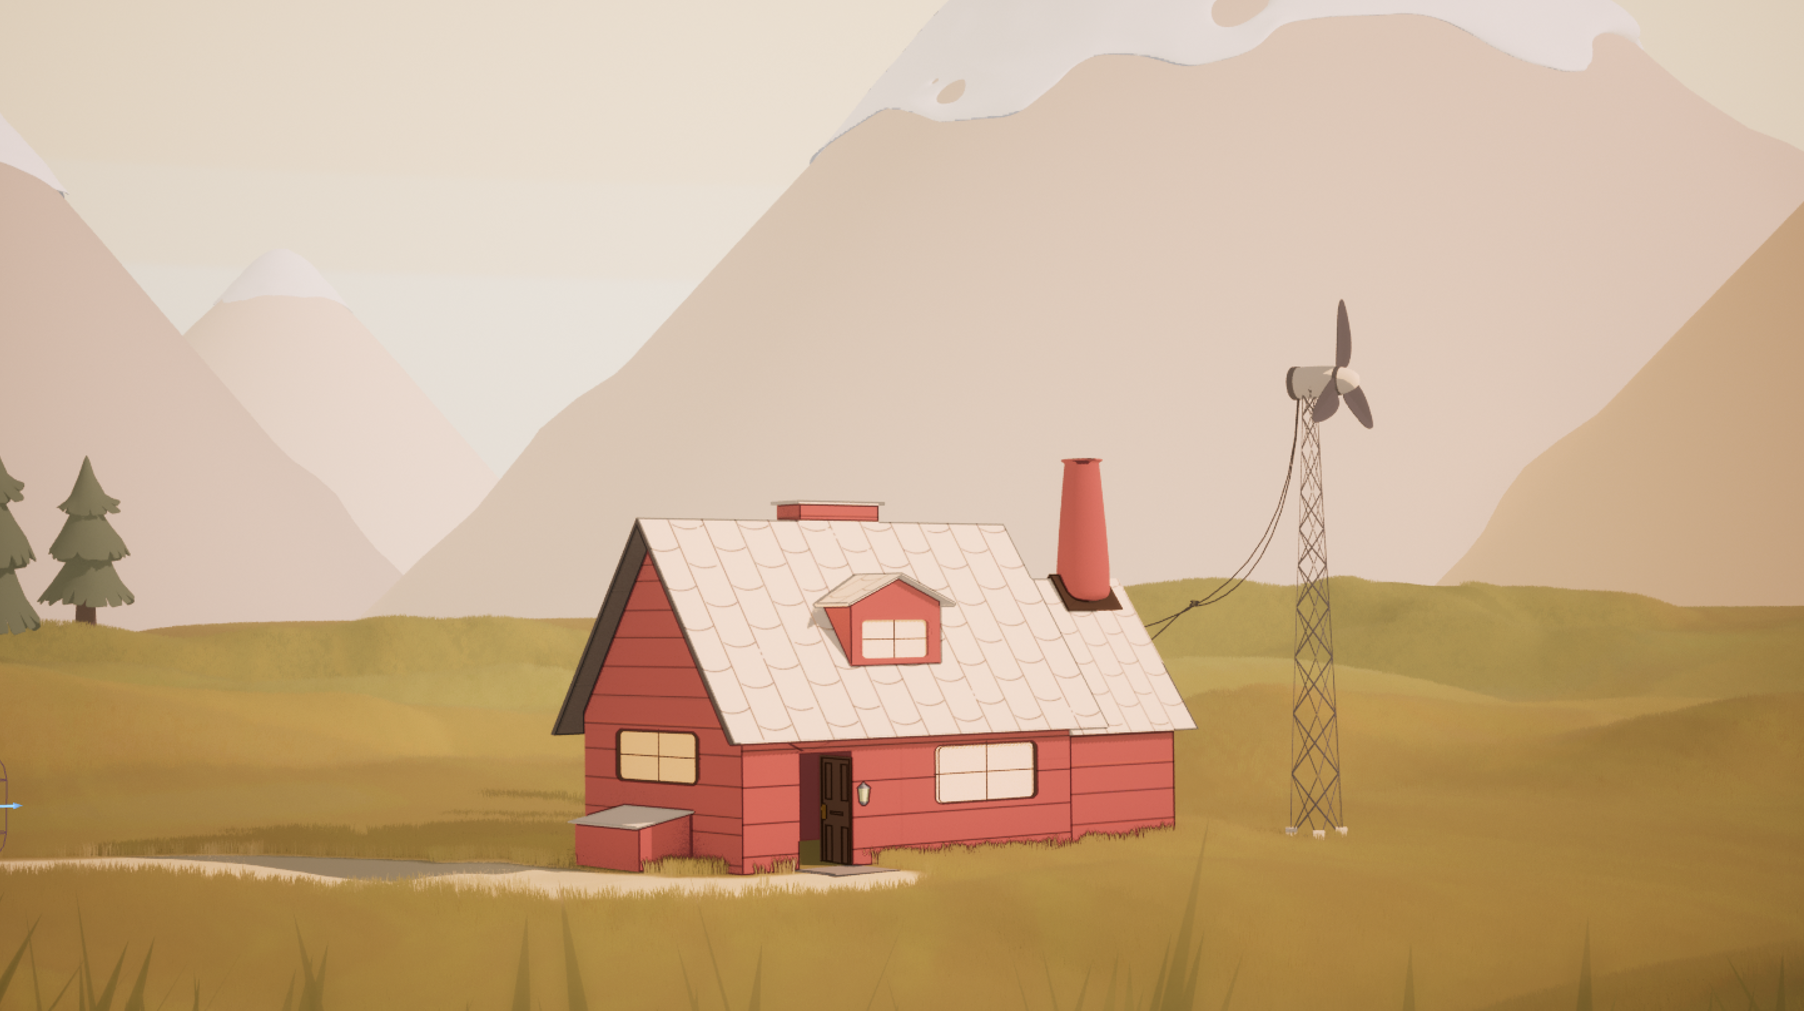
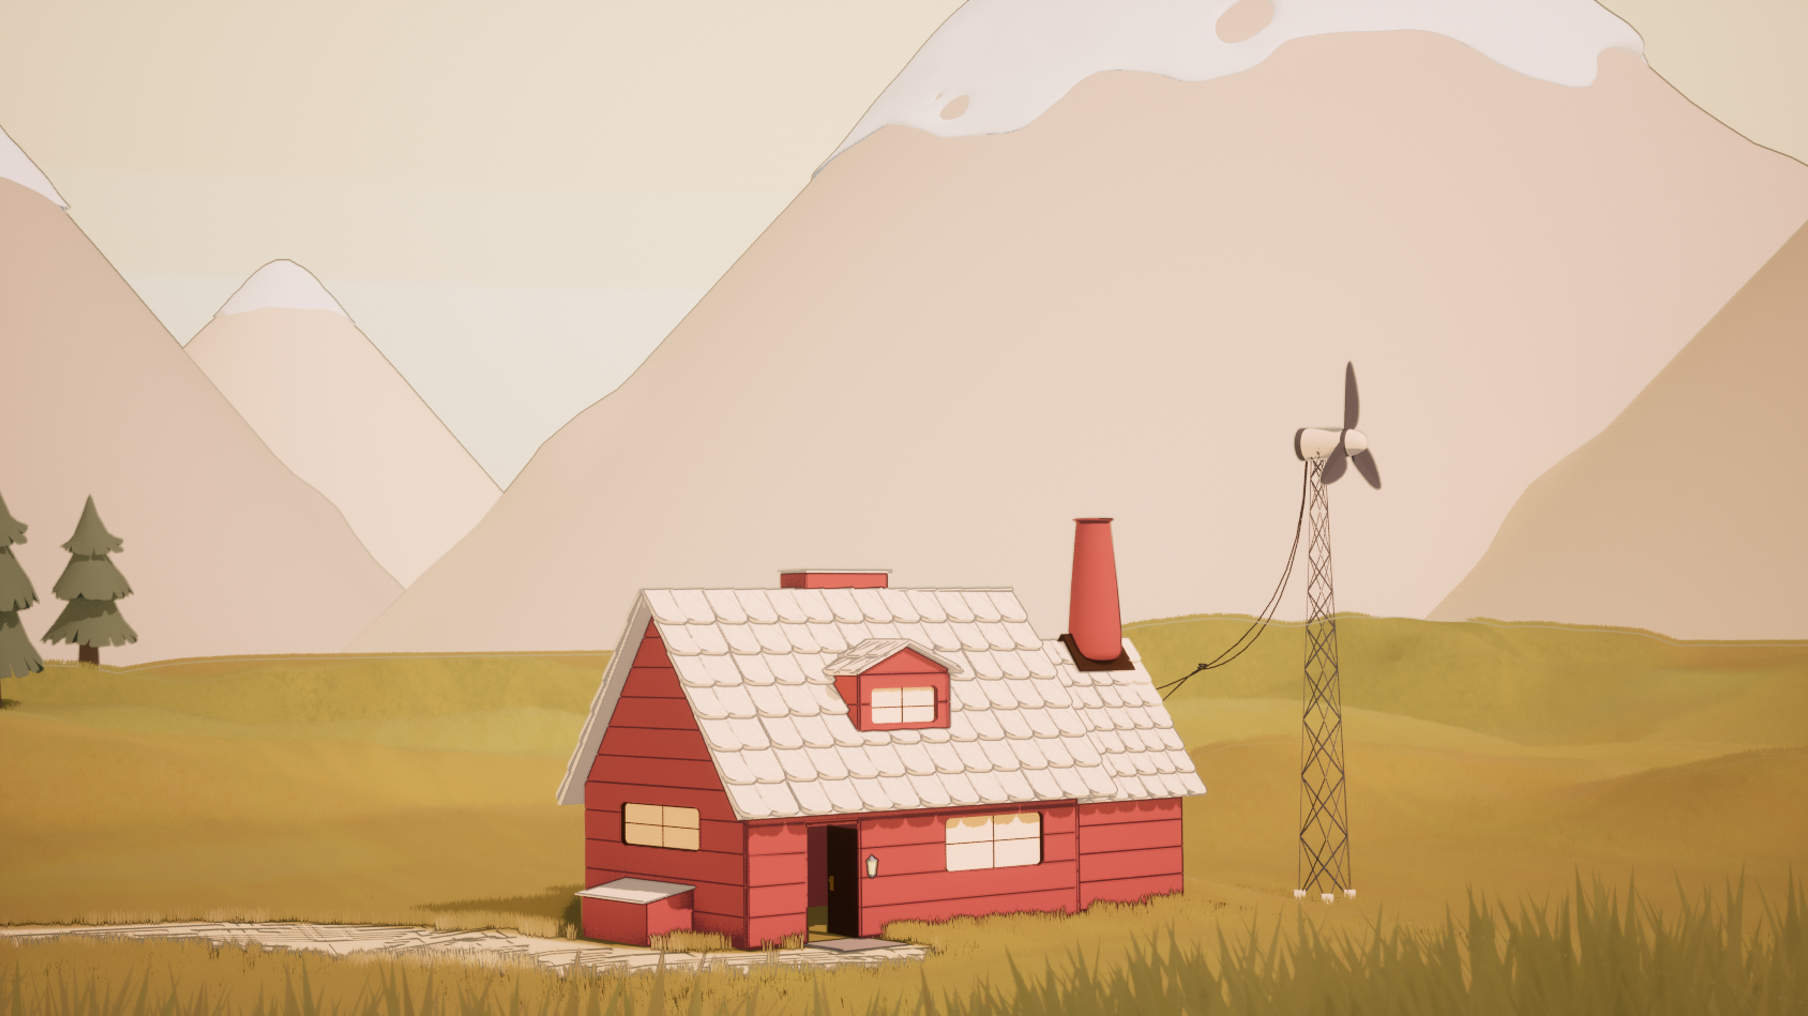
I believe the feedback on making the house more 3D was a good shout, as I seemed to forget that I don’t need to follow the reference 100%, but make it more unique, and give it a purpose for being 3D in the first place. I adjusted the brightness of the skybox, and the position of the sunlight, giving the house the intentional shadow drops on the left side.
4.0 Darkness Factor Adjustment
I noticed when the camera came through the grass to show the house, the dark shadows ‘spawned’ in a pixelated way, something I want to avoid for the final still render. To fix this, I adjusted the darkness factor of the cel-shade post-process material (4.0.1) from 0.5 to 0.3 (4.0.2). This essentially now prevents light shadows from forming and despawning during the camera roll.
4.1 Camera Preview
After much thought and experimentation, decided to adjust the directional light to create a much deeper shadow on the left side of the house. I believe this adds more depth to the still render, whilst making it look more realistic.
4.2 Modelling Logs
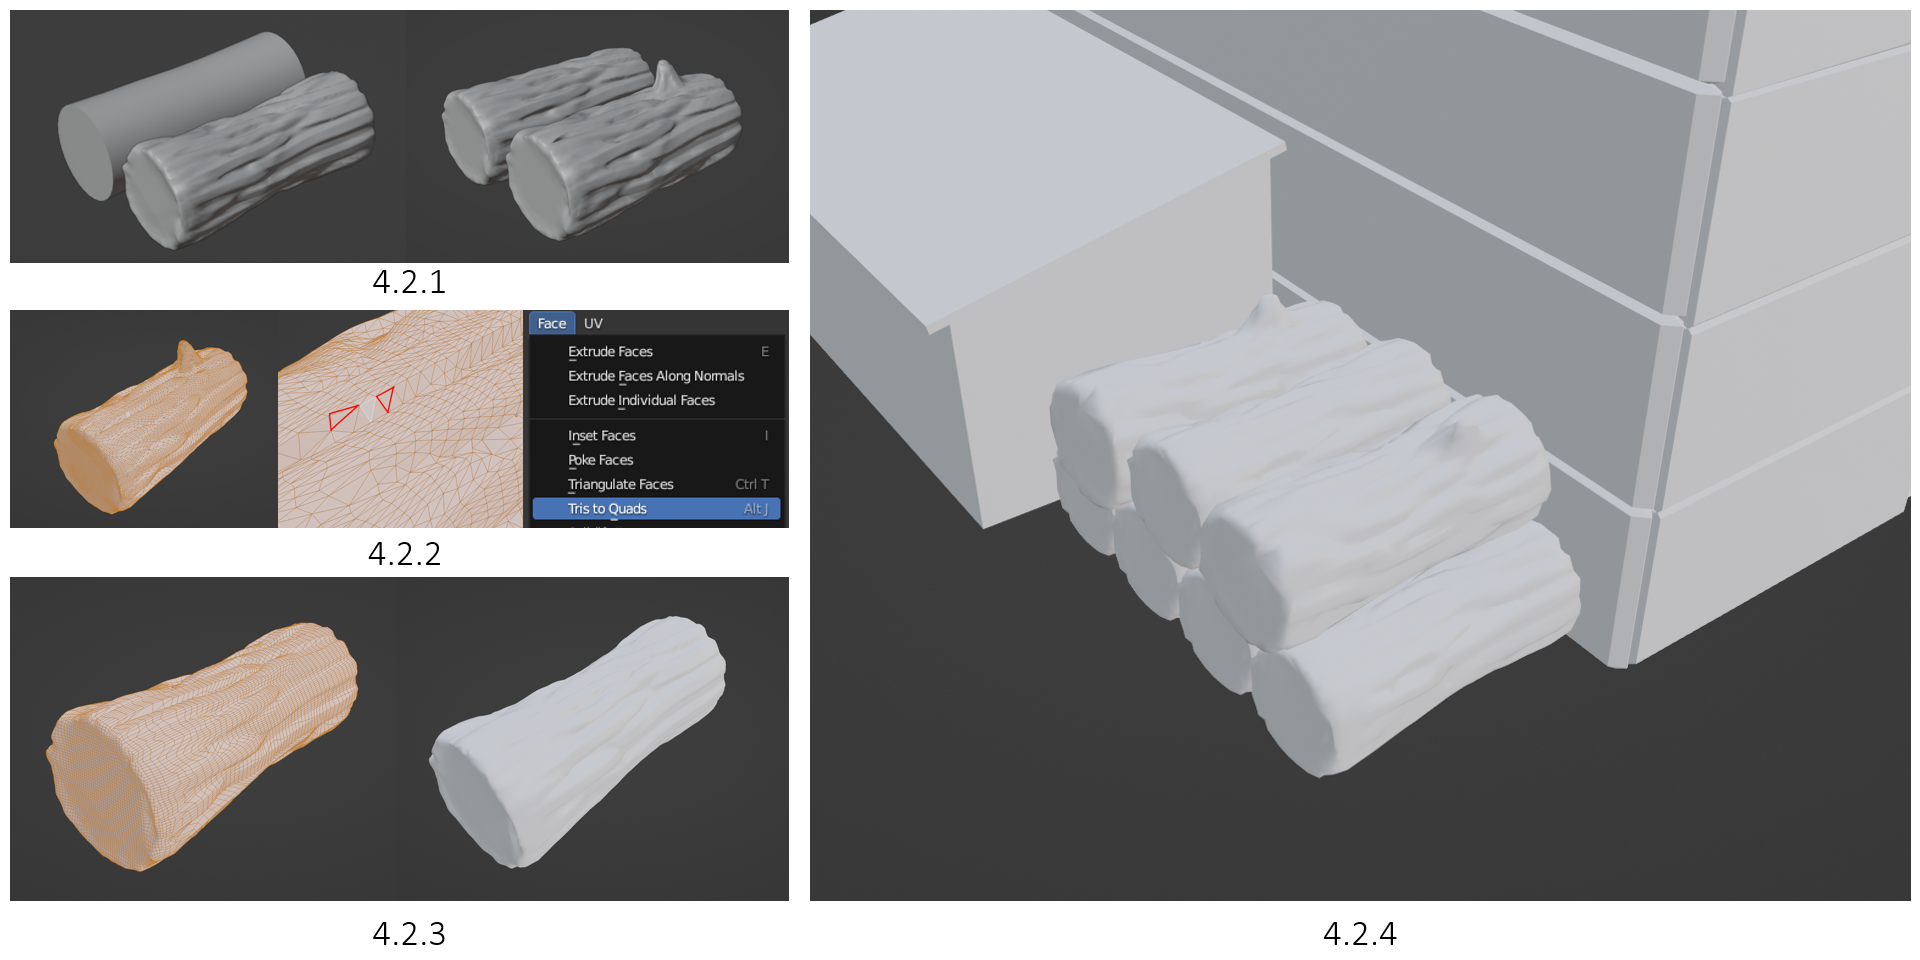
When it came to the logs, I started with a cylinder and enabled Dyntopo set to 100, (dynamic tessellation sculpting method) which helps you conserve geometry without limiting your ability to model the object with a fine degree of precision. I used a mixture of sculpting brushes, such as clay strips, flattening, and smoothing to create that stylized look (4.2.1).
I found that the logs contained a lot of Tris, which can cause issues with the shading, texturing and in general, can make it harder to work with a model. To fix this, I went to Face>Tris to Quads (4.2.2). The final outcome of the quads mesh looks as intended (4.2.3). I also made another log as per the reference and assembled them accordingly (4.2.4).
4.3 Baking Mesh Maps | Substance Painter
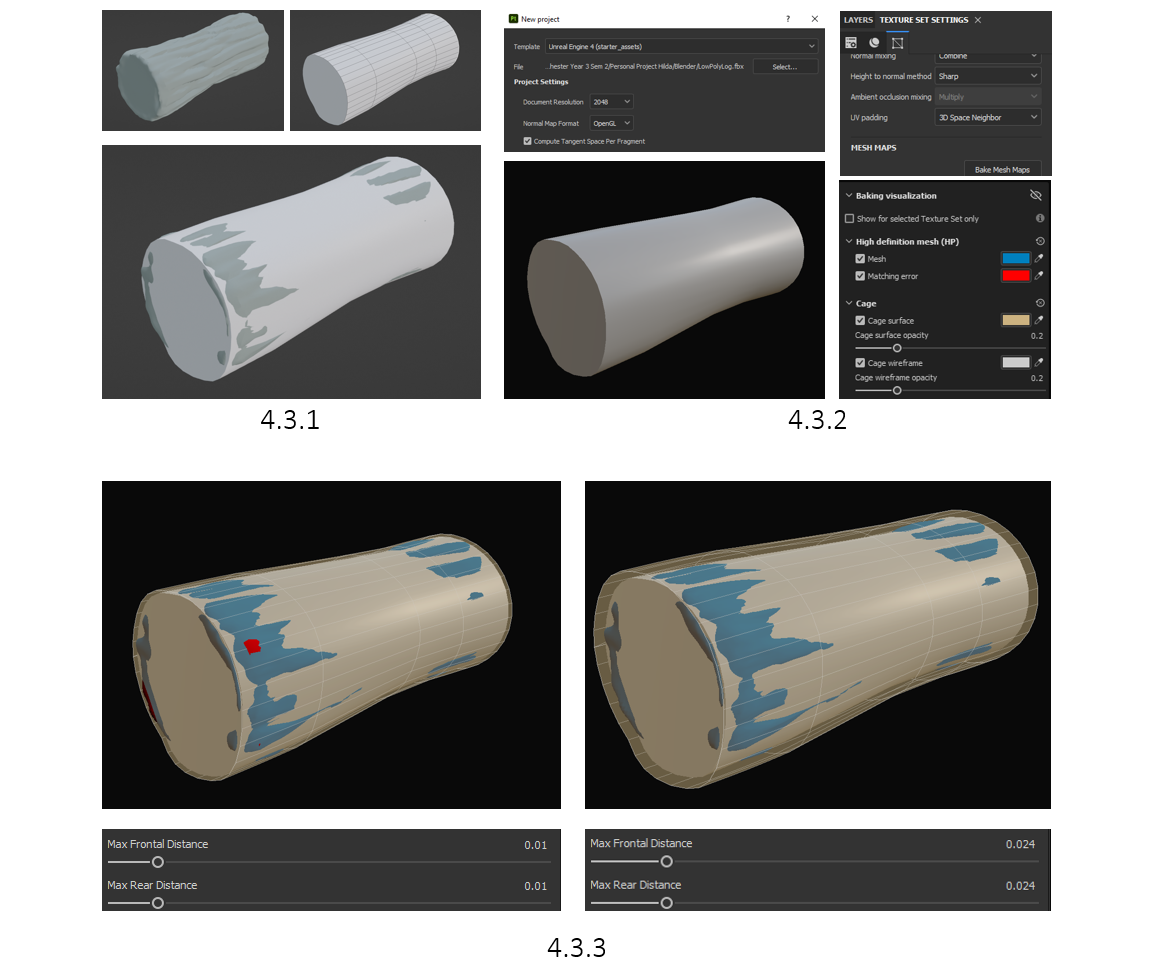
Although it would have been fine to just add the high poly count into the UE5 scene, I wanted to create the logs game ready, having a low poly count and still looking high poly. I started by creating the same shape of the log using a cylinder, giving it loop cuts and adjusting the position to match the log (4.3.1).
Next, I imported the Low Poly log cylinder into Substance Painter, with the resolution set to 2048, ensuring high-quality baking, and using the recommended OpenGL normal maps format. I head into Textures Set Settings>Bake Mesh Maps and imported the high poly log, overlapping the low poly (4.3.2).
I adjusted the baking visualisation accordingly, having the Max Frontal and Max Rear Distance go from 0.01 to 0.024 (4.3.3), removing the red bits to that there will be a matching error between the high and low poly.
4.4 Baking Process
This is how the process looked when baking the high and low poly meshes, baking the Normals of the high poly onto a low poly mesh, closer to a game-ready asset.
4.5 Log Painting | Substance Painter
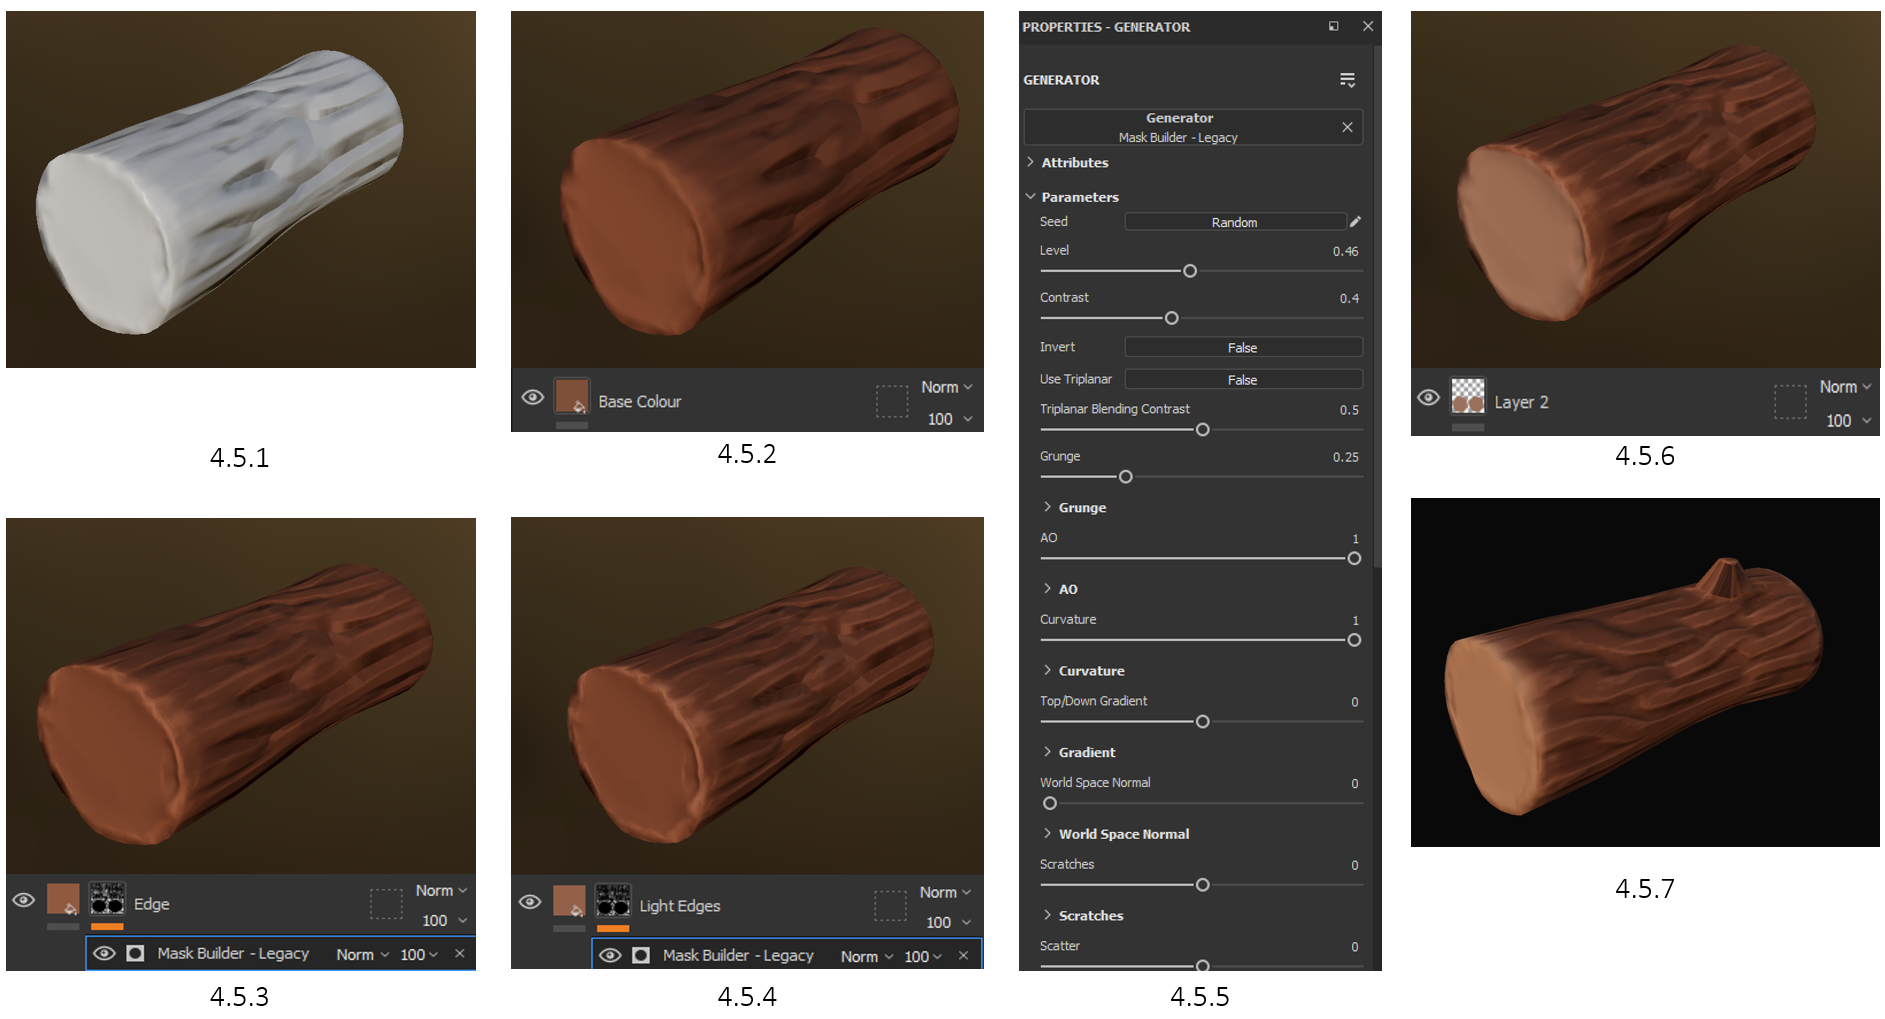
Starting off a blank canvas (4.5.1), I added a base colour to the log (4.5.2), with semi-high roughness due to it being a wooden texture. I wanted to add some highlights to really give that stylized look, so I added a new base colour and created a generator called Mask Builder for the edge (4.5.3) and light edges (4.5.4). The generator settings can be seen here (4.5.5), having the flexibility to adjust almost every aspect of the model, including the edges and creating highlights that don’t require me to hand paint. To finish the log, I hand-painted the end parts of the log with a lighter colour on a new layer (4.5.6), resulting in a finished log (4.5.7).
Substance Painter was quite fun to use and found that this is a software I must learn more about if I want to pursue stylized art direction.
4.6 Applying Normal Maps | UE5
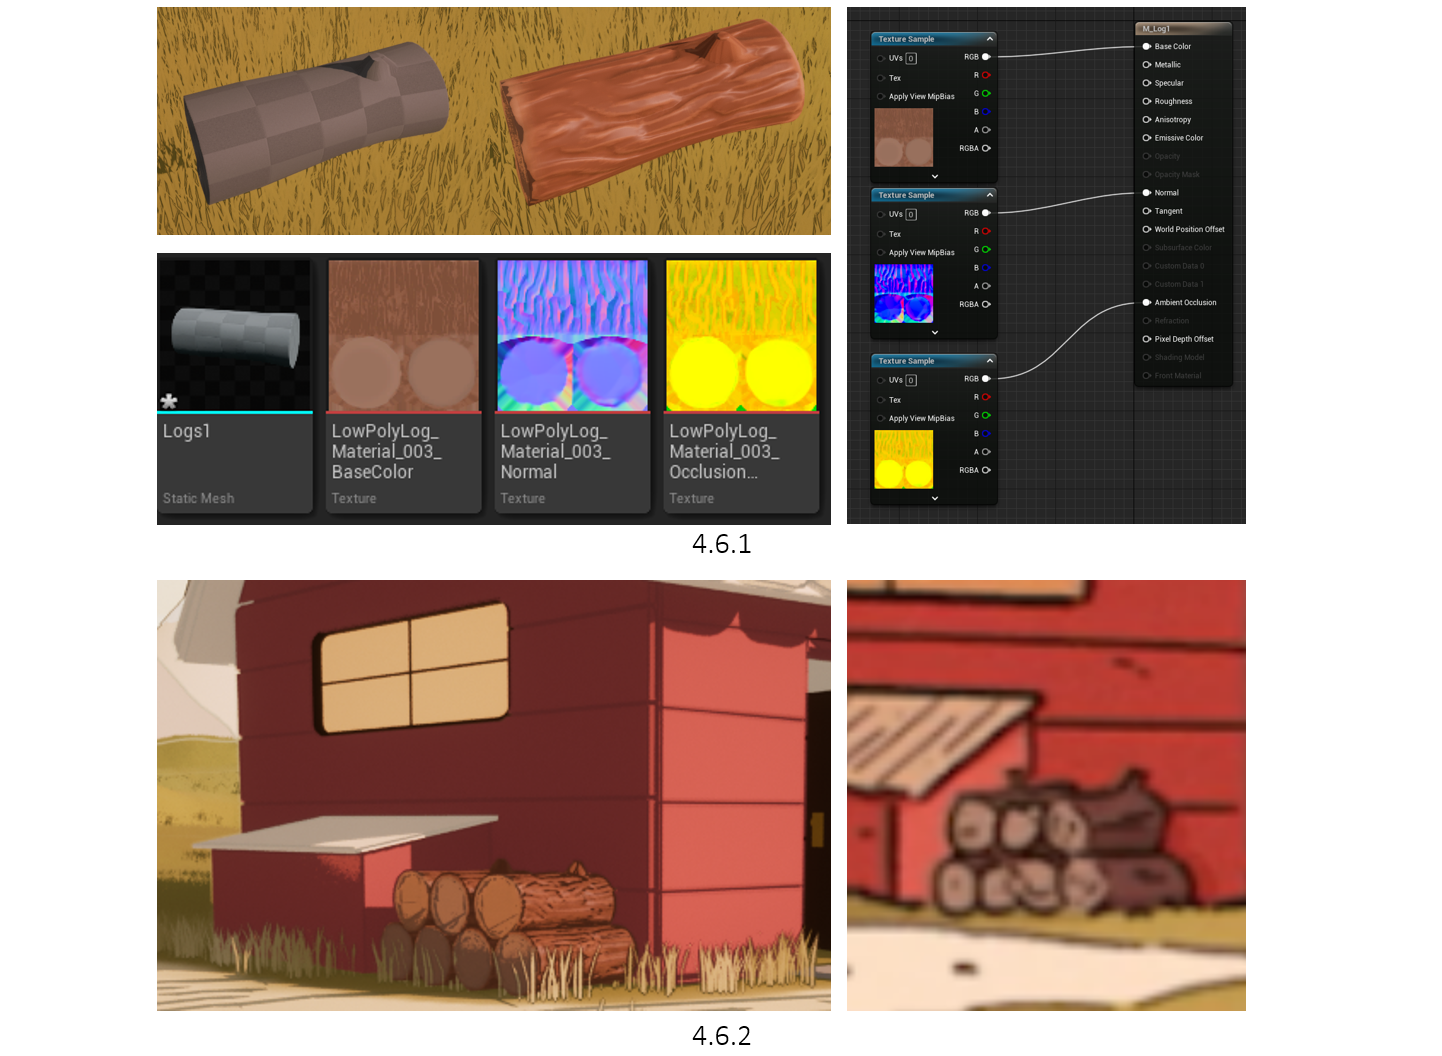
I imported the painted normal maps alongside the low poly cylinder into UE5. I created a material and applied the normal maps accordingly, base colour, normal, and ambient occlusion. These were all set to parameters to allow future baked assets and made the material into an instance (4.6.1). Finally, I aligned the logs as per the reference, with the correct scaling, rotation, and logs used (4.6.2).
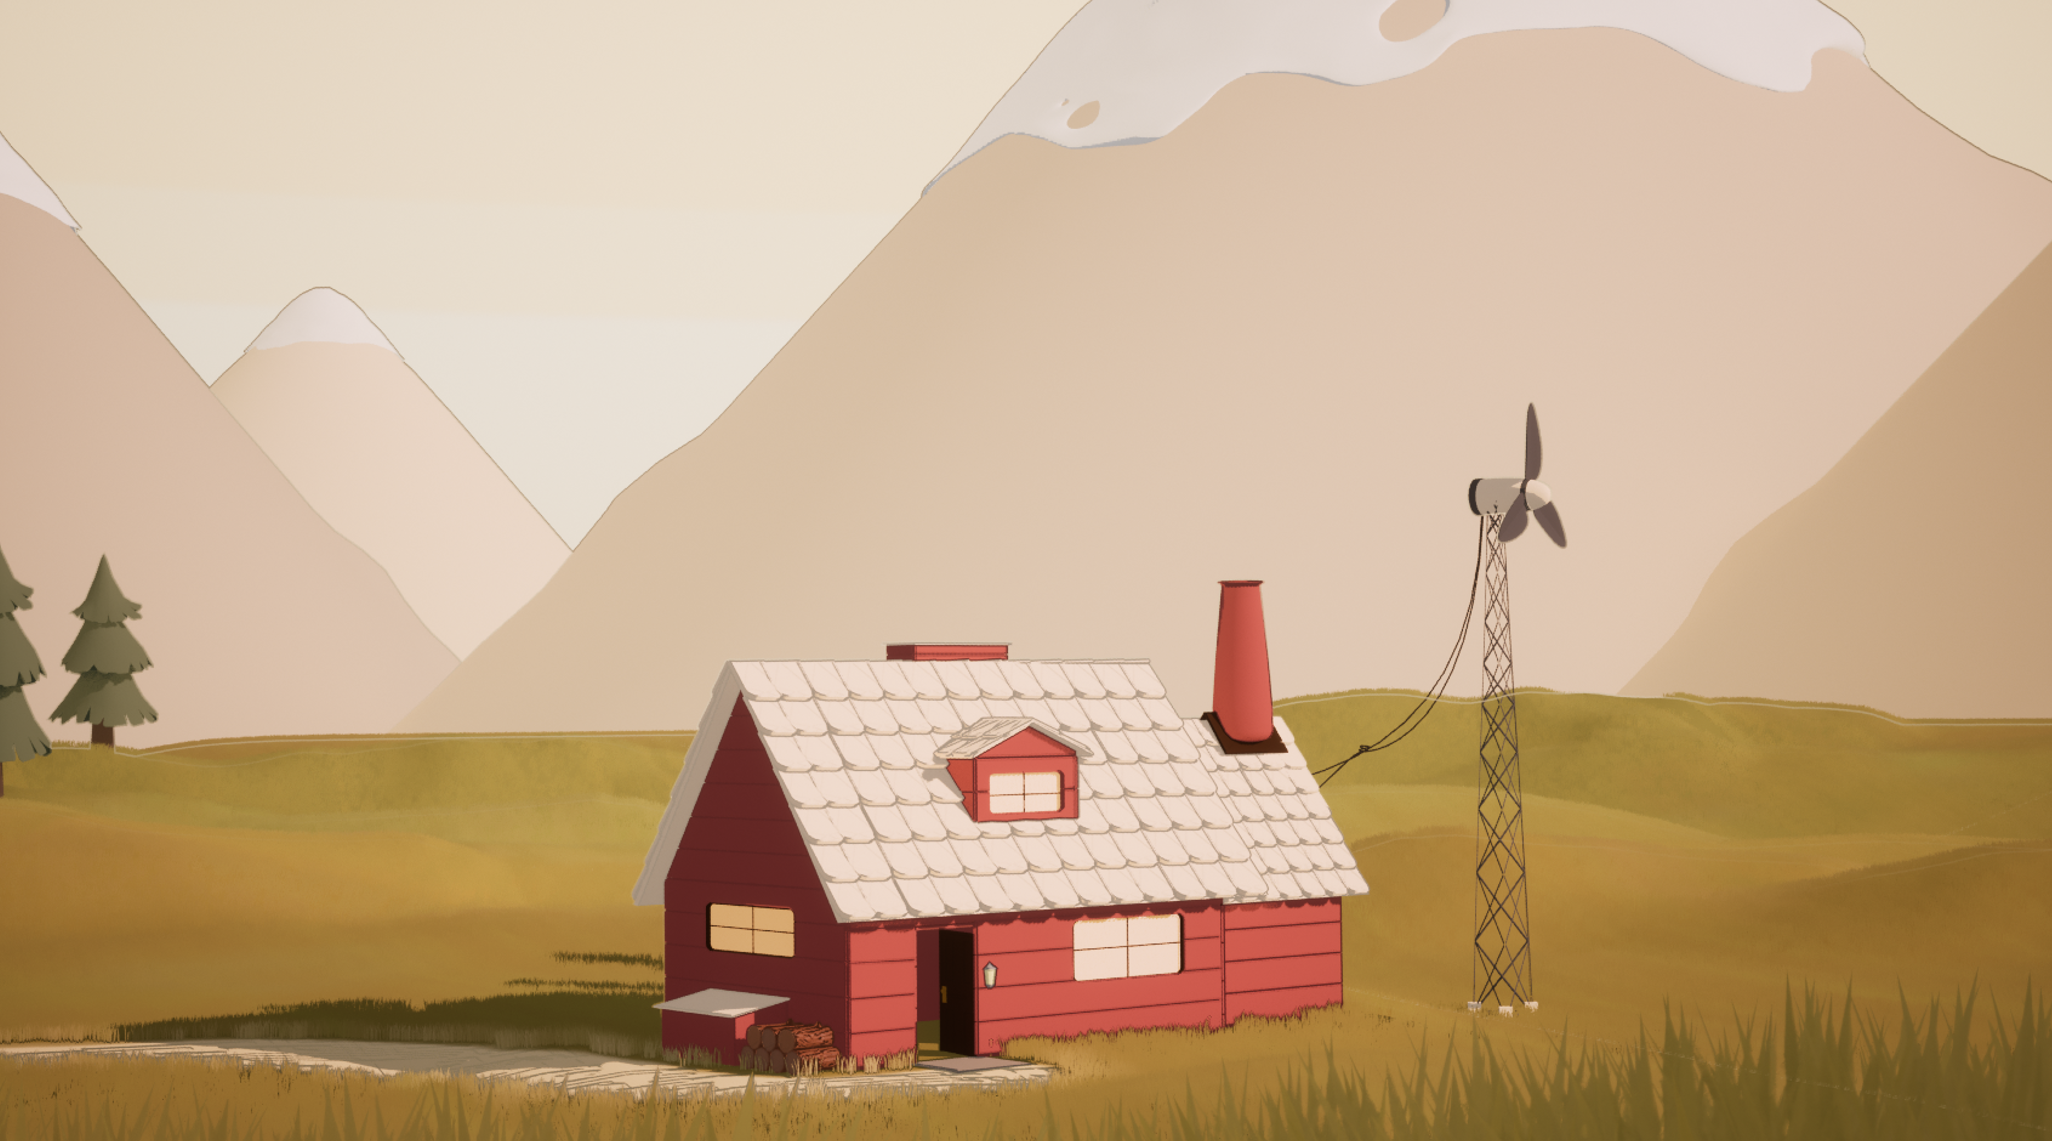
4.7 Scene Preview
At this point, I was very happy with how things were looking. I knew my next step was to add some more foliage, such as rocks and flowers.
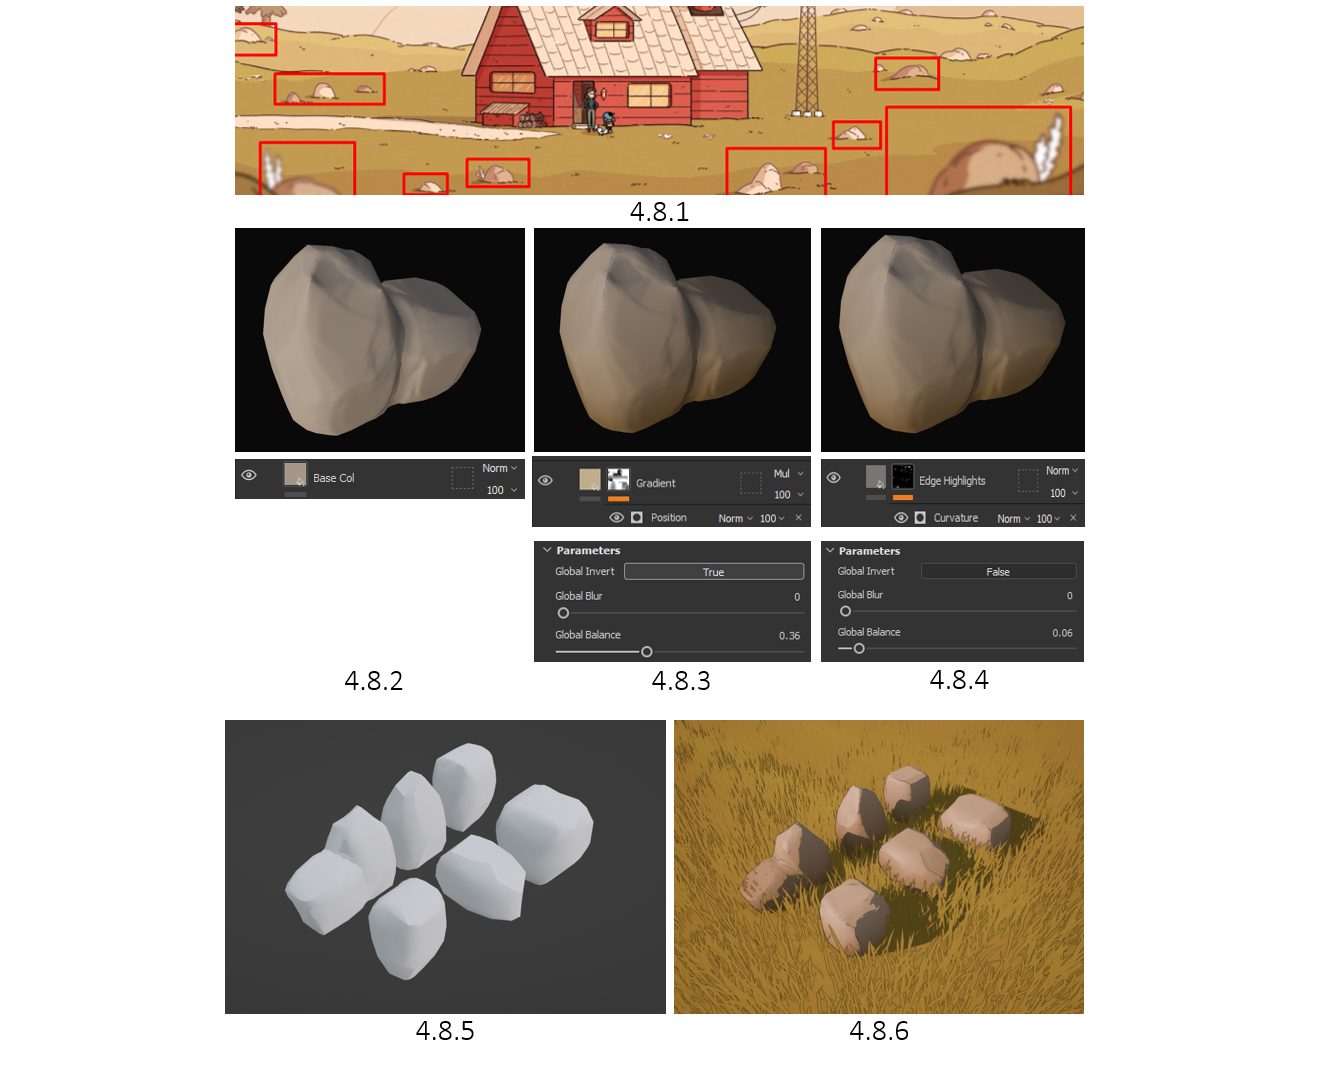
4.8 Stylized Rocks | Substane Painter
When looking at the reference (4.8.1), I’ve highlighted the key rocks I wanted to make, bringing the 3D environment closer to the 2D. I followed the same process of making the logs (4.2) when it came to the rocks, having a low poly cube, cutting it into sections and using the various sculpting methods to give it a natural look. After baking the normal maps, I applied a base colour that was similar to the reference (4.8.2). I wanted the bottom of the rocks to have some kind of dirt, so on a new layer I applied a new generator called gradient, allowing me to adjust the parameters dynamically instead of hand painting (4.8.3). The final step was to add some edge highlights, so using the same method as the logs, I added a new generator mask and adjusted the parameters accordingly (4.8.4). With one rock finished, I was able to save and apply the same material to all other baked rocks.
Finally, all rocks were imported with their baked normal maps, using the previous material instance on each one, and enabling custom depth (4.8.6). It’s amazing to see how such low poly models (4.8.5) can have textures baked onto them to make a game-ready asset.
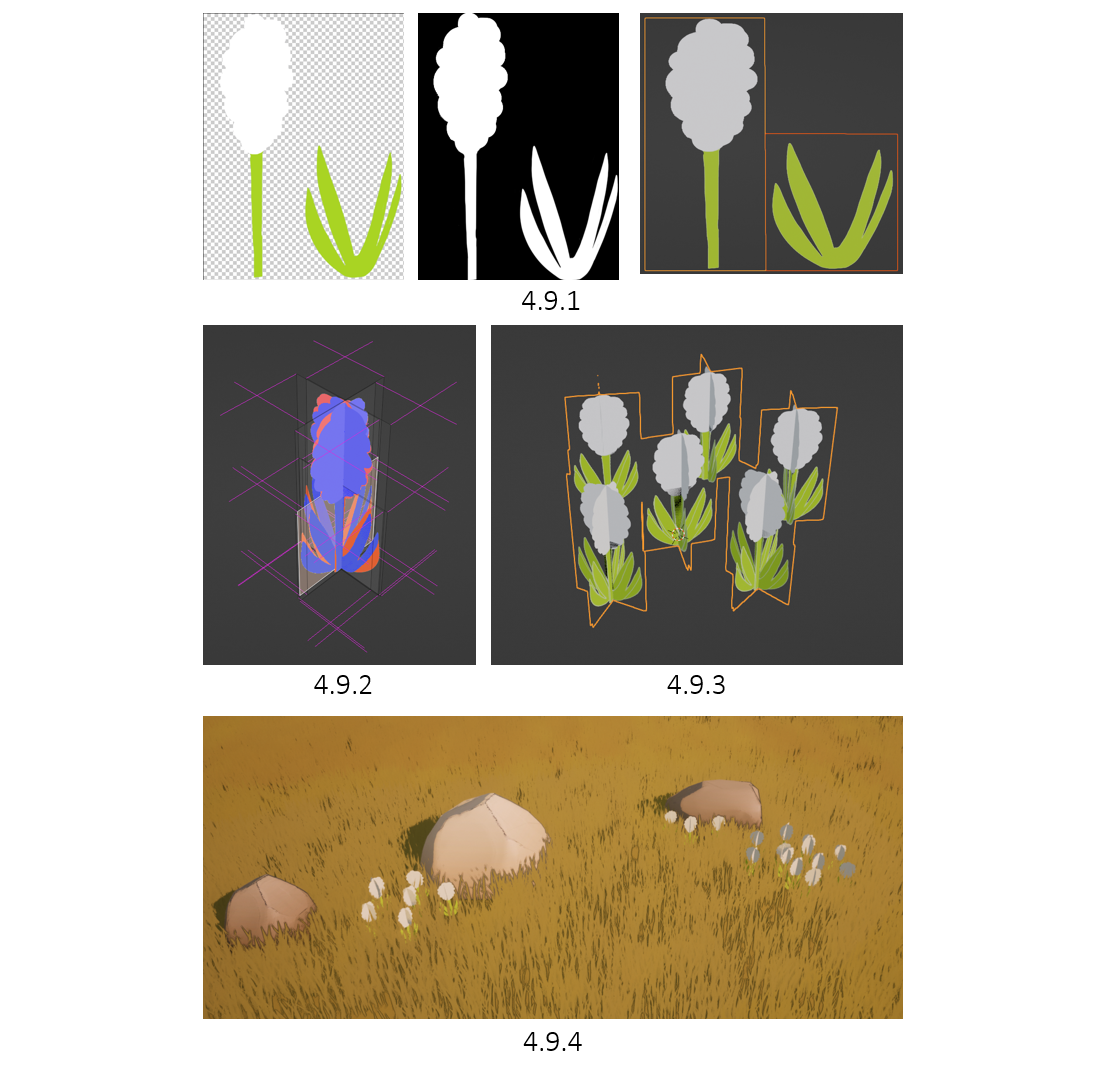
4.9 Flowers | Hyacinths
The next foliage I wanted to add were flowers near the rocks. Although this isn’t in the reference, I wanted to make the scene look livelier. Hyacinths were the flower I decided to add, for no other reason than them being flowers I personally love. Using Photoshop, I painted a general shape of the flower, made an alpha mask and imported into Blender (4.9.1). The alpha mask was key as it allowed the flowers to have a transparent background in both Blender & UE5.
Being aware of the previous issue of how the grass could only be viewed from certain sides, I decided to take a new approach by duplicating the faces and flipping (4.9.2). Although this may have not been the best approach when it comes to the industry pipeline, this was something that worked for me at the time. This allowed the flowers to be viewed from any angle (4.9.3), this was key since there were only going to be so many of them that any gaps will be noticeable. I exported the flowers as a combined mesh, applied them to the foliage painter, and began adding them near rocks (4.9.4).
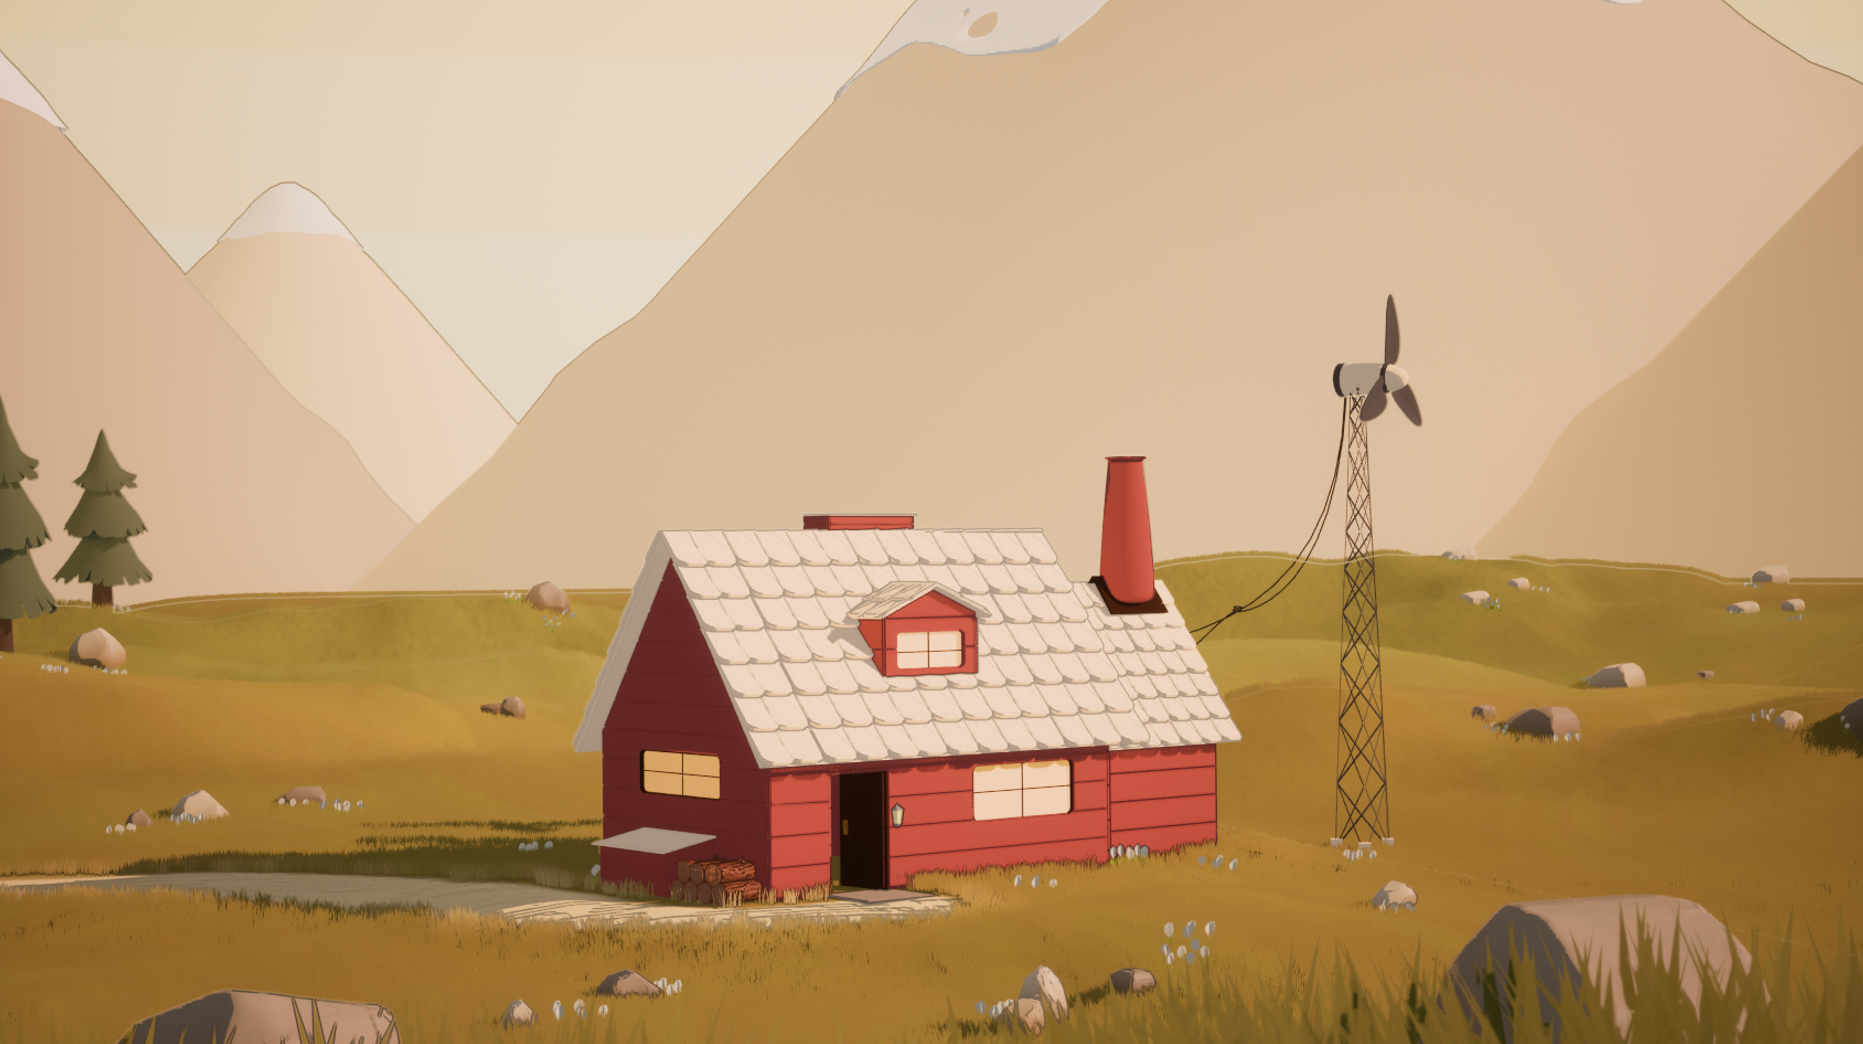
5.0 Scene Preview
It was shocking how much livelier the environment looks with a few foliage additions. I made to position the main rocks in their positions and scattered the rest. I also noticed that in the reference image, some rocks were white. This was a simple change, adding a multiply node to mix the base colour texture with a brightness parameter to the original material. The final step was to add some stylized wind, something I’ve always loved when looking at any PBR/stylized environment.
5.1 Wind Particles
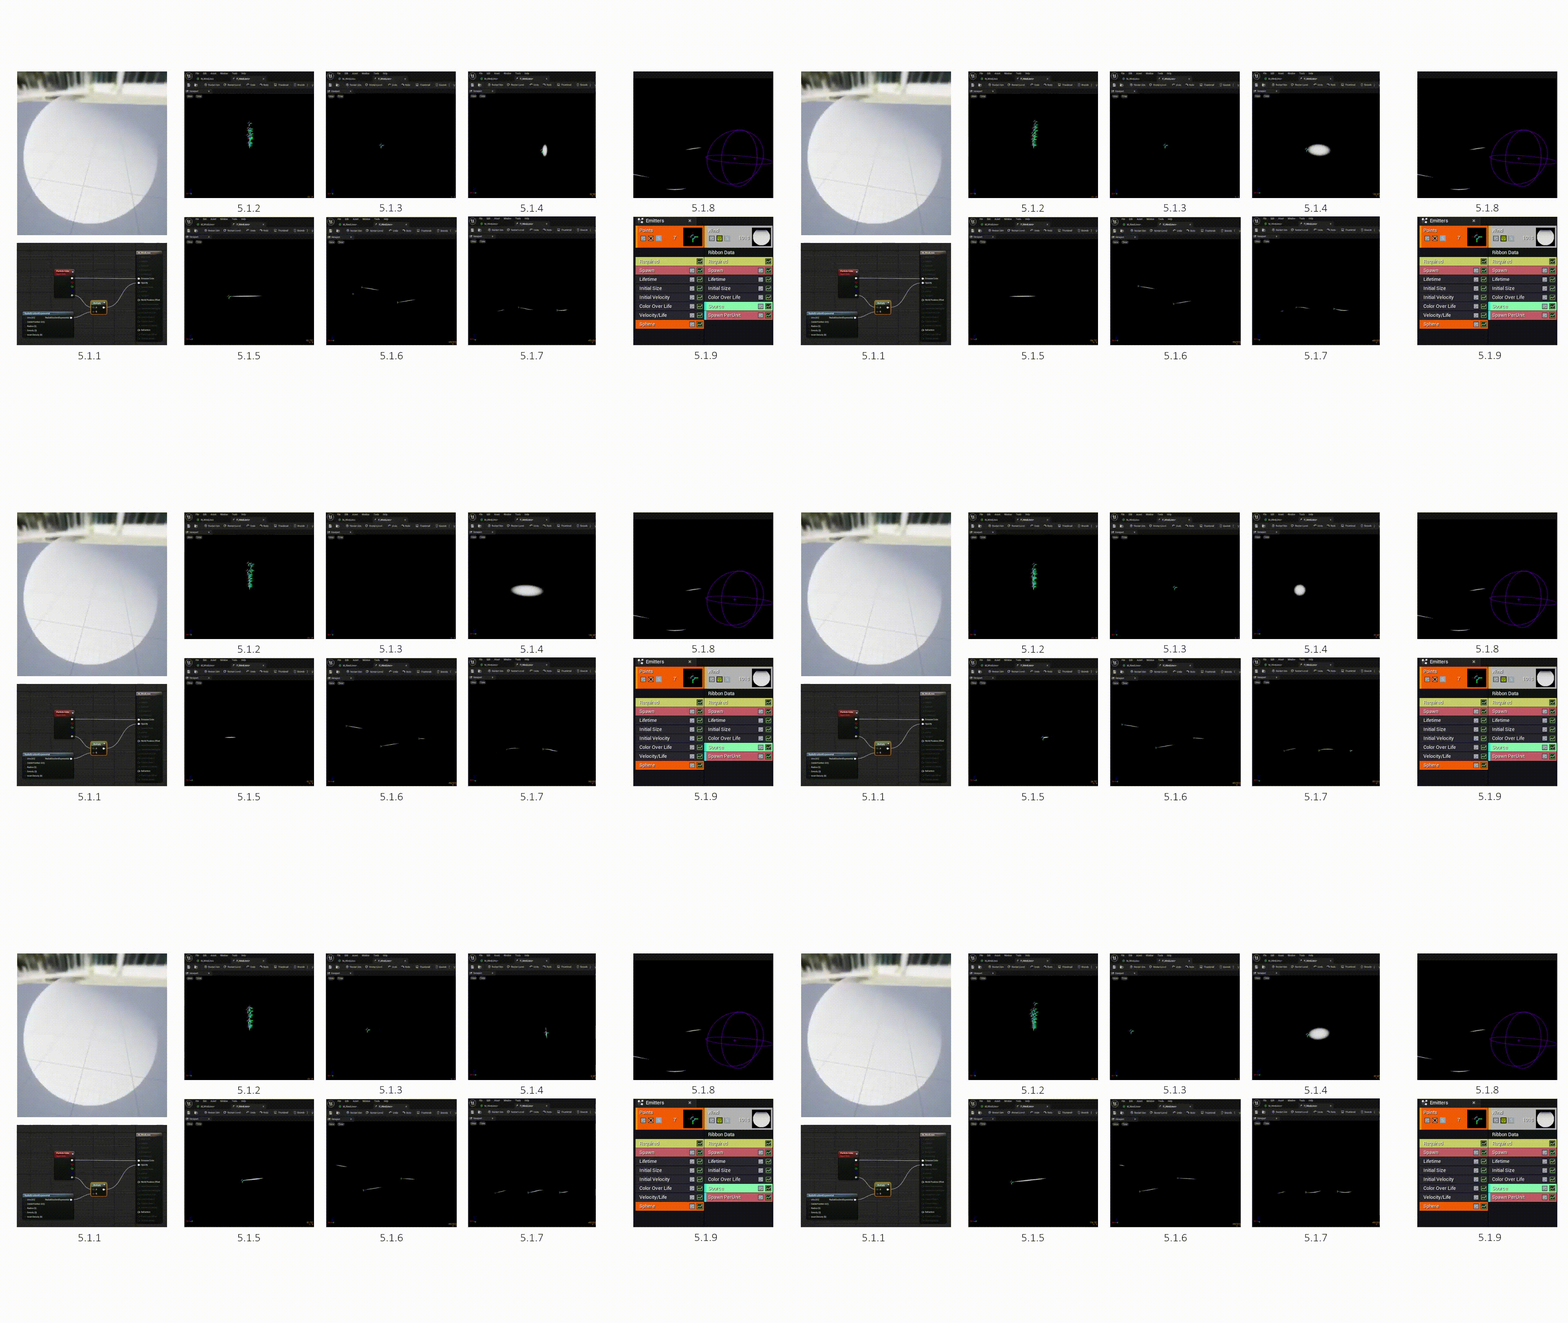
I started by creating a material with a particle colour, multiplying it with RadialGradientExponential, resulting in a ghost-like material (5.1.1).
To make the particle system, I used a Cascade Particle System (Legacy). Within this, I renamed the emitter “Points” to reference other particle systems (5.1.9). I started b changing the XYZ of Initial Velocity, making the particles spread out all to the left, some up, and some down (Max: x200 y30 z40) (Min: x150 y-30 z-40) (5.1.2). Next, I needed to reduce the number of particles. This was done by going into Spawn>Constant and changing the amount from 20 to 5 (5.1.3).
In order to use the white material from earlier, I created a new particle emitter, naming it Wind (5.1.4). The Spawn rate was set to 0, and TypeData was set to New Ribbon Data, making the particle a trail. The source method was set to Particle and the source to reference ‘Points’, in order to follow the initial particles. Next, I added a Spawn Per Unit component, allowing me to set the rule of one unit per particle trail. This now stretches the initial material, which I can now apply the material to the Required section of the wind particle (5.1.4).
To make the stretching look more like a wind ribbon spawning, I head over to the Initial Size area and changed the max and min X axis from 25 to 3 (5.1.5). To give it a randomised direction to follow, I added a Velocity/Life component to the Points particle, since that’s what’s being tracked. I created 5 parameters and adjusted the XYZ axis for all directions, ranging from 0.25, 0.5, to 0.75, all having their own XYZ directions. This was followed by increasing the Lifetime to 7, allowing enough time for the ribbon data to pass through the scene. Also set in the Ribbon Data the Max Trail Count to 10, having more trails appear consistently (5.1.6).
Finally, to make the ribbons go in a wave, within Velocity, I found that by enabling Use Extremes, the particle system will pick between the max and the minimum XYZ axis, having more larger waves (5.1.7). As the ribbons are now done, I wanted to space the ribbons more, instead of a concentrated emission. This was done by going to Points>Location>Sphere, spawning the particles anywhere within the sphere size. This allowed me to increase the size of the spawning, whilst keeping the consistent spawn rate (5.1.8). This is the final view of how the Points & Wind particles look with their added components (5.1.9).
5.2 Day & Night Cycle | Sequencer
The making of the day & night cycle (and the other animations) were all composed in the sequencer. The general animations, such as lights, door opening, and even the camera movement, were all composed of shape keys, similar to Blender. The interesting part of this was how I made the Day & Night cycle.
Since this scene is stylized, I used cel-shading to enhance that effect, however, when animating the directional light, the scene gets more pitch black than dark. After hours of research, I found that I was able to adjust my cel-shaded post-process to adjust the colour of the darkness factor. With this, I duplicated to make two of the same cel-shaded post-process, one for daytime, and the other for night. The day had the original light and darkness factors, whilst night had a larger darkness factor, and was set to a blue colour, giving that cosy night-time feel.
In the video above, you can see how I’ve aligned the two post-processes, both switching from 0 to 1 and 1 to 0. However, I am well aware that the transformation had a cut midway. This was something I wasn’t able to figure out, and due to the deadlines given at the time, I didn’t have enough time to further research another method. This will be something I look at more in the future, fixing the issue within my free time, as I intend to pursue a stylized art direction.
5.3 Final Outcome | Render & Video
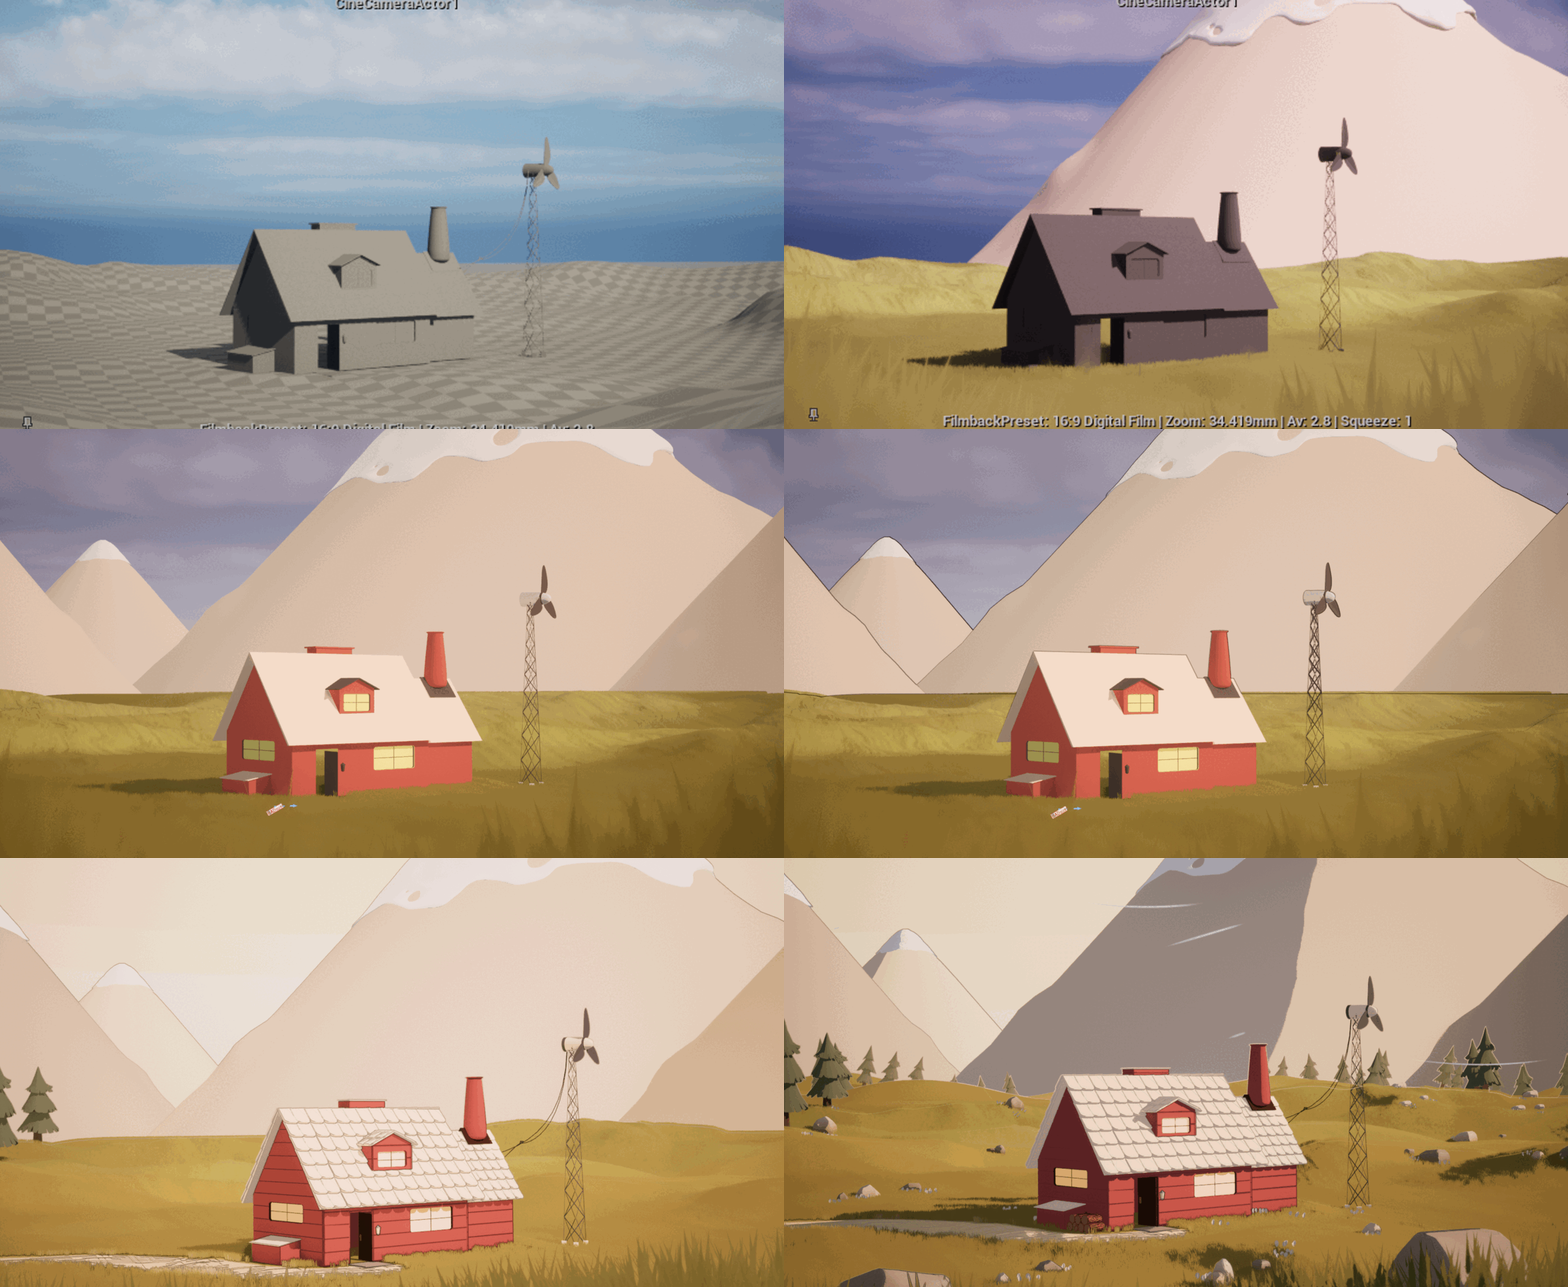
The final outcome of this project was just what I hope for, I was able to create a stylized environment within Unreal Engine 5! It was a great journey in making this environment and learning so many new techniques in brand-new software. Substance Painter was always something I wanted to touch upon, however, never got the chance due to previous projects either being brief-fixed or group projects where a realistic approach was taken. With the creative freedom to do anything, I took my shot at making something I’m passionate about, a stylized environment that feels alive, and this is definitely something I can say I’m proud of.
For anyone who hasn’t seen Hilda, this house was only in the first 1-2 episodes of season 1, never to be seen again. The music playing in the background is also from the first episode, which is why the still render with the music attached makes the perfect outcome.
Overall, I am very happy with the outcome, and this will definitely be something I will be pursuing I the near future.