Transmedia UoW 22 | AR Business Cards
Brief
Design and develop an interactive event that contributes to the Transmedia Event 2022.
Goal
Design and develop business cards that sync with a functional & interactive app that uses Augmented Reality to display students work and direct the user to their portfolio.
Role in Project
Designer
Developer
Software
![]() Unity
Unity
![]() Vuforia Engine
Vuforia Engine
![]() Photoshop
Photoshop
![]() Blender 3.1
Blender 3.1
Prep
1.0 Introduction to Project
1.1 Reference
1.2 Target Audience
1.3 Personas
Inital Setup
1.4 Vuforia Engine Setup
1.5 Inital Card Composition
1.6 Card development
1.7 Progress & Issues
1.8 Card Development
1.9 Building the App Prototype
Idea Development
2.0 New Design
2.1 Card Composition
2.2 Using Vuforia
2.3 Configured Card Layout
2.4 Video Rendered Hero Images
Unity Outcome
2.5 Unity Layout Environment
2.6 Building the App
1.0 Introduction to Project | Concept Trailer
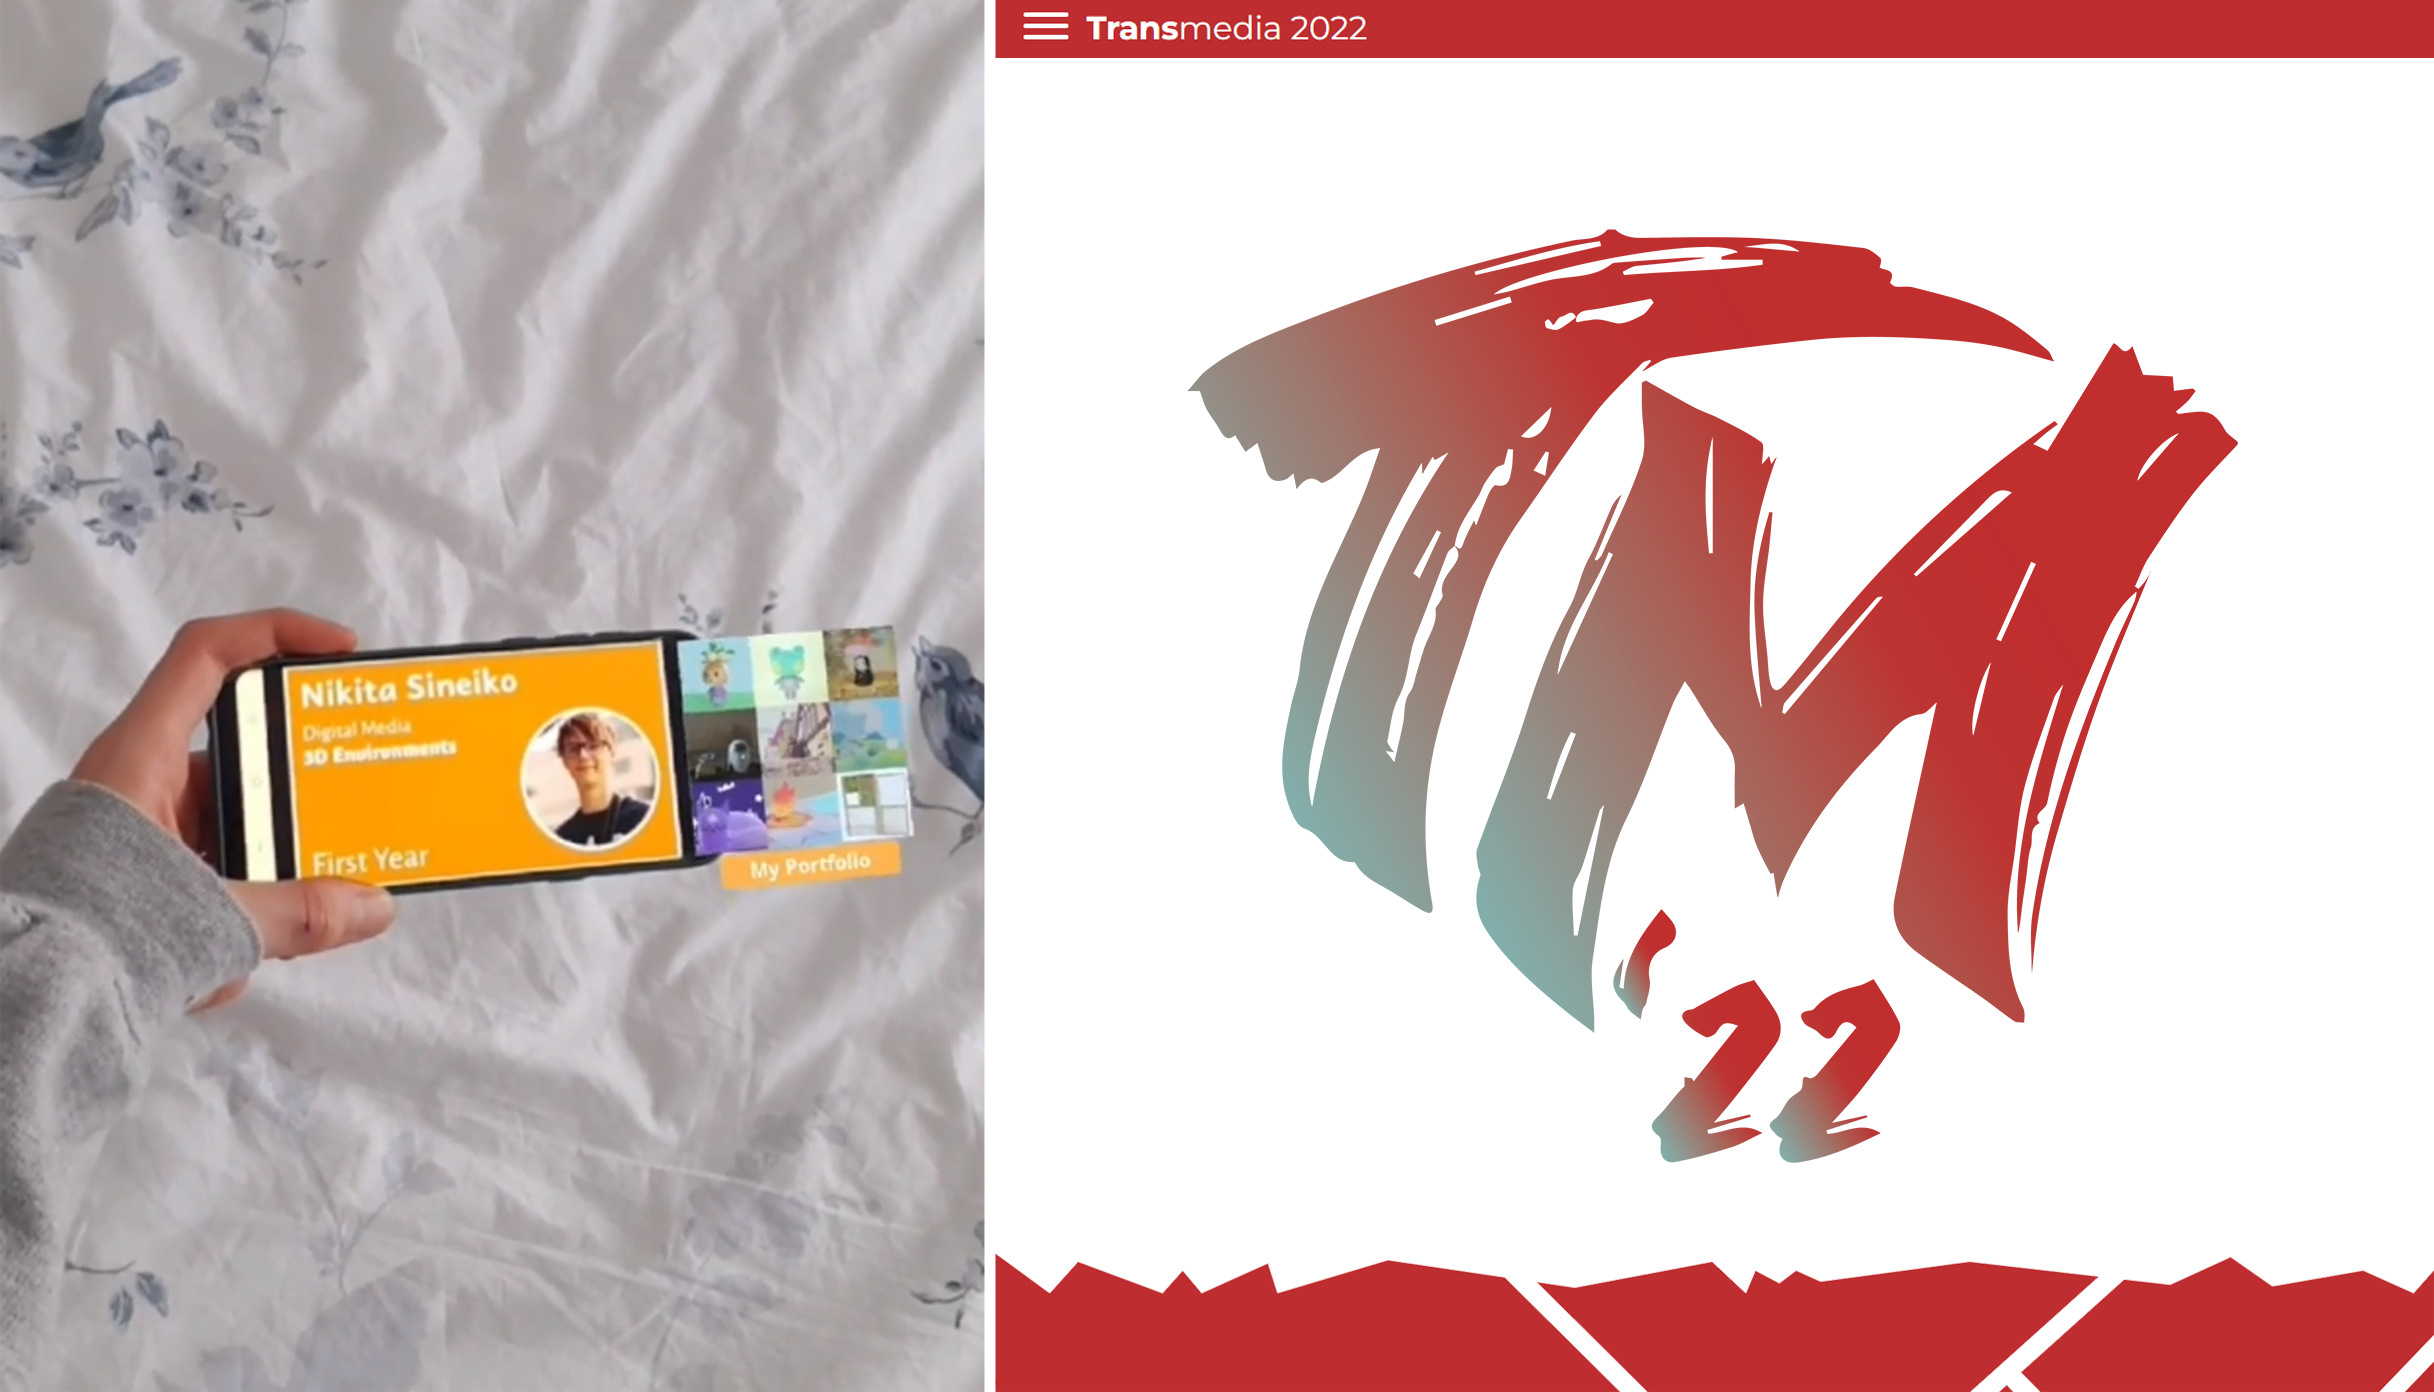
For the Transmedia 2022 event, held at the University of Winchester, I’ve decided to design and develop business cards that sync with a functional & interactive app that uses Augmented Reality to display students’ work and direct the user to their portfolio! This has been an exciting project to work on, I’m still amazed that I pulled it off, knowing I learnt both Vuforia & Unity Engine! All I knew was I wanted to do this, and I will try my hardest to make it functional!
1.1 References | Mood bored
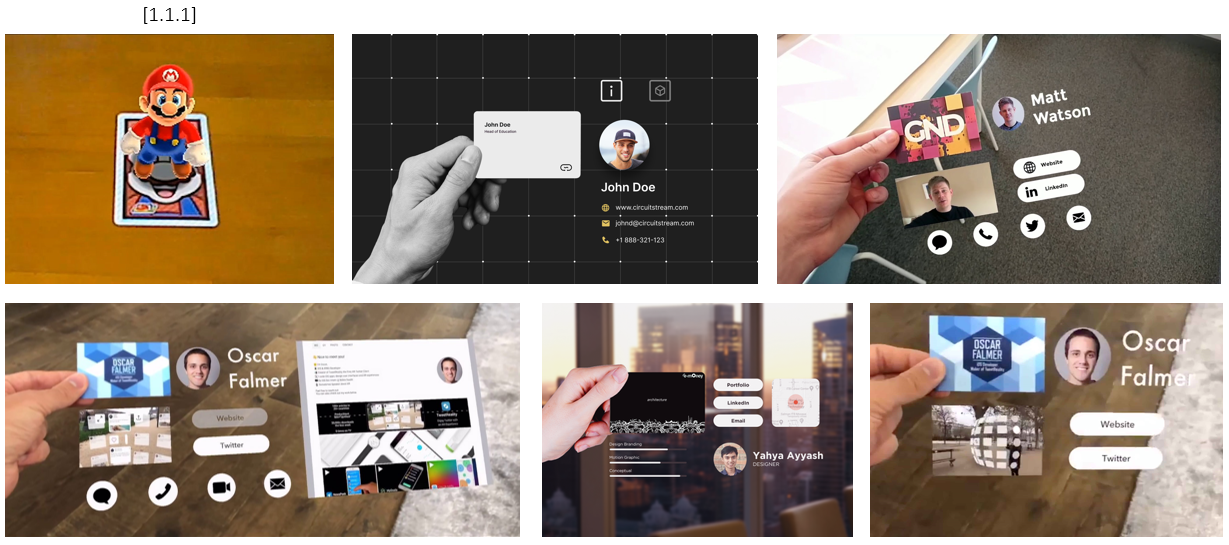
The idea of the business cards came after seeing some concept videos of what AR could
be used for. It seems that cards that display information are the more aspect of AR,
so I decided to see what I could do with that concept! It was interesting to see that
other than informative cards, there were very few AR products out there, such as Nintendo
3Ds, which was only made back in 2010 [1.1.1]!
From these references, I decided to create informative business cards for the Transmedia Event
at the University of Winchester 2022!
1.2 Target Audience
1.3 Personas
1.4 Vuforia Engine Setup
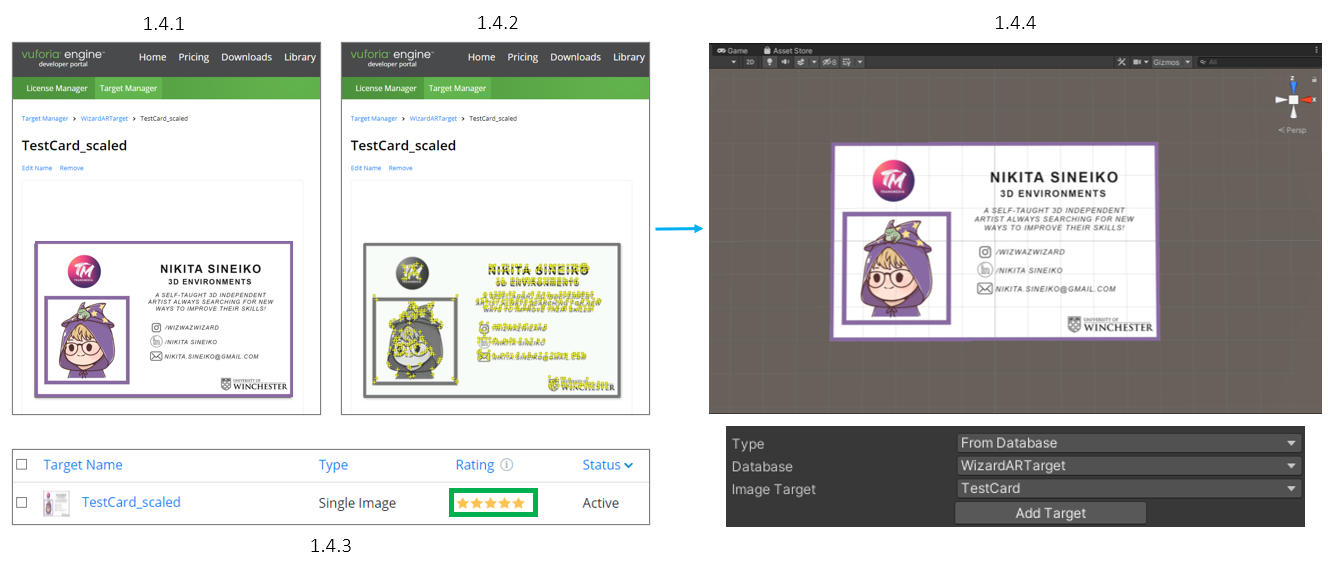
To begin the project, I created a prototype card, having a name, course, small bio, socials, and a profile image. With the card made, I used Vuforia Engine, an AR development tool that creates AR experiences that realistically interact with objects and the environment, supporting PC, Android and IOS. I created a Licence and uploaded my first Image target (1.4.1). Instantly I knew this card would have no issues with camera tracking as Vuforia shows you a star rating (1.4.3). The cool part is that you can see what Vuforia Engine is tracking on your image, what stands out and what doesn’t (1.4.2)! With Vuforia ready, I downloaded the engine within Unity and imported the targets (1.4.4)

1.5 Inital Card Composition
My next step was to find a composition that worked. I decided to try adding 3D models/2D image showcases, displaying the student’s top 1/2/3 work pieces, as well as their hero image. The one I settled with in the end was (1.5.1), having their hero image on the top, and 3 showcases on the bottom. I liked this design as won’t matter which way you hold the card, left or right hand, having the information is displayed easily and clearly.
1.6 Card Development | 3D objects & Sound
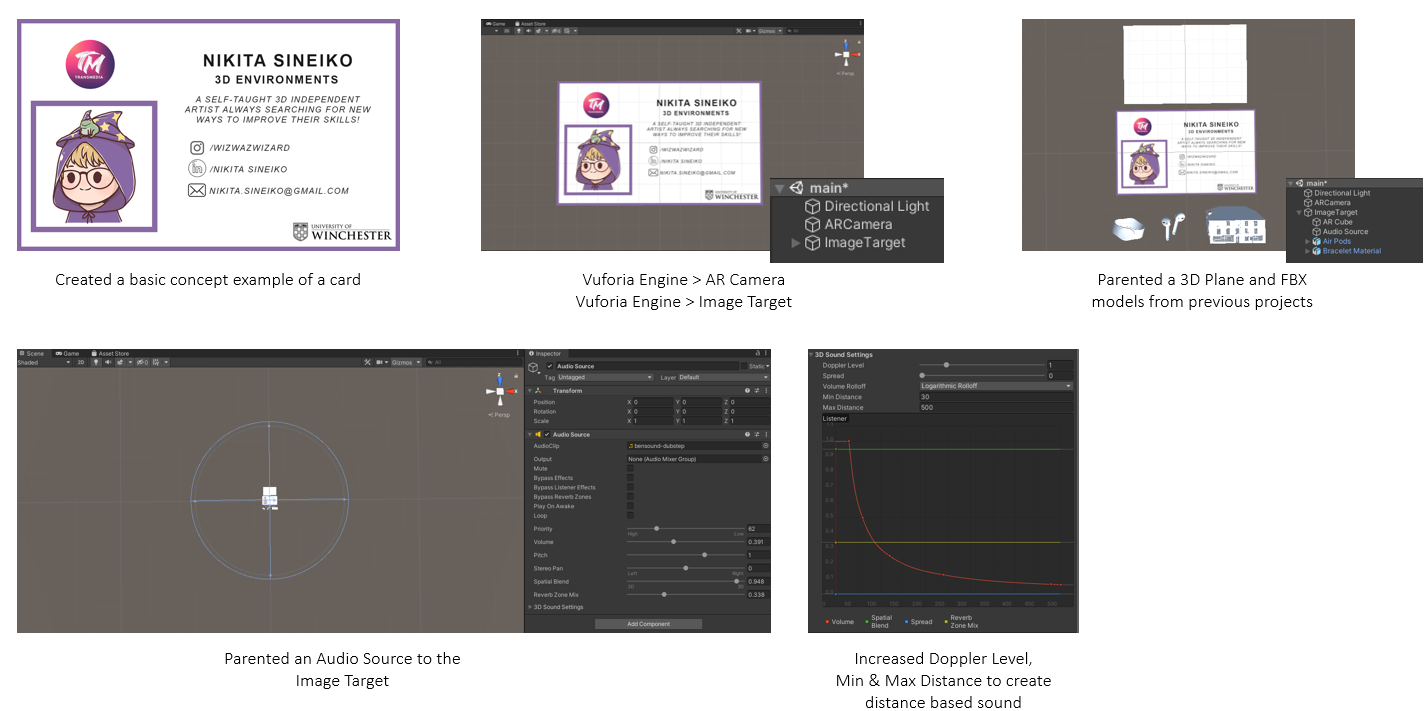
With the card concept design made, I created the Image Target and created the AR camera. Next, I imported and parented 3 FBX models I’ve made before for testing purposes, and a 3D plane above to simulate an image display. With that all set up, I attached an audio source component to the image target and altered the 3D sound settings to create distance based sound!
1.7 Progress & Issues
With the card prototype set up, I gave it a test in Unity with my camera. The card was picked up instantly after the camera focused in, and the models appeared perfectly (1.7.1)! However, after building a quick APK, the 3D objects were flickering, despite them being FBX or OBJ (1.7.2)!
1.8 Card Development | 3D objects & Sound
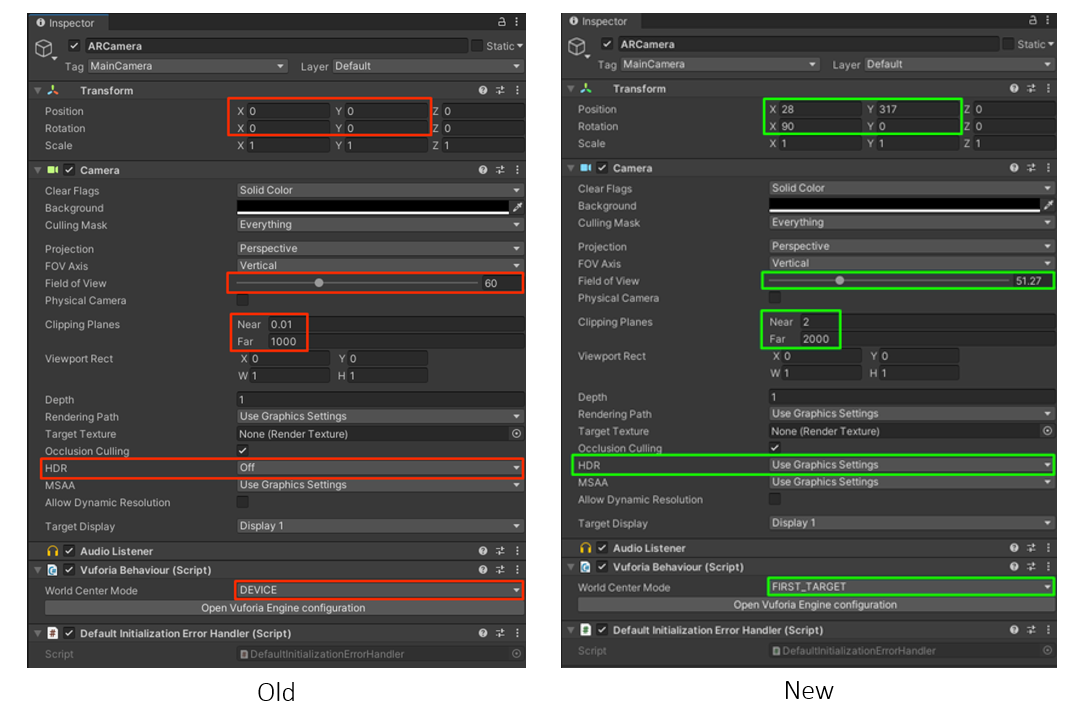
After days of search (honestly felt like years), I found the fix to the issue! Although
I change quite a few variables, I found that the main fix to the issue was increasing the
Clipping Plane, changing the World Central Mode to “First Target”, and changing HDR settings
to “Use Graphics Settings”.
This was a weird fix as I couldn’t tell why this fixed the issue, since it worked fine on my computer.
It was tested on both a paper and digital target, so the phone screen was not the issue. Nor was the
directional light. It took some playing around, and hours reading forums, but to conclude, the 3D
models (both Unity & FBX/OBJ) were not being rendered correctly for AR use.
1.9 Building the App Prototype | A different direction
It was time to build the prototype app! Due to the app only being usable in Android,
I set the version to “Android 6.0 Marshmallow” (1.9.1) as that is the lowest version
that supports Vuforia. In “Build Settings”, I set the “Run Device” to All compatible
and kept the compression method to default. This all ensures that the app will work
with the various versions of Android.
With the issue fixed, the models no longer had any flickering effect (1.9.3)! I also
created a spinning script (1.9.4), however, it did not work for every model ideally
(1.9.3). With that said, I decided to remove the spinning script for later use.
After a conversation with the Lead of the Transmedia event, we found that only 10%
of students submitted some examples of their work, and non-3D, despite having it
announced at presentations and emails. With that said, I’ve decided to remove the
showcases and just focus on the Hero Images, as 95% of students have provided their one.
2.0 New Design | 110 Students
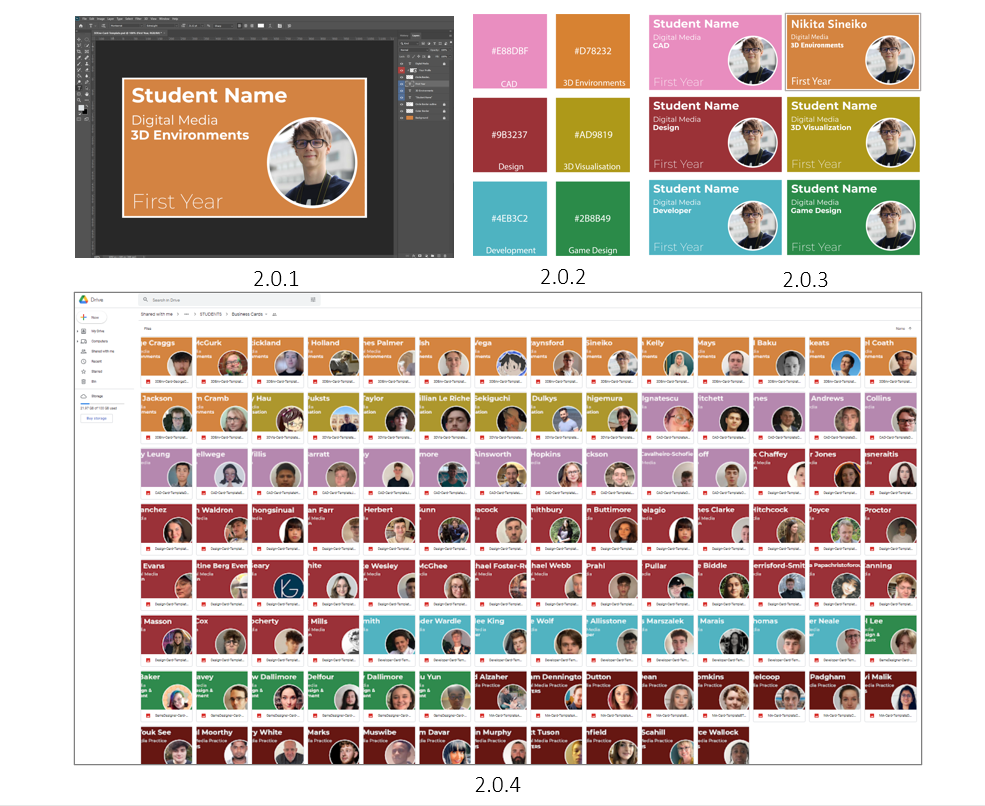
It was now time to make the 110 Student Cards! I created a Photoshop template for each card (2.0.1) using the branding colours (2.0.2) (2.0.3). Its worth noting that we had branding fonts: Montserrat Bold, Medium, Regular, and Extra Light. With the template made, I had one of the Transmedia Organisers help me make the 110 student cards! This was a long process, but we got there in the end! The process wasn’t too difficult luckily, as the students have all uploaded an image of themselves, and were organised in the correct course and year folders. The result was each student had their own coloured card, with the correct course and years (2.0.4).
2.1 Card Composition
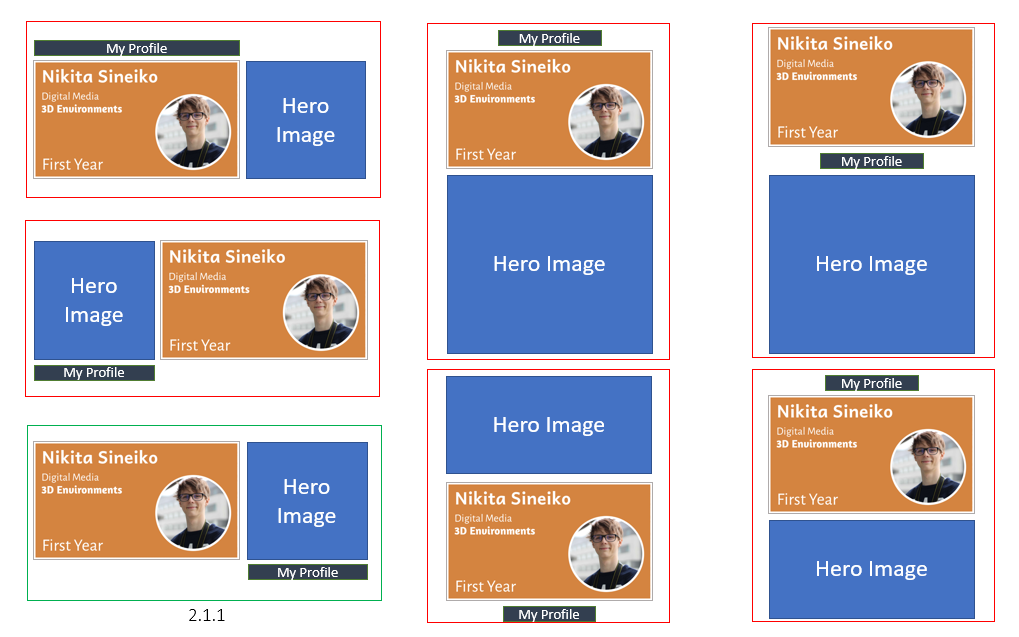
With the cards made, I began arranging various compositions. I found that (2.1.1) worked the best as it looks cleaner and compact. I’ve also come to terms that although the hero image and profile link are on the right, people who hold the cards in the right hand will still see the information, as it will overlap their hands.
2.2 Using Vuforia
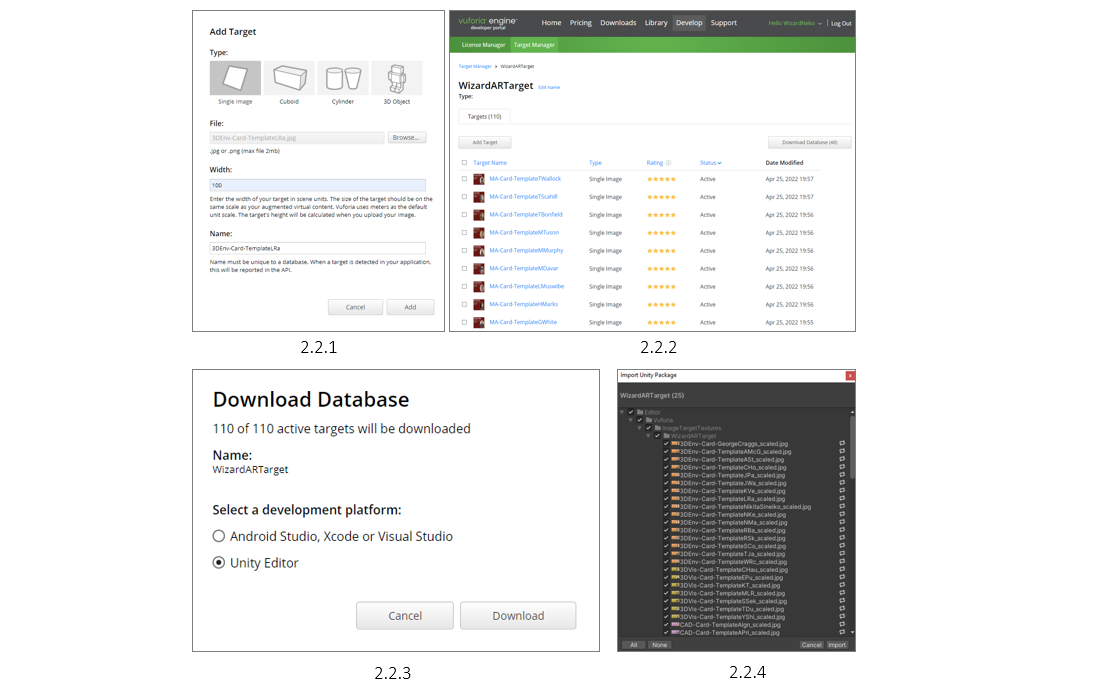
With the composition ready, I began importing them into Vuforia. Each image was imported as a “single image” and with a width of 100 (2.2.1), making it 100% of its scale so no detail is lost when importing to Unity. It was good to see that all cards were at a 5-star rating, meaning there will no be AR tracking issues (2.2.2)! The importing process was simple: Download the database, select Unity Editor (2.2.3) and open the file in Unity to import (2.2.4).
2.3 Configured Card Layout
After all the cards were imported, I began making a prehab of my own card to make it all work!
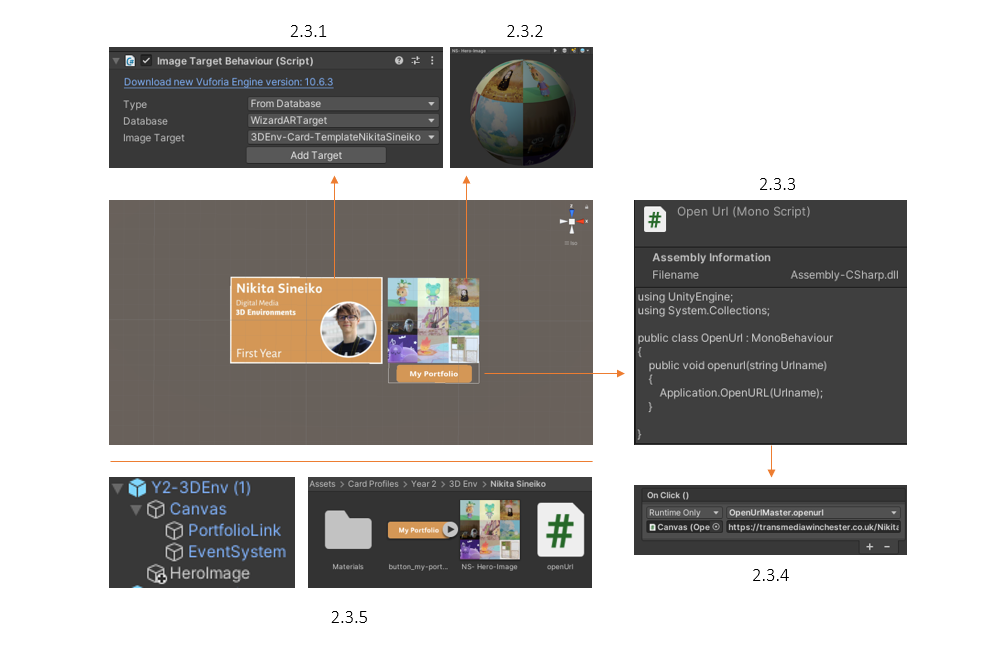
The card (2.3.1) was imported with the correct database, using the image target to select which
card to use. The hero image was imported as a PNG file which is converted into a Unity material,
applying it to a 3D plane that is parented with the card (2.3.2).
Next was to make a working button. For this, a canvas was needed, allowing me to create 2D sprite UI’s.
Within the canvas, I made a button and wrote a small script that opens the URL of the student’s profile
(2.3.3). It’s worth noting that I made the script a public void, meaning when I click on the button to
apply a link, I can simply paste it in, and not have to make 110 scripts (2.3.4)!
I made sure to keep each profile organised, having everything named properly, and located in the correct folders (2.3.5)!
2.4 Video Rendered Hero Images
I noticed that a few students had a mini video clip for their hero image, so I thought
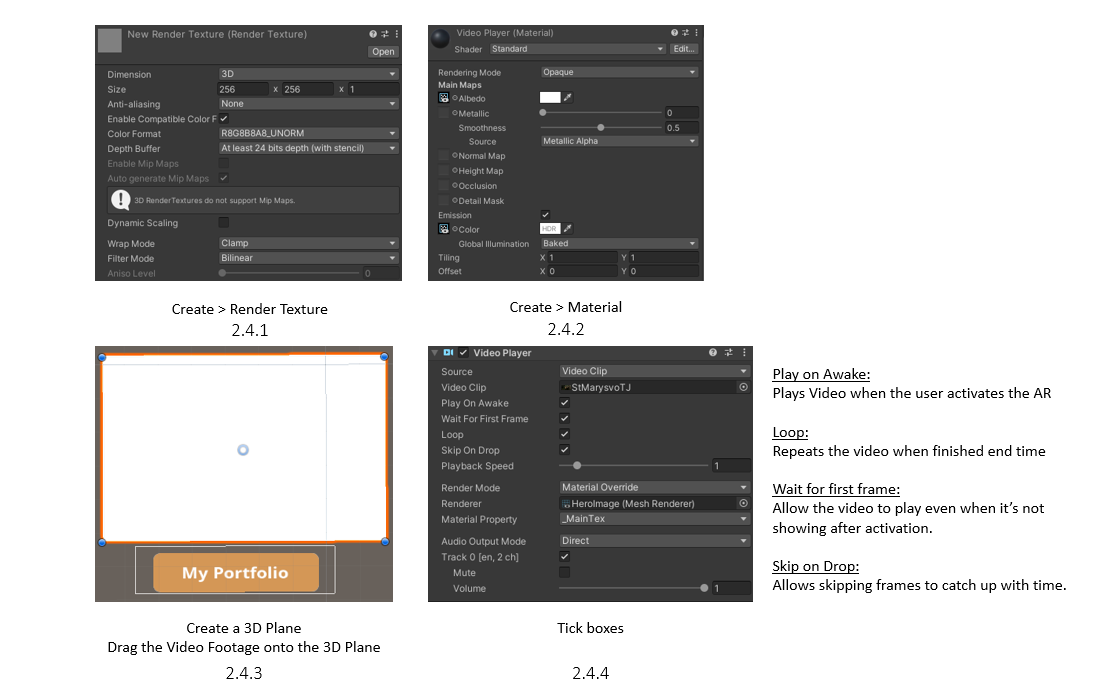
why not implement that in AR! I started by making a Render Texture (2.4.1), basically
allowing a video to be attached to the texture.
Next, I dragged the Render Texture to the Video Material to its Albedo and Emission Colour properties (2.4.2). The Emission > Colour property will make the 3D object have somewhat of a glow like a normal TV or movie screen. No other lighting would be required in order to see the video playing.
Next, I created a 3D plane and dragged the video footage onto it (2.4.3). This is followed by ticking all 4 boxes in the Video Player Editor (2.4.4)
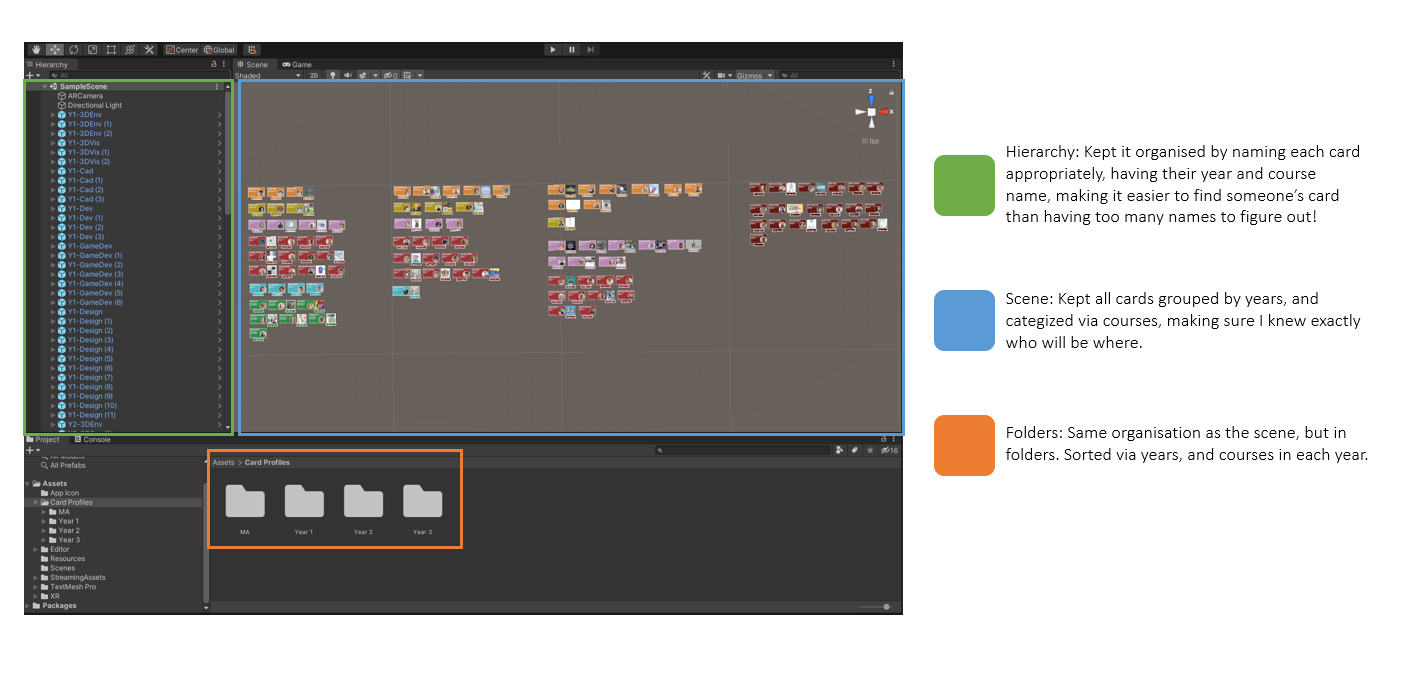
2.5 Unity Layout Environment
2.6 Building the App | Finished App
It was time to build the app! Opening “Project Settings” I attached
the Transmedia Logo for the splash screen (displayed when you open
the app) (2.6.2). Due to the app only being usable in Android, I
set the version to “Android 6.0 Marshmallow” (2.6.1) as that is
the lowest version that supports Vuforia! Although I’d love for
the app to be usable for IOS as well, you’d have to apply to be
a developer to be able to push your own apps for personal use.
With that all set, I build the app and it worked perfectly (2.6.3)!
I created a QR code and linked the download to the app to my website!
Overall, I’m very pleased with the outcome of this project, especially
as I had to learn Unity from scratch to make this possible! Its quite
nice to have an idea, and then actually make it a reality! Not to mention
everyone at the Transmedia event will be using the app, so exciting!
I’ve learnt a lot from this project, from software to coordination with
other members on the Transmedia project! Some people helped me with ideas,
and so I’ve helped with their too, a very nice long-term project that was
filled with creative minds! Very happy with the outcome!